

- Posts: 5713
- Thank you received: 2100
Camera For Touchoff
6 years 1 month ago - 6 years 1 month ago #182507
by phillc54
Camera For Touchoff was created by phillc54
I have been playing around with a Qtvcp camera view tab embedded in Axis and Gmoccapy and with the help of Chris Morley I mangaged to get it working pretty well for touching off X and Y and also setting the rotation of the coordinate system.
Camera View:
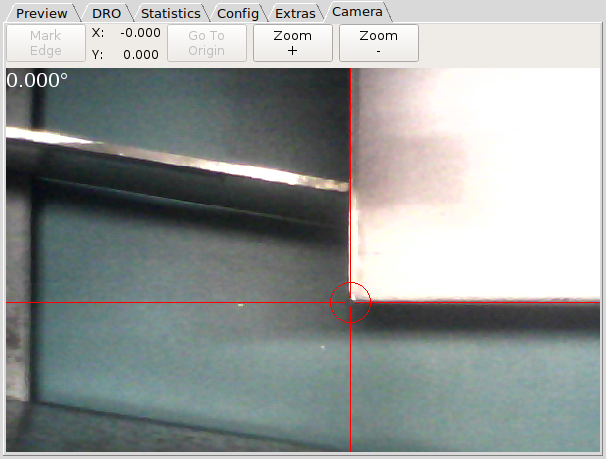
The camera needs to be attached firmly and it is wise to spend the time adjusting it so the crosshairs point to the same place when Z is at the top of travel and also at the bottom of travel. Make sure that the crosshairs are aligned properly with the X and Y axes.
Install any dependencies required for Qtvcp (it is supported by default in the new LinuxCNC Buster ISO).
The attached file needs to be copied to the machines config directory.
Edit the machines ini file by adding these lines to the end of the [DISPLAY] section:
The Mark Edge button and the Goto Origin button will have their names changed to Set Origin and Set 0o Rotate depending on what function they are able to perform.
To touch off a sheet at an angle:
jog to a point along one of the edges that intersects the origin corner of the sheet
press Mark Edge
jog to the origin corner of the sheet
press Set Origin
the X and Y axes are now touched off to zero
You could then press Goto Origin if you wish
To touch off at a zero degree angle with the torch as the origin point:
jog to the point you want the origin
press Mark Edge
Set Origin
the X and Y axes are now touched off to zero
You could then press Goto Origin if you wish
To touch off at a zero degree angle using the current origin point:
press Mark Edge
Set 0o Rotate
the X and Y axes are now touched off to zero
You could then press Goto Origin if you wish
To zoom:
Press the Zoom + or Zoom - button
Holding either button will cause a continuous zoom.
Camera View:
Warning: Spoiler!
The camera needs to be attached firmly and it is wise to spend the time adjusting it so the crosshairs point to the same place when Z is at the top of travel and also at the bottom of travel. Make sure that the crosshairs are aligned properly with the X and Y axes.
Install any dependencies required for Qtvcp (it is supported by default in the new LinuxCNC Buster ISO).
The attached file needs to be copied to the machines config directory.
Edit the machines ini file by adding these lines to the end of the [DISPLAY] section:
Warning: Spoiler!
Axis:
Gmoccapy:
Then add this new section:
Change the X and Y values in the G20 L20 P0 line above to reflect the offset of the centre of the torch from the crosshairs of the camera.
Code:
EMBED_TAB_NAME = Camera
EMBED_TAB_COMMAND = halcmd loadusr -Wn camera qtvcp -c camera -x {XID} cam_align
Code:
EMBED_TAB_NAME = Camera
EMBED_TAB_LOCATION = ntb_preview
EMBED_TAB_COMMAND = halcmd loadusr -Wn camera qtvcp -c camera -x {XID} cam_align
Code:
# for the camera tab
[MDI_COMMAND_LIST]
# X and Y are the offset values from the crosshairs to the torch
MDI_COMMAND = G10 L20 P0 X0 Y0
# origin move
MDI_COMMAND = G0 X0 X0
The Mark Edge button and the Goto Origin button will have their names changed to Set Origin and Set 0o Rotate depending on what function they are able to perform.
To touch off a sheet at an angle:
Warning: Spoiler!
jog to a point along one of the edges that intersects the origin corner of the sheet
press Mark Edge
jog to the origin corner of the sheet
press Set Origin
the X and Y axes are now touched off to zero
You could then press Goto Origin if you wish
To touch off at a zero degree angle with the torch as the origin point:
Warning: Spoiler!
jog to the point you want the origin
press Mark Edge
Set Origin
the X and Y axes are now touched off to zero
You could then press Goto Origin if you wish
To touch off at a zero degree angle using the current origin point:
Warning: Spoiler!
press Mark Edge
Set 0o Rotate
the X and Y axes are now touched off to zero
You could then press Goto Origin if you wish
To zoom:
Warning: Spoiler!
Press the Zoom + or Zoom - button
Holding either button will cause a continuous zoom.
Last edit: 6 years 1 month ago by phillc54.
The following user(s) said Thank You: Dimitrios, tommylight, Clive S, Mud, snowgoer540, Himarc3D, pinder
Please Log in or Create an account to join the conversation.

6 years 1 month ago #182509
by Mud
Replied by Mud on topic Camera For Touchoff
Very nice - can it be used with any linux-compatible webcam?
Please Log in or Create an account to join the conversation.
6 years 1 month ago #182510
by phillc54
Replied by phillc54 on topic Camera For Touchoff
Good question, I used it with a cheap'n'nasty "endoscope" usb camera I had lying around, similar to
this
It also worked on a virtual machine with the inbuilt camera on my Mac.
It also worked on a virtual machine with the inbuilt camera on my Mac.
The following user(s) said Thank You: Mud
Please Log in or Create an account to join the conversation.

6 years 1 month ago #182515
by rodw
Replied by rodw on topic Camera For Touchoff
Phill,
very nice.
Can this be used with a laser pointer?
Do you have to set the rotation by pressing buttons or does it calculate that?
very nice.
Can this be used with a laser pointer?
Do you have to set the rotation by pressing buttons or does it calculate that?
Please Log in or Create an account to join the conversation.
6 years 1 month ago #182516
by phillc54
Replied by phillc54 on topic Camera For Touchoff
Camera only.
Rotation is manual with a mouse, right button + scroll.
Rotation is manual with a mouse, right button + scroll.
Please Log in or Create an account to join the conversation.
6 years 1 month ago #182517
by Himarc3D
Replied by Himarc3D on topic Camera For Touchoff
Work with ELP-USBFHD06H-SFV from AliExpress
I think any compatible camera will work, the laptop camera worked too
I think any compatible camera will work, the laptop camera worked too
The following user(s) said Thank You: phillc54
Please Log in or Create an account to join the conversation.
Moderators: snowgoer540
Time to create page: 0.067 seconds