5x10 Home built Plasma CNC - in progress - Mesa 7I96, THCAD
- aninchlow
- Offline
- New Member
-

Less
More
- Posts: 9
- Thank you received: 0
20 Dec 2021 20:36 - 20 Dec 2021 20:39 #229569
by aninchlow
5x10 Home built Plasma CNC - in progress - Mesa 7I96, THCAD was created by aninchlow
Hello. I live in Alberta, Canada and I decided to start building a Plasma CNC. I'm fortunate to have a 12 x 40 mill, a 14x48 lathe, all the welding processes (Miller) and a complete shop to build this in. I'm a electrician by trade and a hobby machinist. I thought it would be a cool project to build a DIY plasma machine. I've been fabricating stuff forever and thought it would be really nice to be able to plunk a 4x8 peice of material down and burn away. I'd like to build and sell stuff, but I'm so so sick of grinding.
So instead of starting small I just went big. I figured what the hell why not. I've red about a million posts and figured sometimes you just have to start to get somewhere. The one fella RobW has some great posts and watching his machine was really cool. I've decided to go with a water table and I want a clean easy to use system once its built. If that adds a bit of complexity well I guess it does.
Here is the list of what I bought to get started:
7I96 STEP/IO Step & dir plus I/O daughtercard
THCAD-5 High isolation A-D accessory
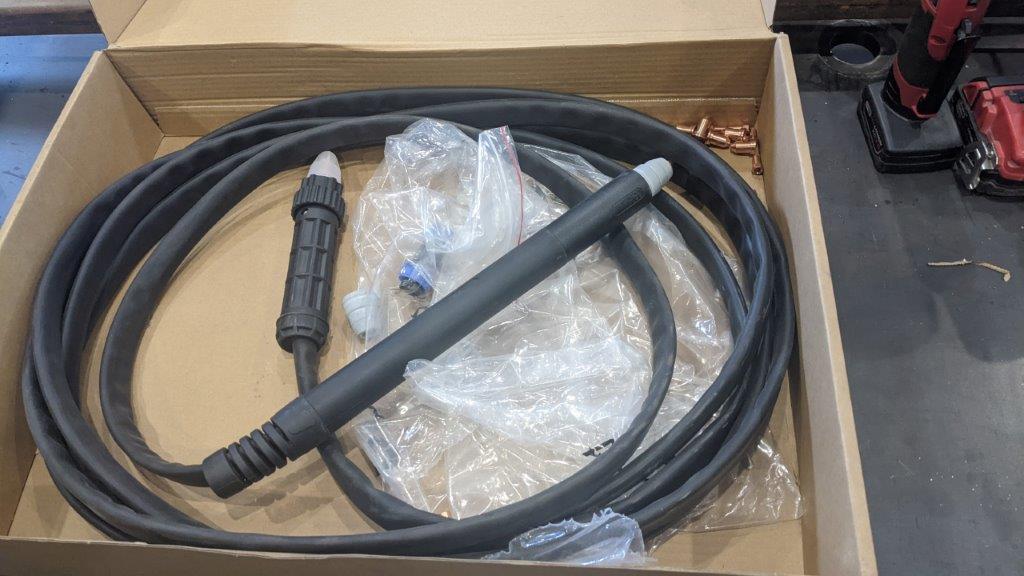
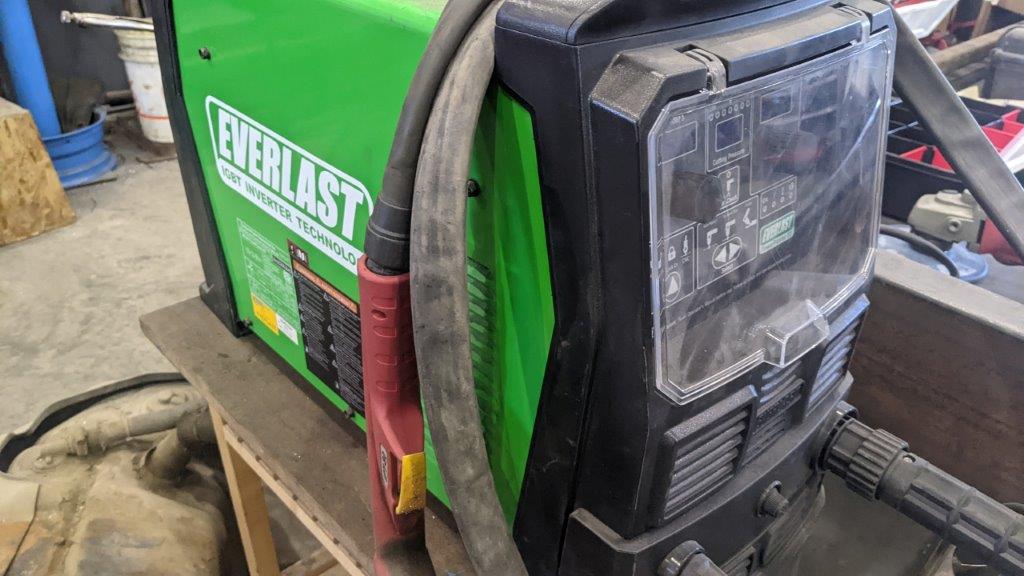
Everlast 82i CNC Kit
I got the following off AliExpress (bit of a pain but I had time while I built the rough table)
60T pulley
20T pulley
Belts
Rack
Spur Gear
Z Axis Linear Rail Combo
30mm X/Y Axis Linear Rail w Rail
I plan to use GreenCut coolant additive in my tank. I plan to use a tank like this UFA FARM 150 Gallon Tank to store the coolant / water when I'm not using the table, I will also have the pump running to flood the table, with a high water drain so I don't have to bladders or anything like that. Pump on = fills table and circulates to the high point drain. Pump off, and pull the big dump valve, tank empties into the storage tank.
My Steel came from Varsteel
Salvaged a computer from my buddy he got a new work one. I'll probably upgrade someday and do the touchscreen but for now I'd like to make sure this is going to work. It runs linuxCNC / PlasmaCNC, I've not got very far with it other than to load the LINUX CNC 2.8.2.
12/20/2021 - Here is what I got to so far.
So instead of starting small I just went big. I figured what the hell why not. I've red about a million posts and figured sometimes you just have to start to get somewhere. The one fella RobW has some great posts and watching his machine was really cool. I've decided to go with a water table and I want a clean easy to use system once its built. If that adds a bit of complexity well I guess it does.
Here is the list of what I bought to get started:
7I96 STEP/IO Step & dir plus I/O daughtercard
THCAD-5 High isolation A-D accessory
Everlast 82i CNC Kit
I got the following off AliExpress (bit of a pain but I had time while I built the rough table)
60T pulley
20T pulley
Belts
Rack
Spur Gear
Z Axis Linear Rail Combo
30mm X/Y Axis Linear Rail w Rail
I plan to use GreenCut coolant additive in my tank. I plan to use a tank like this UFA FARM 150 Gallon Tank to store the coolant / water when I'm not using the table, I will also have the pump running to flood the table, with a high water drain so I don't have to bladders or anything like that. Pump on = fills table and circulates to the high point drain. Pump off, and pull the big dump valve, tank empties into the storage tank.
My Steel came from Varsteel
Salvaged a computer from my buddy he got a new work one. I'll probably upgrade someday and do the touchscreen but for now I'd like to make sure this is going to work. It runs linuxCNC / PlasmaCNC, I've not got very far with it other than to load the LINUX CNC 2.8.2.
12/20/2021 - Here is what I got to so far.
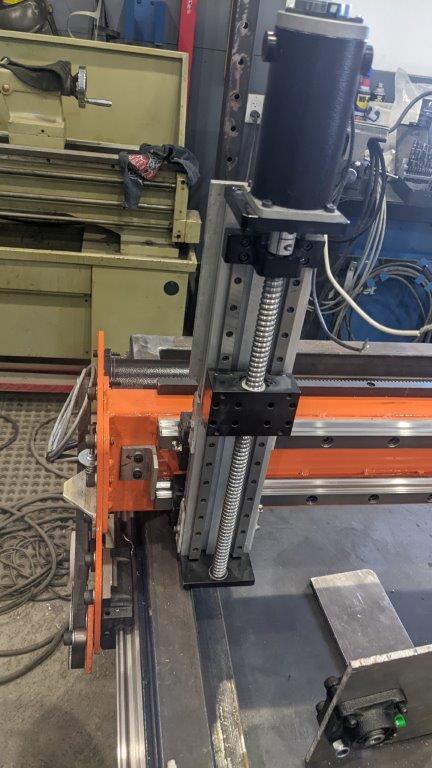
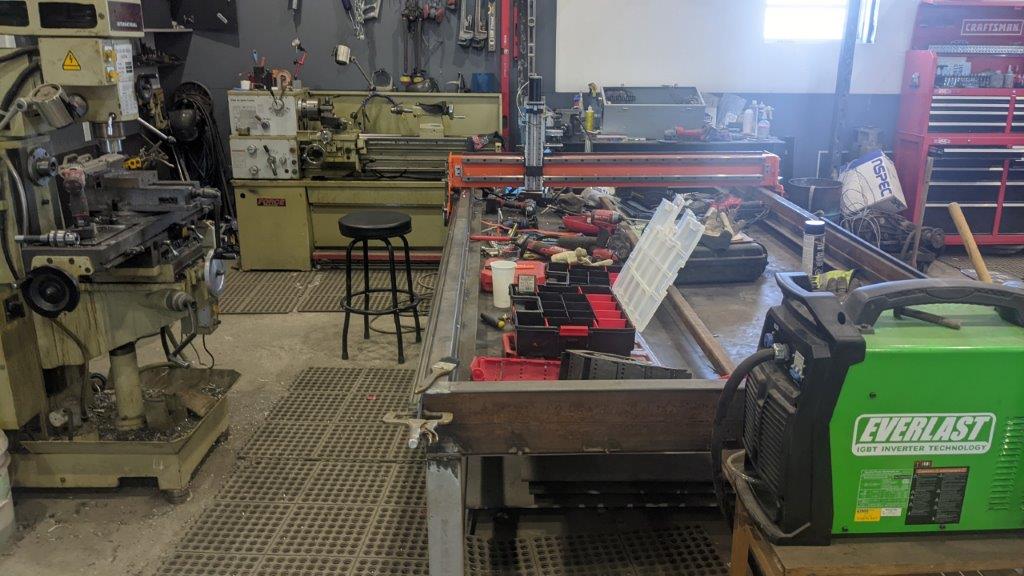
- Table rough fabbed and heat straighted
- Gantry Ends Water Cut
- Gantry Fabricated
- Y/A Rails mounted
- X Rails mounted
- Y/A/X Racks Mounted
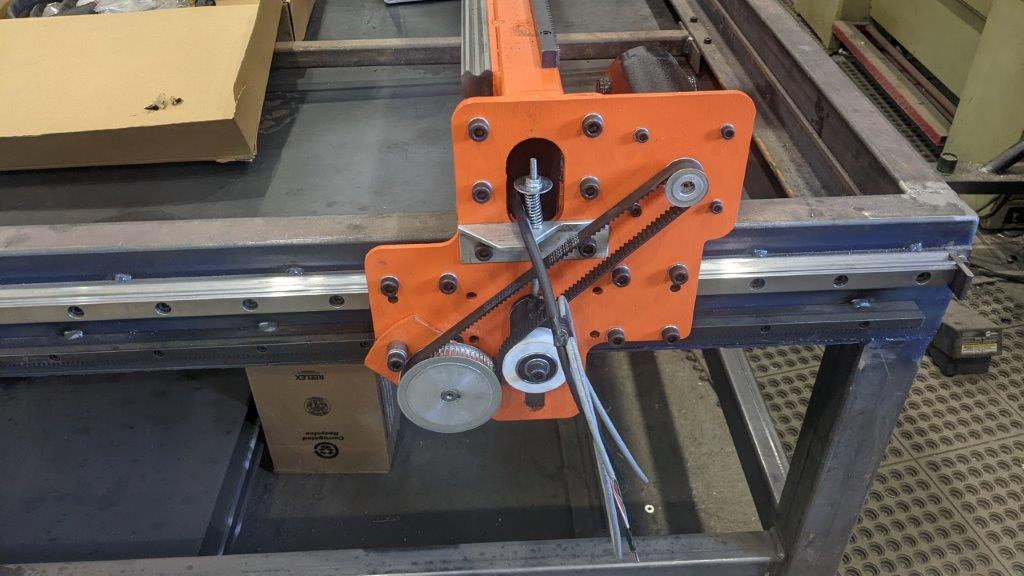
- Linear Y/A Servos mounted
- Tension Mechanism for Y/A servos figured and built
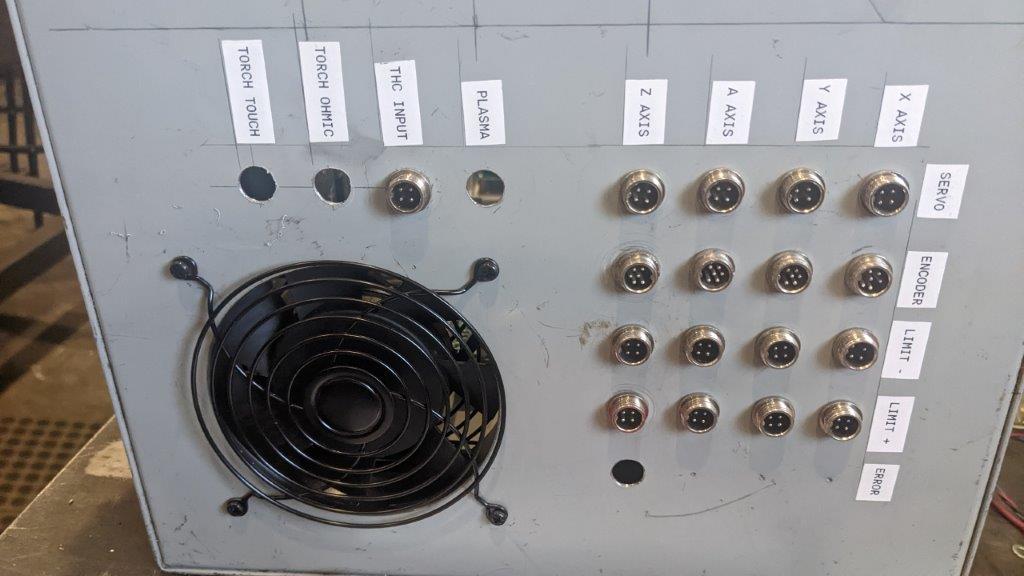
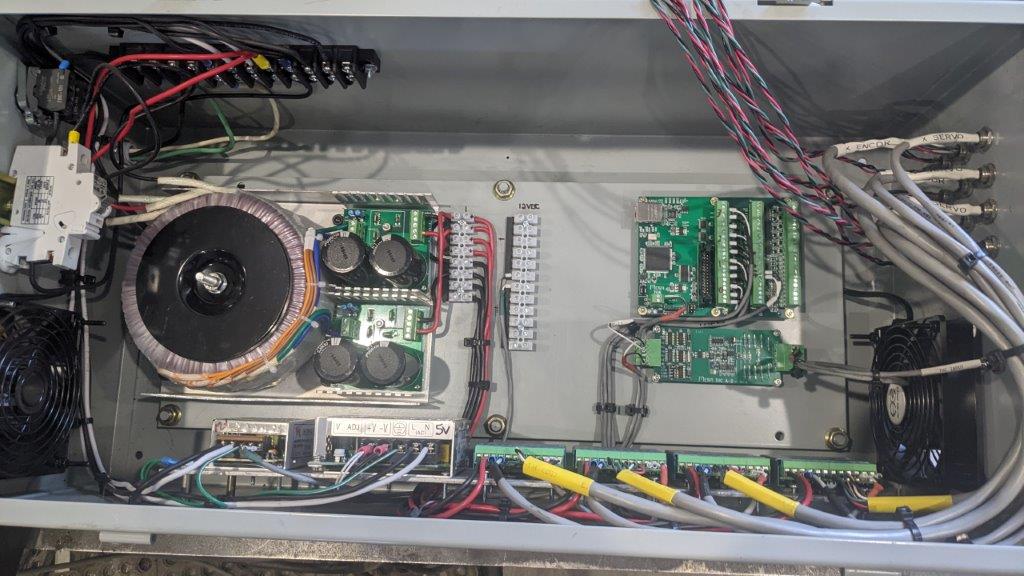
- Cabinet (found a Electrical Meter CT cabinet at the dump for free) partly assembled
Last edit: 20 Dec 2021 20:39 by aninchlow. Reason: formating
Please Log in or Create an account to join the conversation.
- aninchlow
- Offline
- New Member
-
Less
More
- Posts: 9
- Thank you received: 0
20 Dec 2021 20:38 #229570
by aninchlow
Replied by aninchlow on topic 5x10 Home built Plasma CNC - in progress - Mesa 7I96, THCAD
Here are a few pics.
Attachments:
Please Log in or Create an account to join the conversation.
- aninchlow
- Offline
- New Member
-
Less
More
- Posts: 9
- Thank you received: 0
20 Dec 2021 20:43 #229571
by aninchlow
Replied by aninchlow on topic 5x10 Home built Plasma CNC - in progress - Mesa 7I96, THCAD
also forgot to mention I bought this kit from Automation Technologies because it just seemed simple. Didn't have to worry about compatibility. The Mesa people also spent a bit of time on the phone with me and helped me avoid buying the wrong card.
www.automationtechnologiesinc.com/produc...4-kits/4-axis-nema34
www.automationtechnologiesinc.com/produc...4-kits/4-axis-nema34
Please Log in or Create an account to join the conversation.
- aninchlow
- Offline
- New Member
-
Less
More
- Posts: 9
- Thank you received: 0
20 Dec 2021 20:51 #229572
by aninchlow
Replied by aninchlow on topic 5x10 Home built Plasma CNC - in progress - Mesa 7I96, THCAD
My next missions are to (please comment if you have suggestions).
(a) figure out the X axis gantry spur drive combo fab. Going to stay with the same 1:3 reduction for smoothness. Seems like these servos can really move soooo.... why not.
(b) figure out what the hell I'm going to do for touch sensing. I'm thinking about getting another THCAD for robW's style of sensing and it looks really awesome but I don't even know where to begin.
(c) order up a peice of 11g x 5 x 10 and cut a bunch of strips with the ol' plasma as it should be quite a bit cheaper than buying flat bar at todays prices. will have to see as I don't really need 1/8" thick as I'm planning on 2" centers for the table to keep material floppage to a minimum.
(d) figure a place to mount my plasma under the table so it isn't in the way, but still be able to get it out easy. may or may not happen.
(e) get the cabinet mounted and completed. all these sensors........... so much soldering.
Please Log in or Create an account to join the conversation.
- rodw
-

- Offline
- Platinum Member
-

Less
More
- Posts: 11970
- Thank you received: 4079
20 Dec 2021 21:23 #229574
by rodw
Replied by rodw on topic 5x10 Home built Plasma CNC - in progress - Mesa 7I96, THCAD
Looks like you are under way then. Glad you got some inspiration from my journey.
Thcad-5 with the plasma cutter set at 50:1 sounds OK.
But do me a favour, once you have your thcad wired up, can you run 72 volts from your power supply through the Everlast divider and observe the voltage with and without the THCAD connected. I found the THCAD resistors somehow changed the voltage so a 16:1 divider became 24:1 (out by 50%). So you might have a 75:1 divider. Just start out on the right foot here. If this is the case, change the voltage divider link fort a lower ratio. 30:1 would be good, but I used 16:1 on a thcad10.
The plasma primer in the docs has a circuit diagram for a relay based ohmic sensing.
If you find you need to change your THCAD, you'll be able to set up for THCAD ohmic sensing.")
Thcad-5 with the plasma cutter set at 50:1 sounds OK.
But do me a favour, once you have your thcad wired up, can you run 72 volts from your power supply through the Everlast divider and observe the voltage with and without the THCAD connected. I found the THCAD resistors somehow changed the voltage so a 16:1 divider became 24:1 (out by 50%). So you might have a 75:1 divider. Just start out on the right foot here. If this is the case, change the voltage divider link fort a lower ratio. 30:1 would be good, but I used 16:1 on a thcad10.
The plasma primer in the docs has a circuit diagram for a relay based ohmic sensing.
If you find you need to change your THCAD, you'll be able to set up for THCAD ohmic sensing.
The following user(s) said Thank You: aninchlow
Please Log in or Create an account to join the conversation.
- aninchlow
- Offline
- New Member
-
Less
More
- Posts: 9
- Thank you received: 0
21 Dec 2021 01:50 #229595
by aninchlow
Replied by aninchlow on topic 5x10 Home built Plasma CNC - in progress - Mesa 7I96, THCAD
Rod, weird on the voltage divider. Since I'm still in build mode, would you suggest getting the THCAD10 and using the THCAD5 for the ohmic sensing? I really like the idea of (a) not having another component to be added onto the z axis (touch sensing) and (b) the simplicity of wiring. The cost of doing is is all less than $100 so it isn't a big deal at this point.
With the THCAD wiring diagram on the primer docs the TORCH is hooked to input -, how exactly is this hooked to the torch? On the pin out? or directly to the nozzle? I've searched hi and low to find an actual example.
Do I run one THCAD for the torch height off the divided and the other off the raw for the ohmic sensing?
appreciate your time.
Attachments:
Please Log in or Create an account to join the conversation.
- rodw
-
- Offline
- Platinum Member
-
Less
More
- Posts: 11970
- Thank you received: 4079
21 Dec 2021 04:19 #229605
by rodw
Replied by rodw on topic 5x10 Home built Plasma CNC - in progress - Mesa 7I96, THCAD
Yes, you end up with two thcads in the system
Re the voltage divider, there is more info I posted here
www.plasmaspider.com/viewtopic.php?f=111&t=23700
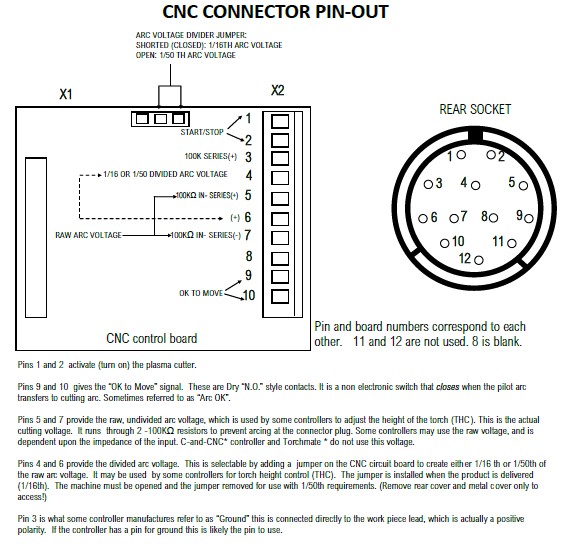
Pins 1 & 2 go to a relay. The integrated ones in the 7i96 should do the job despite some saying they wont but they are polarised.
Pin 9 & 10 arcok. Take field power (24v) to one side and send the other side to an input.
One option you could do if problems arise is to use raw arc voltage and scale according the THCAD manual but you must include the 2 x 100 k resistors in the resistors used. The resistors reduce the current to non-lethal levels
I ran my thermal Dynamics like that as a test and it worked perfectly
Re the voltage divider, there is more info I posted here
www.plasmaspider.com/viewtopic.php?f=111&t=23700
Pins 1 & 2 go to a relay. The integrated ones in the 7i96 should do the job despite some saying they wont but they are polarised.
Pin 9 & 10 arcok. Take field power (24v) to one side and send the other side to an input.
One option you could do if problems arise is to use raw arc voltage and scale according the THCAD manual but you must include the 2 x 100 k resistors in the resistors used. The resistors reduce the current to non-lethal levels
I ran my thermal Dynamics like that as a test and it worked perfectly
The following user(s) said Thank You: aninchlow
Please Log in or Create an account to join the conversation.
- aninchlow
- Offline
- New Member
-
Less
More
- Posts: 9
- Thank you received: 0
21 Dec 2021 06:25 - 21 Dec 2021 06:27 #229613
by aninchlow
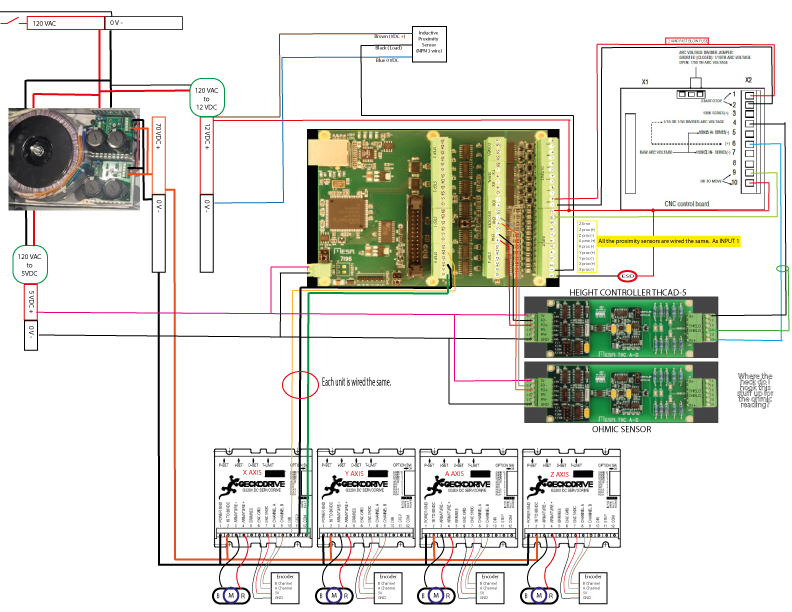 First - SUPER THANKS for the clear info. It is so easy to get lost on the interwebs. I've not drawn your latest info on this but here is my circuit diagram. Took me a couple hours to do. Wanted to keep things clear in my own brain as I leave and come back to this project off and on and it might help some other poor soul out there.
#1 - I see that by my wiring I'm sending 5vdc to the plasma machine for my start. that won't do...
Replied by aninchlow on topic 5x10 Home built Plasma CNC - in progress - Mesa 7I96, THCAD
#1 - I see that by my wiring I'm sending 5vdc to the plasma machine for my start. that won't do...
Attachments:
Last edit: 21 Dec 2021 06:27 by aninchlow.
Please Log in or Create an account to join the conversation.
- rodw
-
- Offline
- Platinum Member
-
Less
More
- Posts: 11970
- Thank you received: 4079
21 Dec 2021 10:05 #229616
by rodw
Replied by rodw on topic 5x10 Home built Plasma CNC - in progress - Mesa 7I96, THCAD
Normally we use 24 V power for field power. That gives better noise immunity. You only need a couple of amps.
Something like a meanwell mdr-60-24
The Ohmic sensing uses a Meanwell HDR-15-24 fully isolated
While you are at it, the 5v could be met by a Meanwell MDR-10-5
All my power supplies were waaay too big when I started.
A couple of resistors on the ohmic sensing and
Mandatory for an Everlast is a HS10 100 R 10W pull down resistor on the arcOK signal to prevent internal relay oxidisation which causes intermittent arcOK operation.
Some people here have different views and methods about solving this issue but they won't have used an Everlast!
The following user(s) said Thank You: aninchlow
Please Log in or Create an account to join the conversation.
- aninchlow
- Offline
- New Member
-
Less
More
- Posts: 9
- Thank you received: 0
22 Dec 2021 04:26 - 22 Dec 2021 04:27 #229694
by aninchlow
Replied by aninchlow on topic 5x10 Home built Plasma CNC - in progress - Mesa 7I96, THCAD
well I could easily change out the 12v power I put in for 24v power. I just picked 12v from inexperience. a 24v power supply will run all my npn stuff. easy peasy switch out, it will also fix up the issues you mentioned of being more reliable and less noise prone..
The pull down resistor just goes in parallel with the everlast for arc ok? or in series.
So fortunate to be able to stand on the shoulders of the giants that came before us and not have to learn this stuff the hard way.
The pull down resistor just goes in parallel with the everlast for arc ok? or in series.
So fortunate to be able to stand on the shoulders of the giants that came before us and not have to learn this stuff the hard way.
Last edit: 22 Dec 2021 04:27 by aninchlow.
Please Log in or Create an account to join the conversation.
Time to create page: 0.535 seconds