AXYZ 4008 ATC CNC router control retrofit
- tsmutz5
- Offline
- New Member
-

- Posts: 10
- Thank you received: 0
I’ve begun the process of retrofitting my router to Linuxcnc.
The way I’m doing the wiring is to patch into the OEM connectors so I can leave the existing control in place and functional until the Linuxcnc system is functional. Minimum downtime is essential as I use this machine for my business.
The OEM control system works ok but is definitely the limiting factor as the hardware is quite good.
The OEM control work flow goes like this, DXF- proprietary software “Toolpath”- file transfer to machine RAM. The downside of this is the Toolpath software is awful, very time consuming and basic machining strategies.
The other option is to use the no longer supported AXYZ DNC program and drip-feed the machine.
This works well as I can use g-code from CAM and the workflow is quick, the downside is curves and 3d work exceeds the look ahead of the DNC and causes stuttering and decreased cut quality.
Years ago I used Mach 3 on a small mill and was never happy with the stability of that system (a couple of random runaways can really sour your opinion of a motion control system).
I’m looking forward to learning Linuxcnc as I plan on using it for more applications in my business.
Hardware:
• HSD ES919A 10HP spindle
• Control Techniques Commander SE vfd (theservicegroup.us/wp-content/uploads/20...r-SE-Users-Guide.pdf)
• Teknic servo motors M-3482-FT-1 on X and Y axis (www.teknic.com/files/downloads/M-3482-FT.pdf)
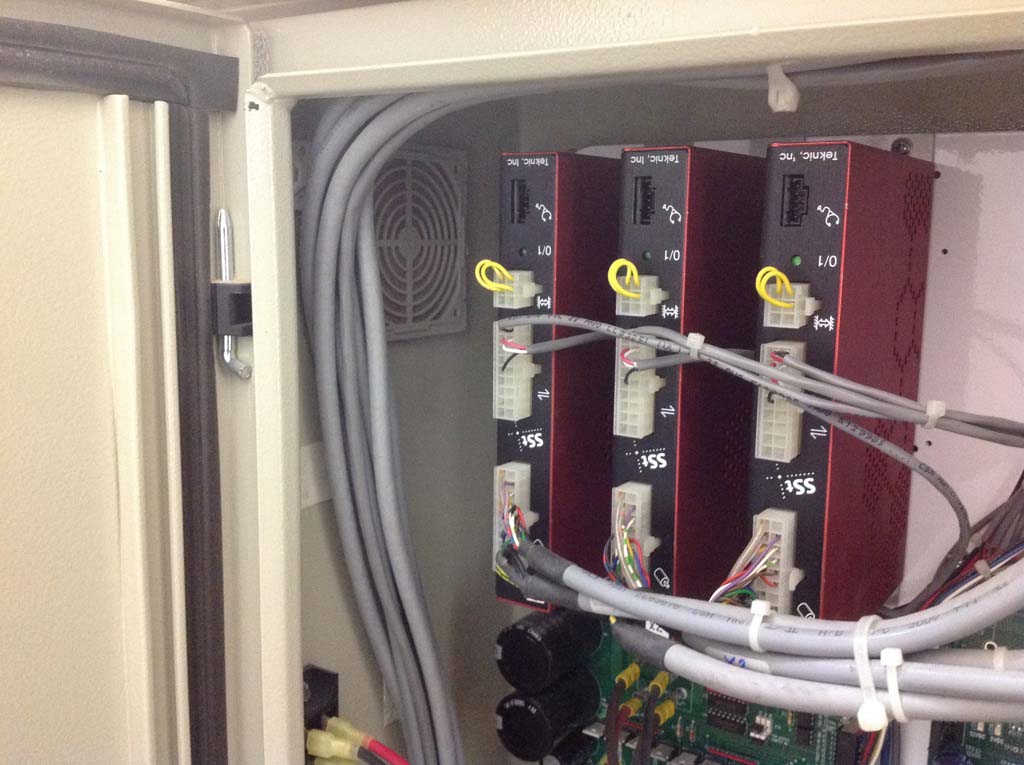
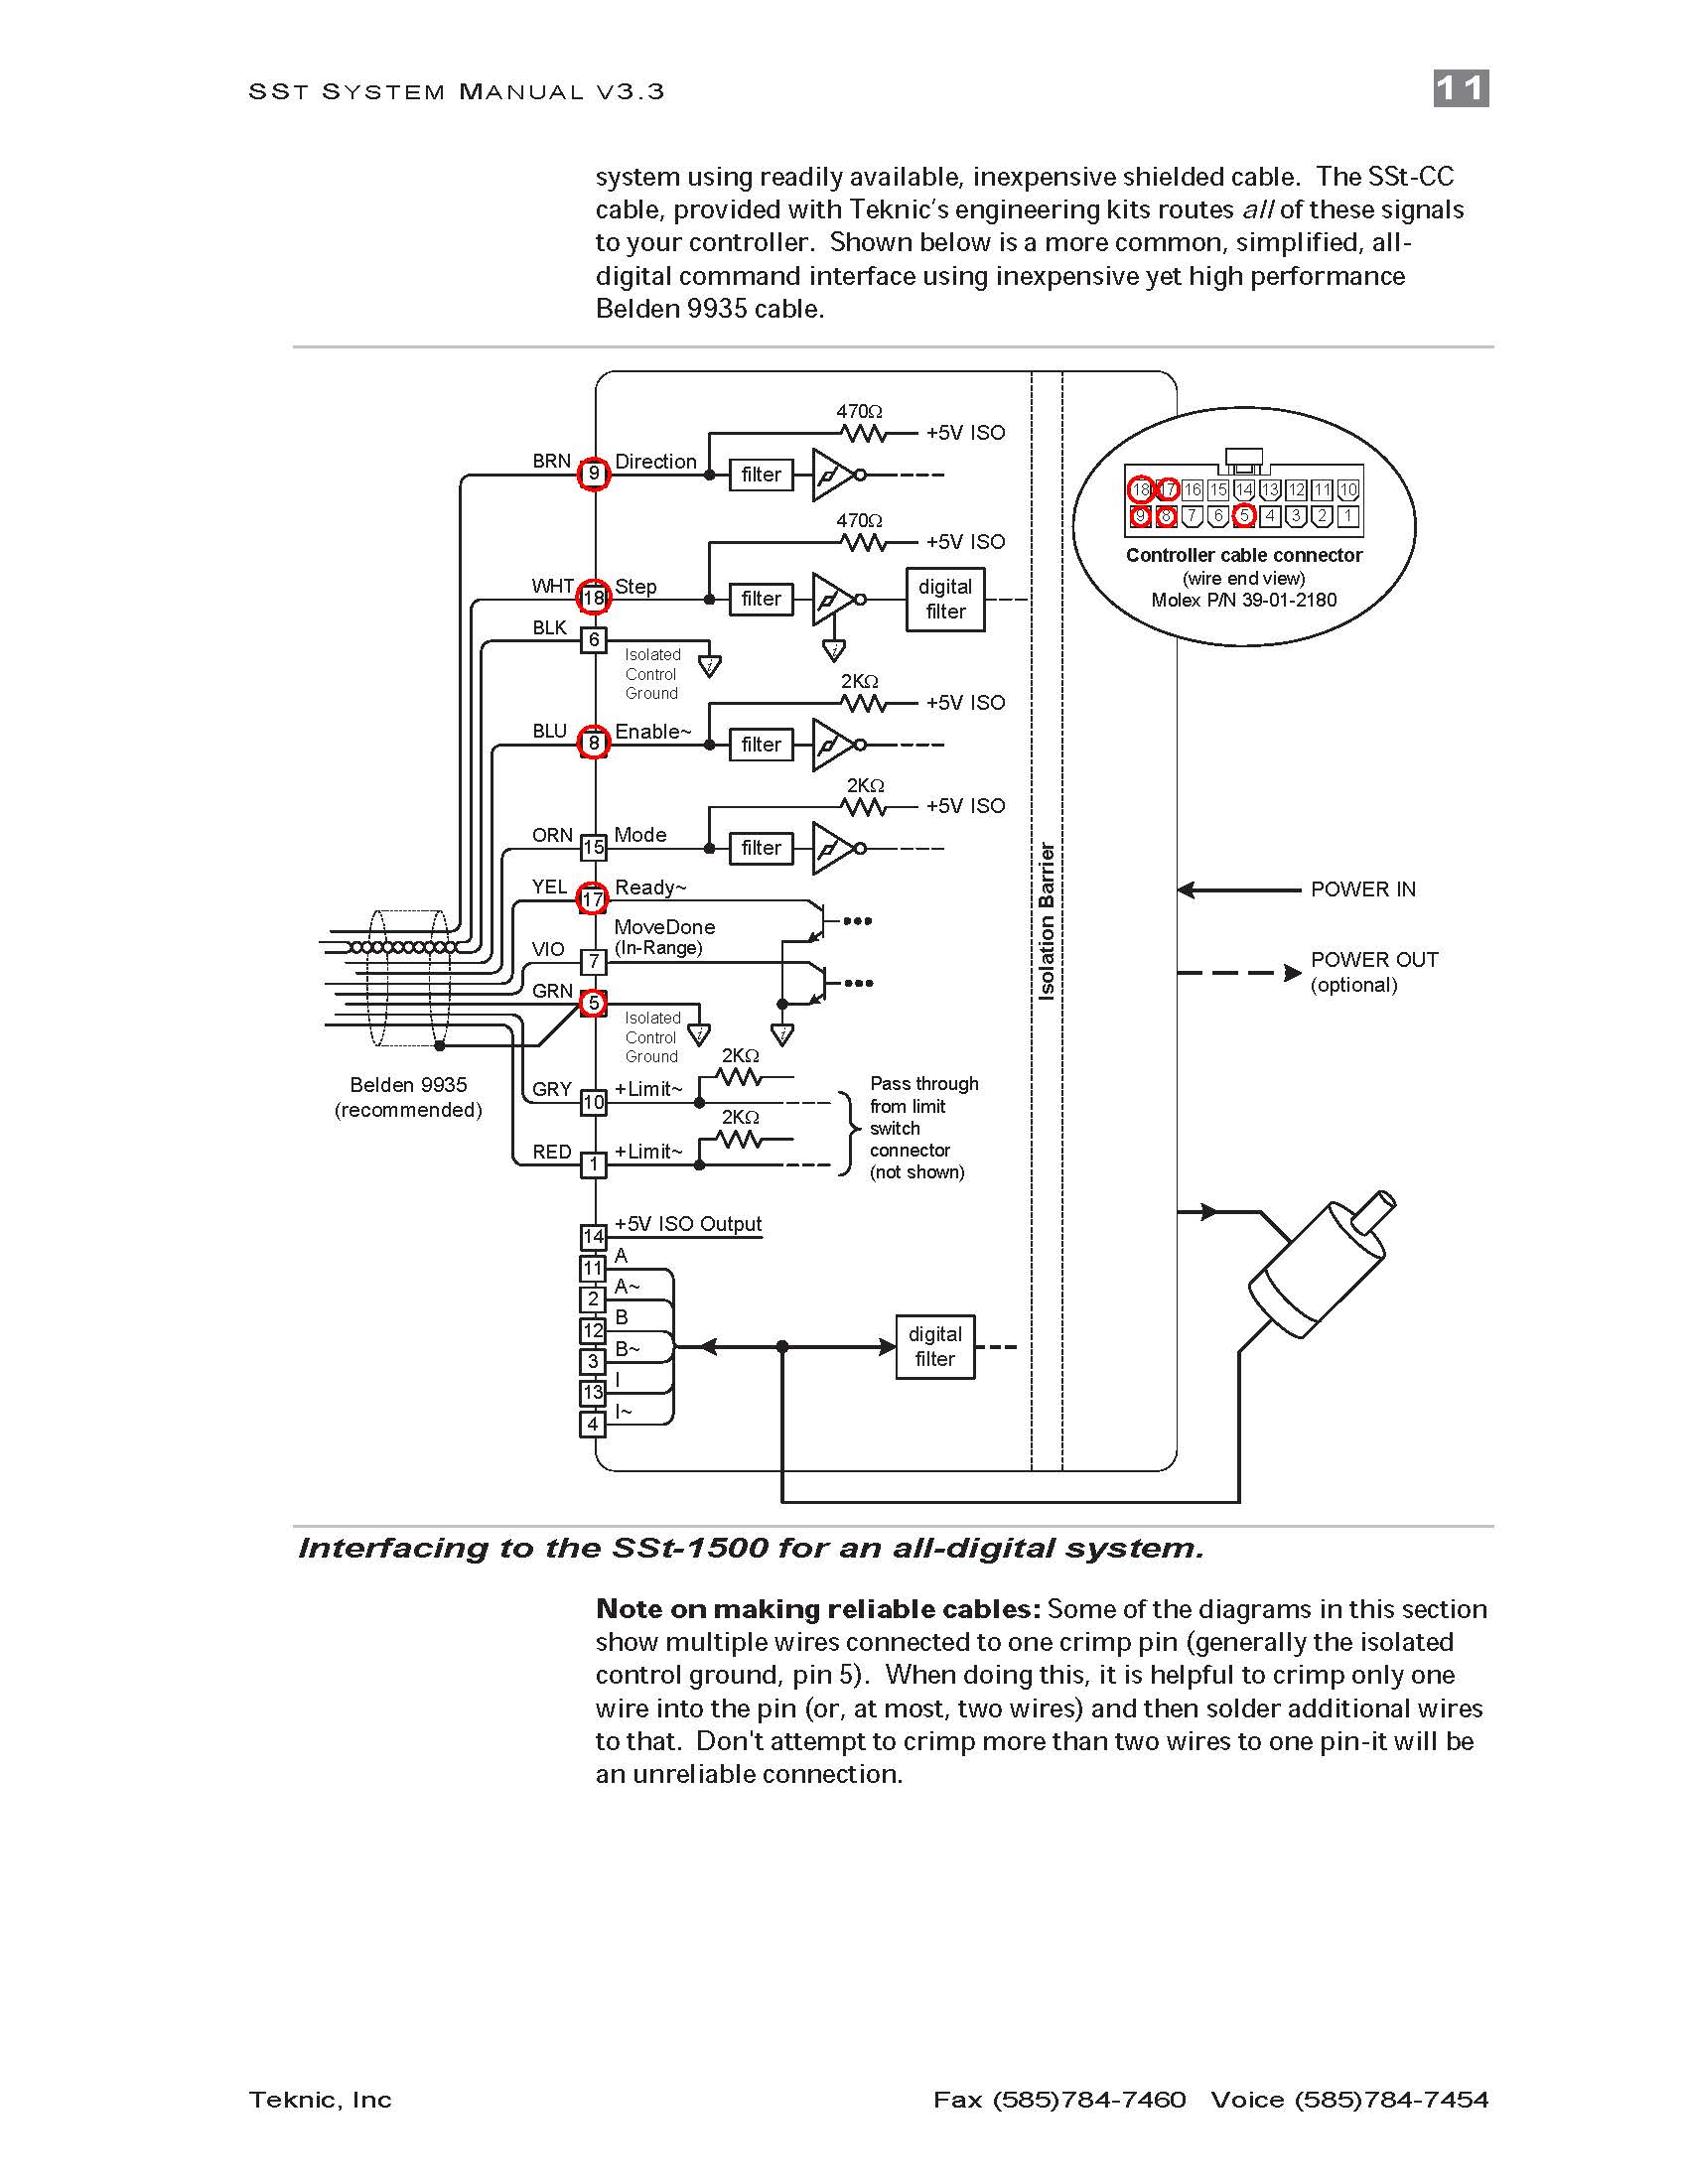
• Teknic servo drives (step-dir) SST-1500-UCX for X and Y (www.teknic.com/files/downloads/Teknic_SS...em_Manual_Rev3.8.pdf)
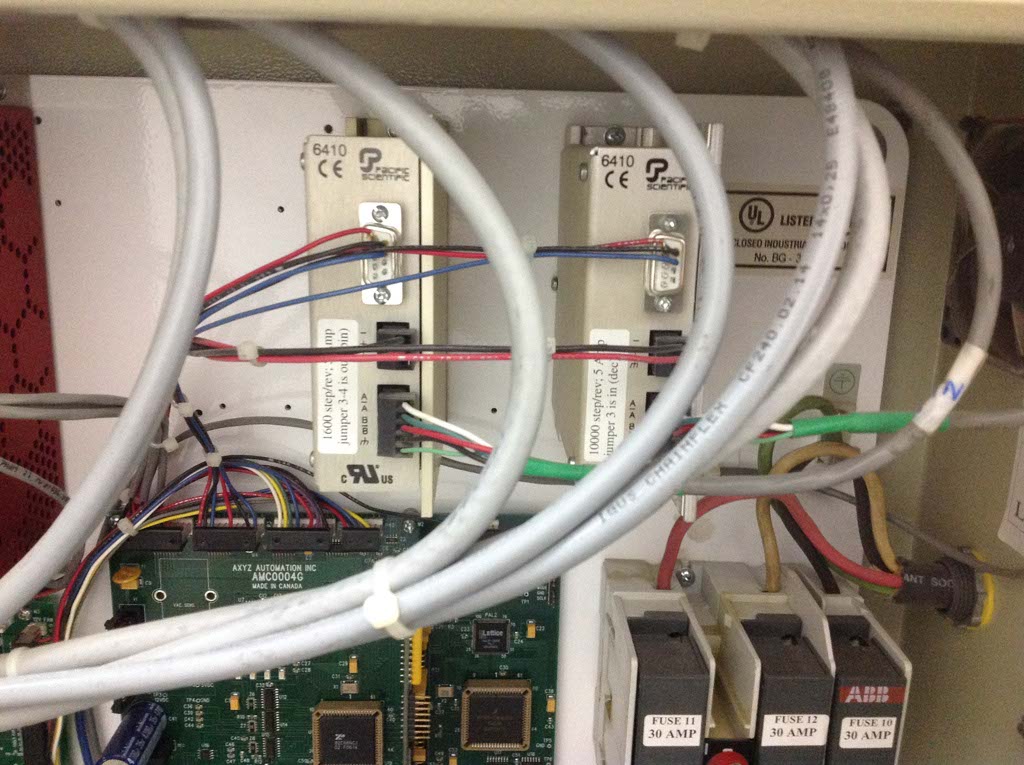
• Pacific Scientific 6410 Stepper Drives on Z and ATC carousel (www.ahs-antriebstechnik.de/pdf-dateien-e...%20Drives/ma6410.pdf)
• Stepper motors on Z and ATC carousel
• Proximity sensors shared for home/limits (5 total)
• Pneumatic actuated drawbar on spindle
• Pneumatic actuated ATC door and dust shoe sharing the same pneumatic circuit
• Pneumatic actuated drill
• Low air pressure sensor
• Fixed tool touch off plate next to ATC for recording tool length offsets
• Moveable tool touch off plate for setting spoil board top surface
• HP dc7600 PC
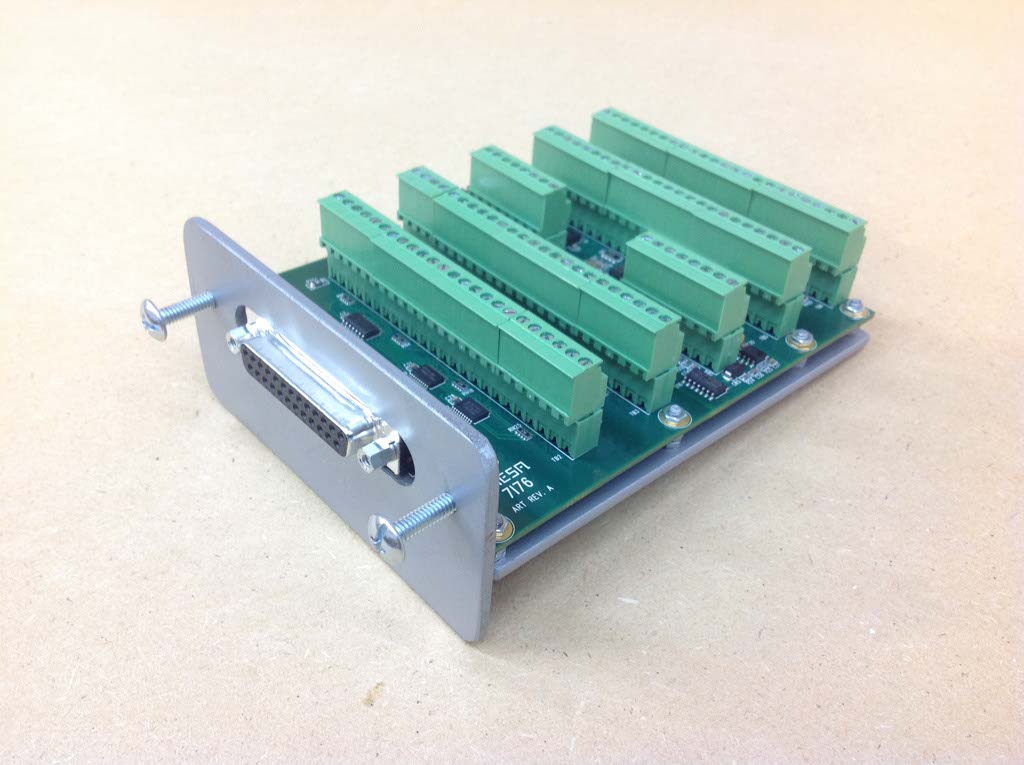
• MESA 5i25-7i76
Here come loads of questions about how to get this thing running
")
Tyler

Please Log in or Create an account to join the conversation.
- tsmutz5
- Offline
- New Member
-
- Posts: 10
- Thank you received: 0
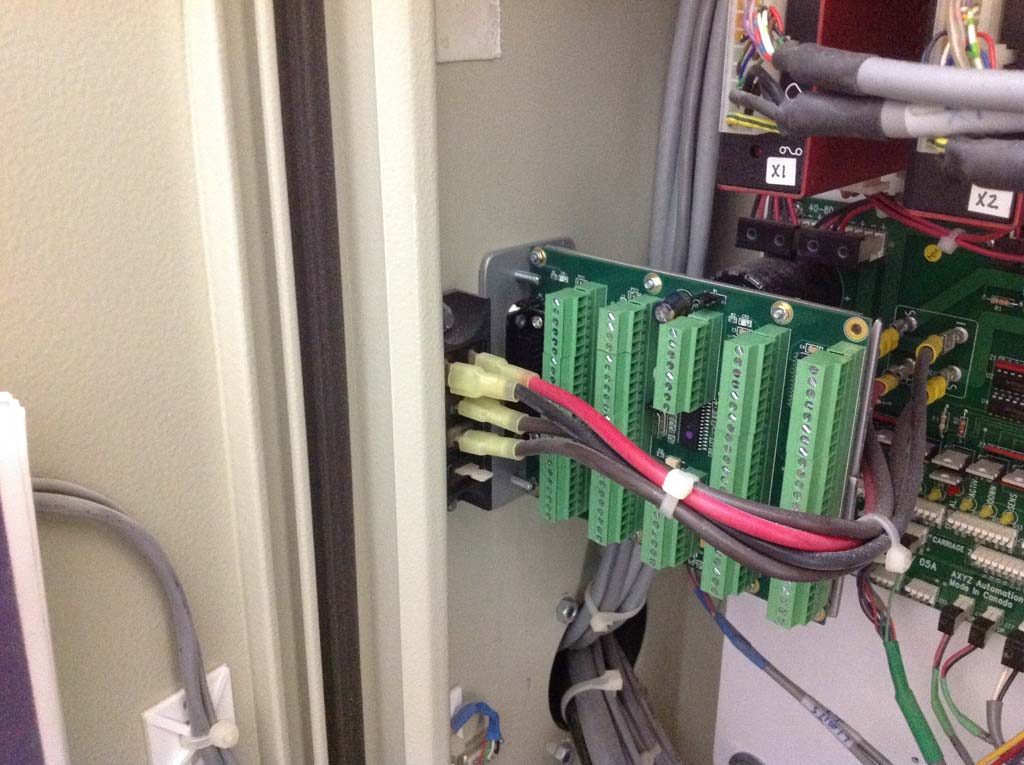
• 5i25 installed and talking to the 7i76.
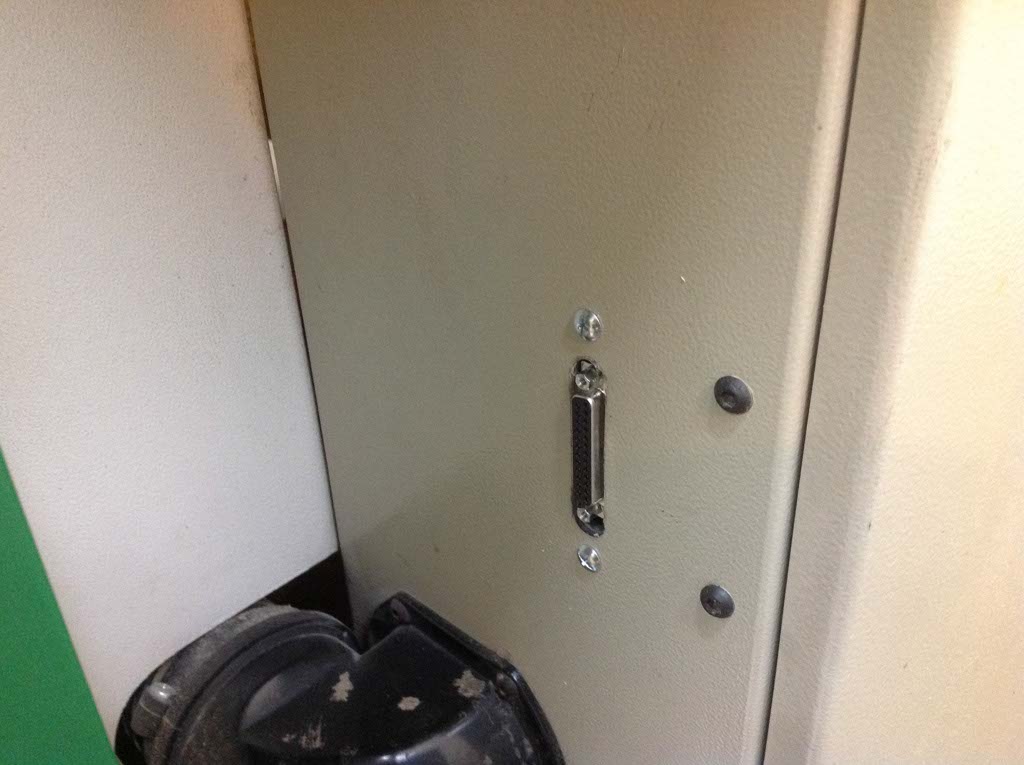
• 7i76 mounted to control cabinet.
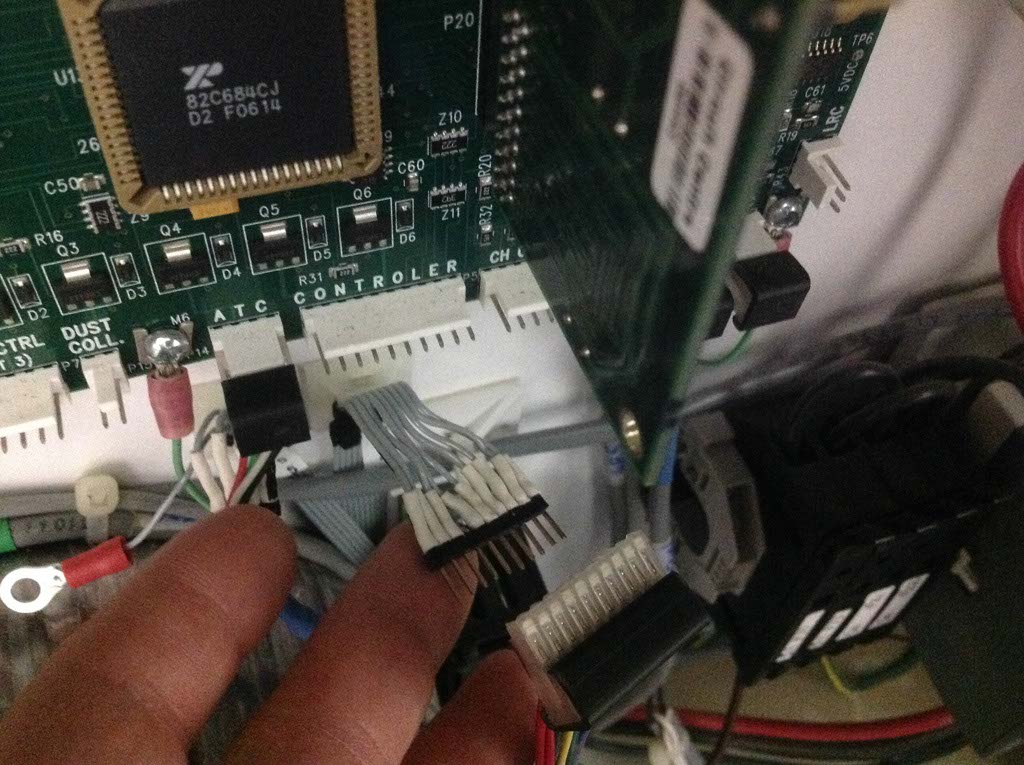
• Ribbon cable running from OEM connectors to 7i76.
• X, X1, Y, Z, A, wired to 7i76.
• Field power to 7i76.
Issues currently:
• (update: Fixed, was missing a jumper on stepper driver.)
• No motion on X, X1, or Y. The OEM control only uses three pins (I think) to control the drives. Pins 18 and 9 go to the control board, pins 8,17,5 go to the power board.
How should this be wired to the 7i76?
This is from the drives manual
“DIRECTION POLARITY WIRING. With a standard motor cable the Direction line will have the following effect: With Direction at a high level, the motor will rotate clockwise (when viewing the shaft while facing the drive end of the motor) for each pulse of the Step line, and the internal position register (which is displayed by SSt-QuickSet's™ Status window) will decrement for each step pulse. When the Direction line is at a low level the motor will rotate counter-clockwise and the SSt servo drive’s internal position register will increment for each pulse of the Step line.”
Thanks for the help.
Tyler
Please Log in or Create an account to join the conversation.
- tsmutz5
- Offline
- New Member
-
- Posts: 10
- Thank you received: 0
X, X1, Y, are moving. Pin 8 needs to be grounded to enable the drive. I metered the drives behavior on OEM control to determine this. Using a clip lead to ground pin 8 on the servo drive I can now jog in PNCCONF.
Question:
Is pin 8 something that I will connect to a gpio pin later on in HAL as a drive enable function? I need to be able to disable the drives to square the gantry and then re-enable. I'm not sure what the proper way to do this is.
Question:
In PNCCONF I don't get the option to configure the 5th stepgen used to drive the ATC. Is this correct?
Now to figure out homing switches, pneumatic functions, drawbar, ATC and on and on.
That's it for tonight.
Tyler
Please Log in or Create an account to join the conversation.
- andypugh
-

- Offline
- Moderator
-

- Posts: 19861
- Thank you received: 4636
Yes. I think that the 5i25/7i76 IO is high-impedence when unpowered so it will work properly (and safely). If the power-off behaviour isn't right then you might need a mechanical relay, crude though that sounds.Is pin 8 something that I will connect to a gpio pin later on in HAL as a drive enable function?
In theory LinuxCNC knows how to auto-square the gantry (though you would need independent limit switches). It takes a bit of configuration. There was some discussion about building it in to the standard homing code, but once you try to handle every single possibility (homing to switches, homing to encoder index, homing to encoder indexes that don't actually line up with each other...) it becomes quite a task. It is supposedly easier with a development branch of LinuxCNC called joints_axes_4 which has a kinematic module called gentrivkins.I need to be able to disable the drives to square the gantry and then re-enable. I'm not sure what the proper way to do this is.
There is a sample configuration in the standard installation which uses "gantrykins" which has some problems and irritations. You might want to experiment with this simulated gantry configuration (without hardware) to see if it looks like it would work for you.
There are so many options for ATC that I can't ever see the wizards being able to configure them all. How does yours work, and what does it need?In PNCCONF I don't get the option to configure the 5th stepgen used to drive the ATC. Is this correct?
If it has a 4th servo then you might want to temporarily configure an A axis for the ATC carousel. It looks like your tool-change will be easiest to control with a G-code subroutine and configuring that as an A (or B or C) axis will make moving it from G-code easier. You can configure LinuxCNC to call a G-code subroutine when it sees an "M6" in the input file. There are (several) other ways to do it too, but as you need coordinated moves in Y and Z to change a tool the G-code approach looks simplest. G-code can operate pneumatics and read switches using the digital IO commands (M62 and friends)
Please Log in or Create an account to join the conversation.
- papaours
- Offline
- Junior Member
-

- Posts: 20
- Thank you received: 1
I have done a similar job on an Industiral router same size.
Pncconf is a good base to start.
My advice will be to look and understand very well the homing sequence of your actual machine befor dismantling the controller.
The second mistake i done was to not mesure or register the acceleration of the 3 axis driving by the old controller.
You could use your smartphone to get it.
During the first move always keep a physical Estop button under your hand........
Be shure your Z axis servo is not breaking when machine is stop.
( i have nearly burn my drive by forgetting to conect the break to machine the On relay )
If you have a vacuum pump you probably have a Vacuum switch to stop the machine in case of pump failure
On this kind of machine the Estop chain is something to think seriously and it is not luxury to by a safty-relay like a Pilz.
During my first milling test i have discoverd the subtilty of G61 G61.1 and G64p0.1
If you let it by default to g64 during poketing operation at 10m/mn feed you will have some surpise......
The controller will take the shortest way between 3 point !
Also if you drill, the controller will start mooving in X or Y before the tool is out of the hole !
In my case when a cut very simple cabinet parts i use to set my post processor to start the gcode with g61.1
And when i do some 2.5d art workt i set it to a tolerance of 0.1mm with g64p0.1
After one year of use i am very happy with LinuxCnc,
For many reason i am thinking to moove to Gmoccapy.
My only regret is about the mystery of the ATC ! And the mapping fonction of M6
Some time i look over mach3 with Cslab product csmio with the servo closed loop autotuning fonction, and the already built rack toolchange macro, and for shure the computer ardware facility like hdmi video card, usb wifi dongle, ipad remot control, rj45 conection between computer and motion controller and touch screen compatibility but i am a bit worried to let mach3 mooving my 5000kg machine or distroy the hsd es919 spindle!
So if you have time and patience to tune as you like the whole system, you have made a very good choice.
And if you have some info about the ATC i will be very happy to learn and get my Atc working.....
Good evening.
Mael
Please Log in or Create an account to join the conversation.
- tsmutz5
- Offline
- New Member
-
- Posts: 10
- Thank you received: 0
The drive enable function makes sense.
For squaring the gantry the OEM procedure is as follows:
• Disable servo drives.
• Pull X-axis (gantry) to negative hard stop. The stop is fixed on one side and adjustable on the other side.
• Re-enable servo drives.
• Jog off limit and re-home.
The machine only has one proximity switch for homing/limit on the X-axis. The signal for the X and Y proximity switches goes over the same conductor in the E-chain to the OEM control. So for Linuxcnc I think I’ll need the homing procedure to home Z then Y then X. This is done in the .ini with HOME_SEQUENCE correct?
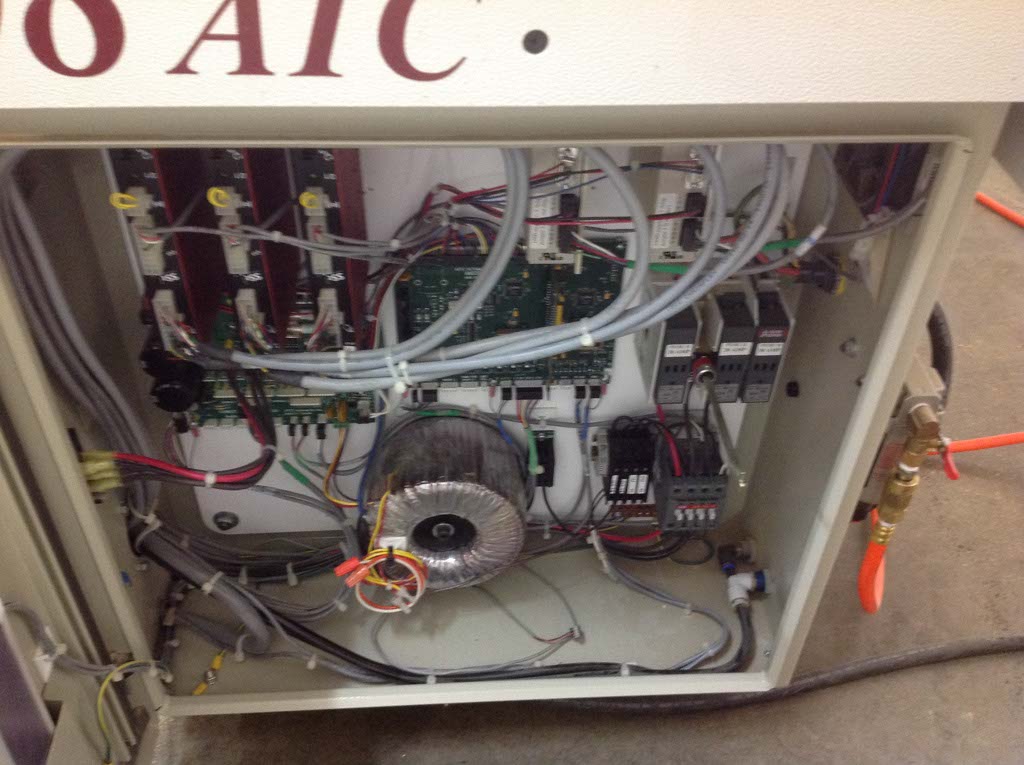
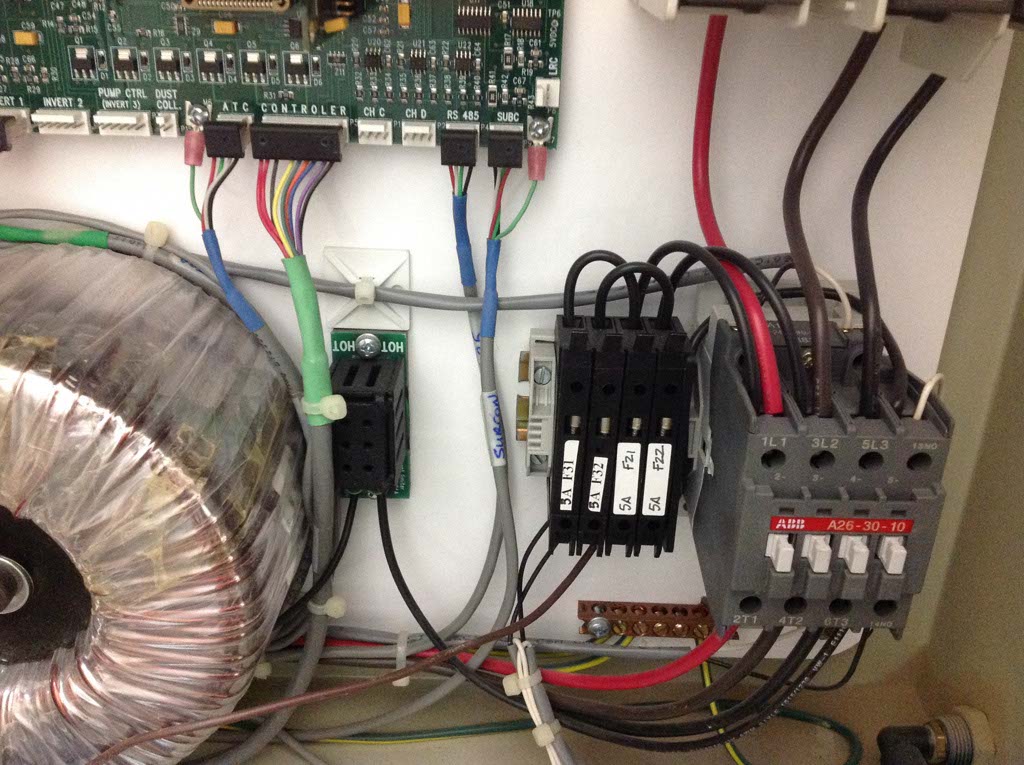
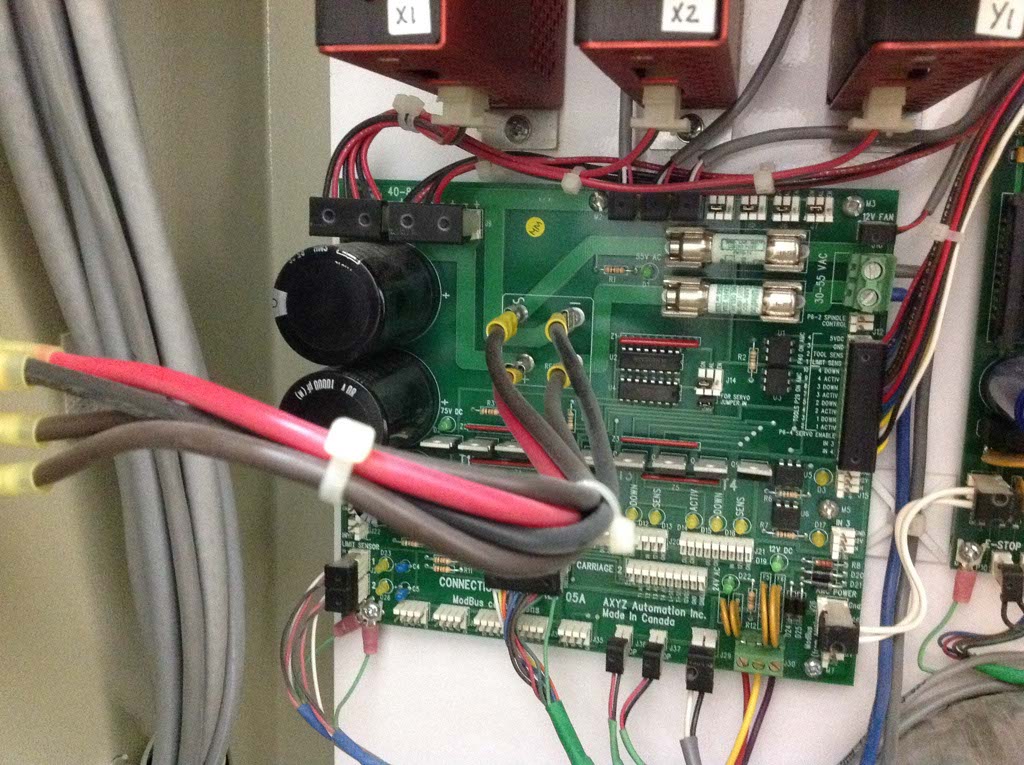
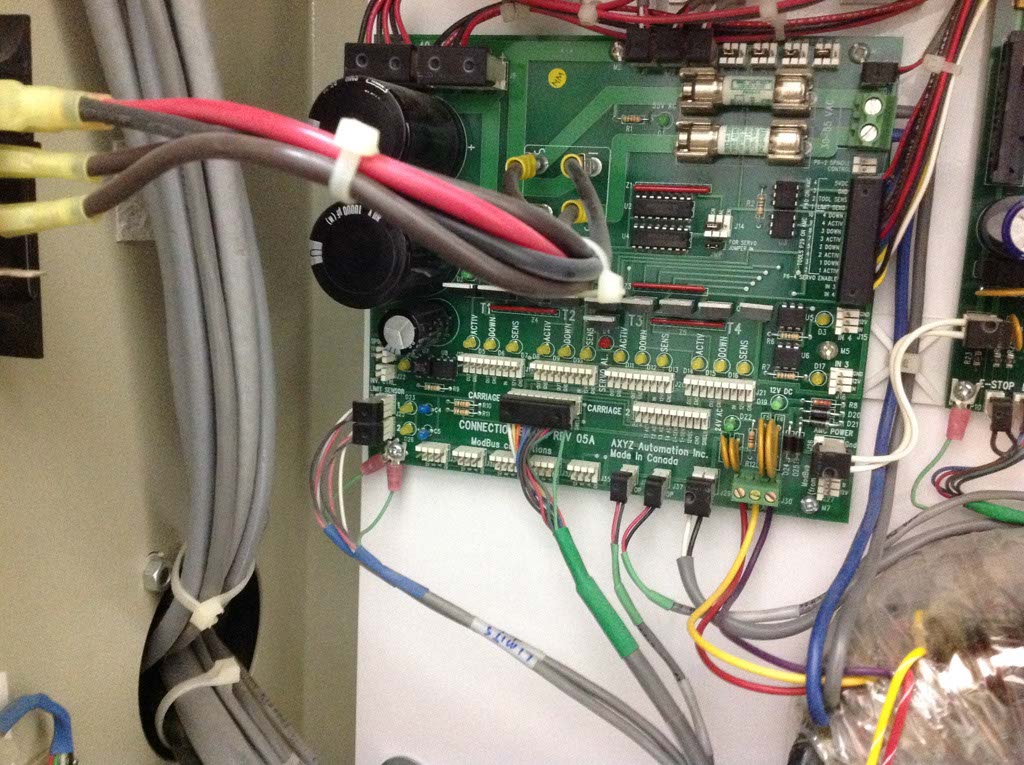
Here are a few pictures of my ATC.
It’s a stepper driven carousel type tool changer that is mounted to the X-axis gantry with a proximity sensor 180 deg from the current tool selected with studs for ATC home and at every tool location. The ATC detects the home stud by the distance from one pulse to the next is closer together than all others (around 1250 steps between tool studs). Once homed the ATC goes to the required number of steps to tool “?” hits the sensor, and then backs off till the sensor goes off then the tool change routine continues.
The OEM routine goes like this for empty spindle first tool change:
• M6 T? starts the process.
• Check air supply pressure sensor, if low abort.
• Check spindle “zero speed” if zero proceed.
• Air solenoid triggered to open ATC door and dust foot.
• Z retract to home position.
• Home ATC.
• ATC to “T?”.
• Y rapid to 67.6” .
• Spindle pullstud open and purge air.
• Z down to tool pickup height.
• Spindle pullstud closed.
• Y to 64.0”.
• Z retract to home.
• Rapid back to coordinate the M6 was called at.
• Air solenoid released to close ATC door and dust foot.
The OEM routine goes like this for mid-program loaded spindle tool change:
• M6 T? starts the process.
• Check air supply pressure sensor, if low abort.
• Check spindle “zero speed” if zero proceed.
• Air solenoid triggered to open ATC door and dust foot.
• Z retract to home position.
• ATC advance till sensor trips for tool currently in spindle then back off of sensor.
• Y rapid to 64.0” .
• Z down to tool pickup height.
• Y to 67.6
• Spindle pullstud open and purge air.
• Z retract
• ATC to T?
• Z down to tool pickup height
• Spindle pullstud closed.
• Y to 64.0”.
• Z retract to home.
• Rapid back to coordinate the M6 was called at.
• Air solenoid released to close ATC door and dust foot.
I’m not sure about how to handle the homing/latching system.
The reasoning for the latching procedure for every tool is as the Y-axis slides the tool out of the holder the stepper could be pushed out of position by a burr or wood chip.
Does this seem like something that is doable with G-code?
I still have to figure out the spindle control.
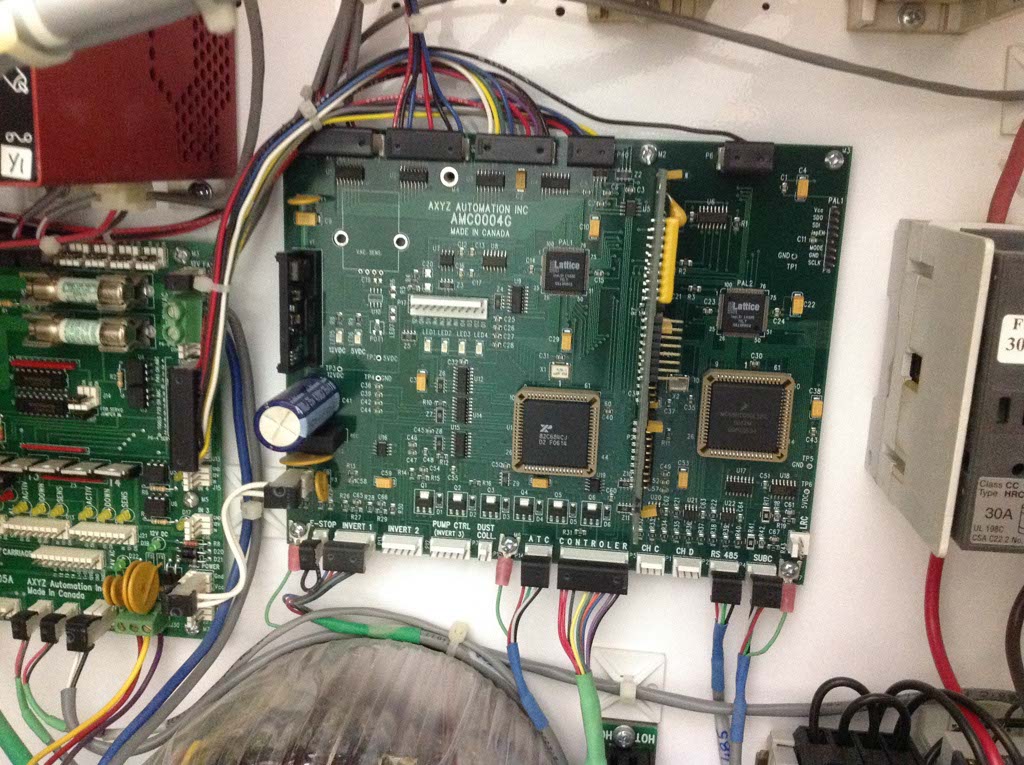
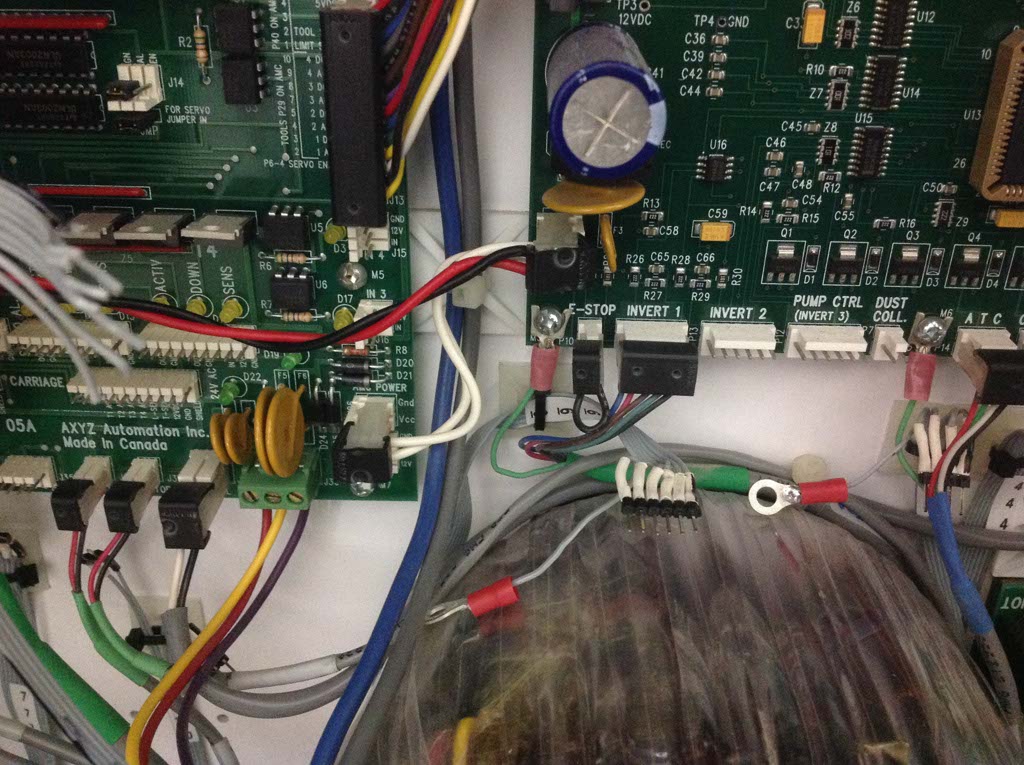
I attached the OEM control board diagram and highlighted the “inverter 1” section.
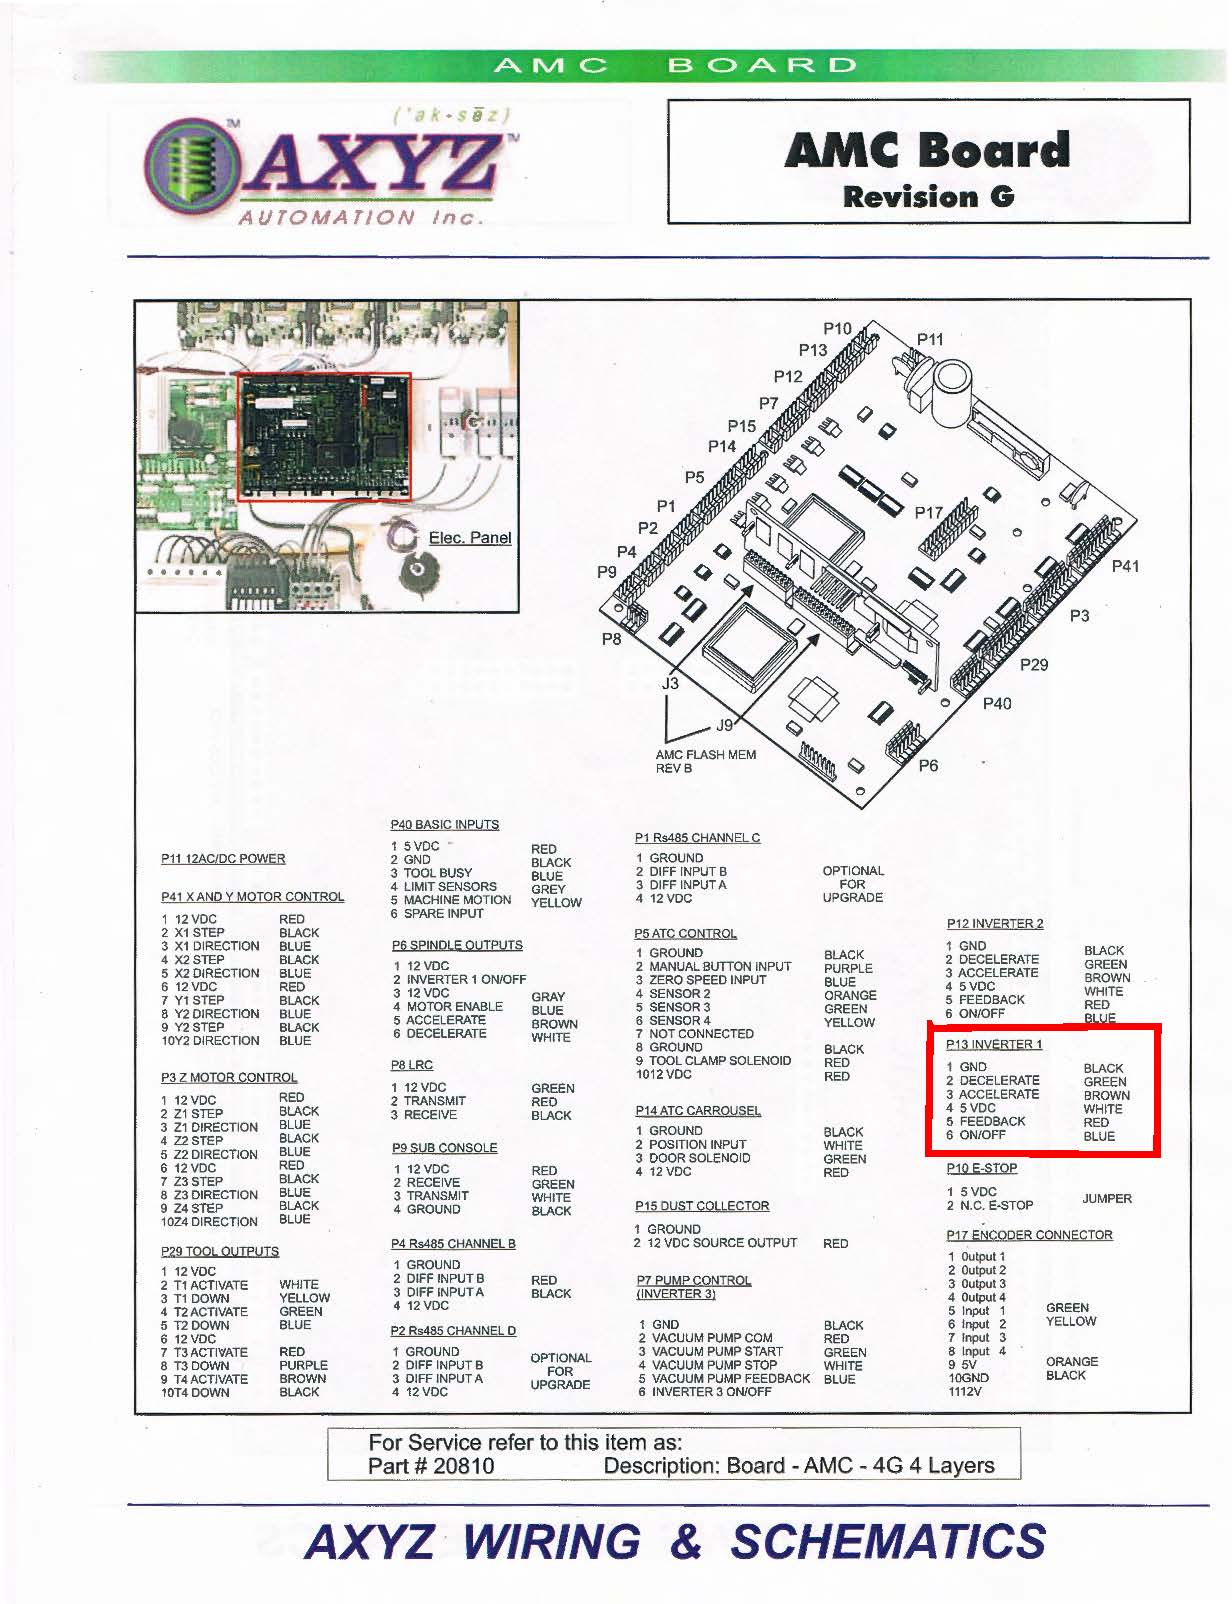
On OEM control the control mode is referred to as “tach” which has a zero speed indicator coming from the spindle to the inverter so that the tool change doesn’t start with a tool still spinning down.
I’m not sure how to bring this all together on the 7i76 and Linuxcnc.
Thanks so much for the help.
Tyler
Please Log in or Create an account to join the conversation.
- tsmutz5
- Offline
- New Member
-
- Posts: 10
- Thank you received: 0
Thanks for the advice!
That’s some heavy looking iron you’ve got there! What kind of machine is it?
My plan is to keep the existing control system in place as it is functional but not great at 3d work. The wiring I’ve done so far plugs into the OEM connectors so I just un-plug the cables from the OEM controller board and plug my cables into them when I want to develop my Linuxcnc settings. During the day I am still using the OEM controller.
I’ve got pretty decent documentation for accel, decal, max linear, max angular, centripetal accel, steps per unit, etc. But my weakness is Linux!
Good advice on E-stop importance. I’ve operated and maintained some 30+ axis automated systems with close human interaction and man oh man is safety important. A runaway axis (something I’ve experienced with MACH on smaller machines) is a very scary thing. My hardware E-stop Chain is working (disconnects the drives and stops the spindle as fast as possible. I’ve still got to get Linuxcnc disconnecting the relays powering the drives/spindle.
Gmoccapy looks like a great GUI! I’ll have to look into it more once I get up and running. Thanks for bringing it to my attention.
The Cslab products look nice, and presents an “easier” path, kind of like “going to the darkside”
 It’s temping sometimes.
What I really like about Linuxcnc is how adaptable it is, but that edge cuts both ways as my programming knowledge is not developed enough yet to make it sing.
When I get my ATC working well I'll definitely let you know how I did it.
Talk soon.
Tyler
Please Log in or Create an account to join the conversation.
- andypugh
-
- Offline
- Moderator
-
- Posts: 19861
- Thank you received: 4636
The machine only has one proximity switch for homing/limit on the X-axis. The signal for the X and Y proximity switches goes over the same conductor in the E-chain to the OEM control. So for Linuxcnc I think I’ll need the homing procedure to home Z then Y then X. This is done in the .ini with HOME_SEQUENCE correct?
Yes. You can basically use the original procedure and simply run two stepgens from the same axis position commands. You might want to add auto-squaring later, but lets leave that for now.
I think that you can do this using the normal homing routines and HAL logic. If you choose a homing direction such that the sensor sees the tool pin first then a oneshot in HAL set to run for about 75% of the time between studs during the homing procedure triggered from the falling edge of the sensor, then combined with an and2 component so that the homing signal is actually "Stud now AND stud recently passed" becomes the home signal.. The ATC detects the home stud by the distance from one pulse to the next is closer together than all others (around 1250 steps between tool studs). Once homed the ATC goes to the required number of steps to tool “?” hits the sensor, and then backs off till the sensor goes off then the tool change routine continues.
www.linuxcnc.org/docs/html/man/man9/oneshot.9.html
www.linuxcnc.org/docs/html/man/man9/and2.9.html
So your first job is probably to sort out homing for the axes and toolholder. I think in this case, as you need axis movements to perform a tool change, it makes sense to do tool-change with a G-code routine.
The tool carousel can be any unused axis, but a rotary one (possibly C if you plan to use A and/or B later) might be easier.
It is also possible to consider using an non-axis stepgen for the toolholder. The stepgen doesn't care where the position commands come from.
I’m not sure about how to handle the homing/latching system.
The reasoning for the latching procedure for every tool is as the Y-axis slides the tool out of the holder the stepper could be pushed out of position by a burr or wood chip.
Assuming that the C-axis is the toolchanger, and the stepgen scale is set so that one-tool = one-unit I think my simplistic approach would be:
G0 C #<tool>
M66 P0 L0 (check that there is a stud at the sensor)
O100 IF [#5399 EQ 0] (no stud)
M64 P0 (trigger a HAL pin to re-home the C-axis, halui.joint.5.home)
M66 P1 L1 Q20 (wait for halui.joint.5.is-homed)
O200 IF [#5399 EQ -1] (homing timed out)
(message, PANIC)
O200 ENDIF
O100 ENDIF
{Rest of sequence}
There is quite a lot to configure, but it should be OK in bite-size chunks.
Please Log in or Create an account to join the conversation.
- andypugh
-
- Offline
- Moderator
-
- Posts: 19861
- Thank you received: 4636
Please Log in or Create an account to join the conversation.
- papaours
- Offline
- Junior Member
-
- Posts: 20
- Thank you received: 1
it is not a carousel but it could be done whit a C axis in place of the Yaxis move
THat could not be easily translate to Linuxcnc but the frame and the message are good
the soft-limit override and the cone cleaning option are interesting.
'------------------------------------------------------------------------------
'-----------------------------
'------------------------------------------------------------------------------
' CS-Lab s.c.
' Toolchanger VB macro (MILL - Flat ATC with toolholders on the work table)
' v1.3
'------------------------------------------------------------------------------
'-----------------------------
'------------------------------------------------------------------------------


'------------------------------------------------------------------------------
' Digital outputs CONFIG
'------------------------------------------------------------------------------
Const OUT_OPENCOLLET	=	10	' open collet CSMIO output
Const OUT_CLEANCONE	=	11	' cone cleaning CSMIO output
Const OUT_CURTAIN	=	12	' raise curtain CSMIO output

'------------------------------------------------------------------------------
' Digital inputs CONFIG
'------------------------------------------------------------------------------
Const IN_COLLETCLOSED	=	20		' collet locked sensor CSMIO input
Const IN_COLLETOPENED	=	21		' collet open sensor CSMIO input
Const IN_TOOLINSIDE	=	22		' tool locked sensor CSMIO input

'------------------------------------------------------------------------------
' variables declaration - don't modify
'------------------------------------------------------------------------------
Dim Z_TOOLGET, Z_LIFT, Z_SAFE, X_FORSLIDE, X_LOCK, Y_BASE, Y_TOOLOFFSET, TOOLCOUNT
Dim ToolNew, ToolOld
Dim SoftLimitsState As Boolean

'------------------------------------------------------------------------------
' CONFIG data
'------------------------------------------------------------------------------
	Y_TOOLOFFSET = 170.00	' distance between tools
	Y_BASE = 42.93		' Y position of first tool
	Z_TOOLGET = -311.3	' Z position (abs) of tool get/relase
	Z_SAFE = -220		' Safe Z for safe moving above tool holders
	Z_LIFT = 10		' rise distance for cone cleaning
	X_FORSLIDE = -50	' X position before slide tool into the holder
	X_LOCK = -100		' X position for lock tool into the holder
	TOOLCOUNT = 6		' Max. tool number
'------------------------------------------------------------------------------


'------------------------------------------------------------------------------
  ' ------------------------
  ' Macro start
  ' ------------------------
'------------------------------------------------------------------------------
  	SetUserLED(1001, 1)	' UserLED 1001 - private info, toolchange is in progress

	' Get the current tool # and new tool #
	ToolOld = GetCurrentTool()
	ToolNew = GetSelectedTool()

	' save softlimits state
	If(GetOEMLED(23)) Then
		SoftLimitsState = true
	Else
		SoftLimitsState = false
	End If

	' turn off softlimits - toolholders can be outside normal work area
	SoftLimitsOff

	' raise the curtain
	Call SetCsmioOut (OUT_CURTAIN, true)


	' check are the axes referenced
	If GetOEMLed(807) Then
		SetCurrentTool( ToolOld )
		SetUserLED(1001, 0)
		DoOEMButton(1003)
		DoOEMButton(1002)
		Sleep(150)
		Message( "Machine is not referenced" )
		Sleep(150)
		' restore softlimit
		SetSoftLimits(SoftLimitsState)
		' curtain down
		Call SetCsmioOut (OUT_CURTAIN, false)
		End
	End If
	If GetOEMLed(808) Then
		SetCurrentTool( ToolOld )
		SetUserLED(1001, 0)
		DoOEMButton(1003)
		DoOEMButton(1002)
		Sleep(150)
		Message( "Machine is not referenced" )
		Sleep(150)
		' restore softlimit
		SetSoftLimits(SoftLimitsState)
		' curtain down
		Call SetCsmioOut (OUT_CURTAIN, false)
		End
	End If
	If GetOEMLed(809) Then
		SetCurrentTool( ToolOld )
		SetUserLED(1001, 0)
		DoOEMButton(1003)
		DoOEMButton(1002)
		Sleep(150)
		Message( "Machine is not referenced" )
		Sleep(150)
		' restore softlimit
		SetSoftLimits(SoftLimitsState)
		' curtain down
		Call SetCsmioOut (OUT_CURTAIN, false)
		End
	End If
	If GetOEMLed(11) Then
		SetCurrentTool( ToolOld )
		SetUserLED(1001, 0)
		DoOEMButton(1003)
		DoOEMButton(1002)
		Sleep(150)
		Message( "Spidnle is running. Toolchange failed." )
		Sleep(150)
		' restore softlimit
		SetSoftLimits(SoftLimitsState)
		' curtain down
		Call SetCsmioOut (OUT_CURTAIN, false)
		End
	End If

	' Spindle must be turned off for toolchange
	If (ToolNew = ToolOld) Then
		If (IsToolInside()) Then
			SetCurrentTool( ToolOld )
			SetUserLED(1001, 0)
			Sleep(150)
			Message("Tool is already in spindle.")
			Sleep(150)
			' restore softlimit
			SetSoftLimits(SoftLimitsState)
			' curtain down
			Call SetCsmioOut (OUT_CURTAIN, false)
			End
		End If
	End If

	' New tool # must be <= TOOLCOUNT
	If (ToolNew > TOOLCOUNT) Then
		SetCurrentTool( ToolOld )
		SetUserLED(1001, 0)
		DoOEMButton(1003)
		DoOEMButton(1002)
		Sleep(150)
		Message("There is no such a tool.")
		Sleep(150)
		' restore softlimit
		SetSoftLimits(SoftLimitsState)
		' curtain down
		Call SetCsmioOut (OUT_CURTAIN, false)
		End
	End If

	Code("G0G53 Z0.0")	' Z up to machine '0'
	WaitForMove

	' if current tool > 0 put it first into the holder
	If (ToolOld > 0) Then
		' if there is no tool in spindle, skip this part
		If (IsToolInside()) Then
			' move to the toolholder
			Code("G0G53 X"& X_FORSLIDE &" Y" & (Y_BASE + (Y_TOOLOFFSET * (ToolOld-1))))
			WaitForMove
			Code("G0G53 Z" & Z_TOOLGET)
			WaitForMove
			Code("G0G53 X" & X_LOCK)
			WaitForMove
			ColletOpen
			CleanConeOn
			Sleep(1000)
			' is collet opened?
			If (Not IsColletOpened()) Then
				ColletClose
				CleanConeOff
				Sleep(1000)
				Code("G0G53 X"& X_FORSLIDE)
				WaitForMove
				Code("G0G53 Z0")
				Code("G0G53 X0Y0")
				WaitForMove
				SetCurrentTool( ToolOld )
				SetUserLED(1001, 0)
				DoOEMButton(1021)
				DoOEMButton(1002)
				Sleep(150)
				Message("Can't open collet! Toolchange failed.")
				Sleep(150)
				' restore softlimit
				SetSoftLimits(SoftLimitsState)
				' curtain down
				Call SetCsmioOut (OUT_CURTAIN, false)
				End
			End If
			Code("G0G53 Z" & Z_SAFE)
			WaitForMove
			CleanConeOff
			ColletClose
		End If
	End If

	' If newtool = 0, there is no need to get new tool
	If (ToolNew = 0) Then
		Code("G0G53 Z0")
		WaitForMove
		Code("G0G53 X0Y0")
		WaitForMove
		SetCurrentTool( ToolNew )
		Message("Tool loaded : " & ToolNew)
		Code("G43T" & ToolNew)	' G43 to sync tool length in system
		Code("G43H" & ToolNew)	' G43 to sync tool length in system
		WaitForMove
		SetUserLED(1001, 0)
		' restore softlimits
		SetSoftLimits(SoftLimitsState)
		' curtain down
		Call SetCsmioOut (OUT_CURTAIN, false)
		End
	End If

	' Is there no tool in the spindle?
	If (IsToolInside()) Then
		Code("G0G53 Z0")
		Code("G0G53 X0Y0")
		WaitForMove
		SetCurrentTool( ToolOld )
		SetUserLED(1001, 0)
		WaitForMove
		DoOEMButton(1021)
		DoOEMButton(1002)
		Sleep(150)
		Message("Can't get new tool, because other tool is already in spindle!")
		Sleep(150)
		' restore softlimits
		SetSoftLimits(SoftLimitsState)
		' curtain down
		Call SetCsmioOut (OUT_CURTAIN, false)
		End
	End If

	' move to the new tool position
	Code("G0G53 X" & X_LOCK &" Y" & (Y_BASE + (Y_TOOLOFFSET * (ToolNew-1))))
	WaitForMove
	ColletOpen
	Sleep(1000)
	' check is the collet opened
	If (Not IsColletOpened) Then
		CleanConeOff
		ColletClose

		Sleep(1000)
		Code("G0G53 X"& X_FORSLIDE)
		WaitForMove
		Code("G0G53 Z0")
		Code("G0G53 X0Y0")
		WaitForMove

		SetCurrentTool( 0 )
		SetUserLED(1001, 0)
		DoOEMButton(1021)
		DoOEMButton(1002)
		Sleep(150)
		Message("Can't open collet! Toolchange failed!")
		Sleep(150)
		' restore softlimits
		SetSoftLimits(SoftLimitsState)
		' curtain down
		Call SetCsmioOut (OUT_CURTAIN, false)
		End
	End If

	' cone cleaning
	CleanConeOn
	Code("G0G53 Z" & (Z_TOOLGET + Z_LIFT))
	Code("G1G53 Z" & Z_TOOLGET & " F3000")
	Code("G1G53 Z" & (Z_TOOLGET + Z_LIFT) & " F3000")
	Code("G1G53 Z" & Z_TOOLGET & " F1500")
	WaitForMove
	' colled close
	CleanConeOff
	Sleep(500)
	ColletClose
	Sleep(1000)
	' check is tool locked?
	If (Not IsToolInside()) Then
		Code("G0G53 X"& X_FORSLIDE)
		WaitForMove
		Code("G0G53 Z0")
		Code("G0G53 X0Y0")
		WaitForMove

		SetCurrentTool( 0 )
		SetUserLED(1001, 0)
		DoOEMButton(1021)
		DoOEMButton(1002)
		Sleep(150)
		Message("Toolchange failed. Tool should be locked!")
		Sleep(150)
		' restore softlimits
		SetSoftLimits(SoftLimitsState)
		' curtain down
		Call SetCsmioOut (OUT_CURTAIN, false)
		End
	End If

	' slide out from toolholder position
	Code("G0G53 X" & X_FORSLIDE)
	WaitForMove
	Code("G0G53 Z0")
	WaitForMove
	' Go to absolute 0,0
	Code("G0G53 X0 Y0")
	WaitForMove

	SetCurrentTool( ToolNew )
	Message("Tool Loaded: " & ToolNew)
	Code("G43T" & ToolNew)	' G43 to sync tool length in system
	Code("G43H" & ToolNew)	' G43 to sync tool length in system
	WaitForMove
	SetUserLED(1001, 0)
	' restore softlimit
	SetSoftLimits(SoftLimitsState)
	' curtain down
	Call SetCsmioOut (OUT_CURTAIN, false)
	End
' -----------------------------------------------------------------------------
Public Function IsToolInside () As Boolean
	If(GetCsmioIn(IN_TOOLINSIDE)) Then
		IsToolInside = true
	Else
		IsToolInside = false
	End If
	Exit Function
End Function
' -----------------------------------------------------------------------------
Public Function IsColletOpened () As Boolean
	If(GetCsmioIn(IN_COLLETOPENED)) Then
		IsColletOpened = true
	Else
		IsColletOpened = false
	End If
	Exit Function
End Function
' -----------------------------------------------------------------------------
Public Function IsColletClosed () As Boolean
	If(GetCsmioIn(IN_COLLETCLOSED)) Then
		IsColletClosed = true
	Else
		IsColletClosed = false
	End If
	Exit Function
End Function
' -----------------------------------------------------------------------------
Sub ColletClose ()
	Call SetCsmioOut(OUT_OPENCOLLET, false)
End Sub
' -----------------------------------------------------------------------------
Sub ColletOpen ()
	Call SetCsmioOut(OUT_OPENCOLLET, true)
End Sub
' -----------------------------------------------------------------------------
Sub CleanConeOn ()
	Call SetCsmioOut(OUT_CLEANCONE, true)
End Sub
' -----------------------------------------------------------------------------
Sub CleanConeOff ()
	Call SetCsmioOut(OUT_CLEANCONE, false)
End Sub
' -----------------------------------------------------------------------------
Sub SoftLimitsOff ()
	If(GetOEMLED(23)) Then
		DoOEMButton(1029)
	End If
End Sub
' -----------------------------------------------------------------------------
Sub SetSoftLimits (state As Boolean)
	If(state) Then
		If(GetOEMLED(23) = 0) Then
			DoOEMButton(1029)
		End If
	Else
		If(GetOEMLED(23)) Then
			DoOEMButton(1029)
		End If
	End If
End Sub
' -----------------------------------------------------------------------------
Sub WaitForMove ()
	While IsMoving()
		Sleep(15)
	Wend
End Sub
' -----------------------------------------------------------------------------
Public Function GetCsmioIn (n As Integer) As Boolean
	Dim reg As Integer

	If(n < 16) Then
		reg = 90
	Else
		reg = 91
		n = n - 16
	End If

	If(GetInBit(reg, n)) Then
		GetCsmioIn = true
	Else
		GetCsmioIn = false
	End If
	Exit Function
End Function
' -----------------------------------------------------------------------------
Public Sub SetCsmioOut (ByVal n As Integer, ByVal state As Boolean)
	If(state) Then
		SetOutBit(90, n)
	Else
		ResetOutBit(90, n)
	End If
End Sub
' -----------------------------------------------------------------------------Please Log in or Create an account to join the conversation.