GLADE BUTTON DECORATION
- Askjerry
-
 Topic Author
- Offline
- Elite Member
-

Less
More
- Posts: 239
- Thank you received: 31
06 Jan 2018 09:03 #104071
by Askjerry
GLADE BUTTON DECORATION was created by Askjerry
A while back, I started a thread on getting GLADE buttons to work properly... (
LINK HERE
)
After getting buttons to work properly... I wanted to start to decorate them better than the standard gray-blue tint. I moved the discussion here as it covers a different topic and will have SIMULATED machine files so that a parallel port or MESA card is not required. I figure that way... more people can assist me. (Thanks is advance!)
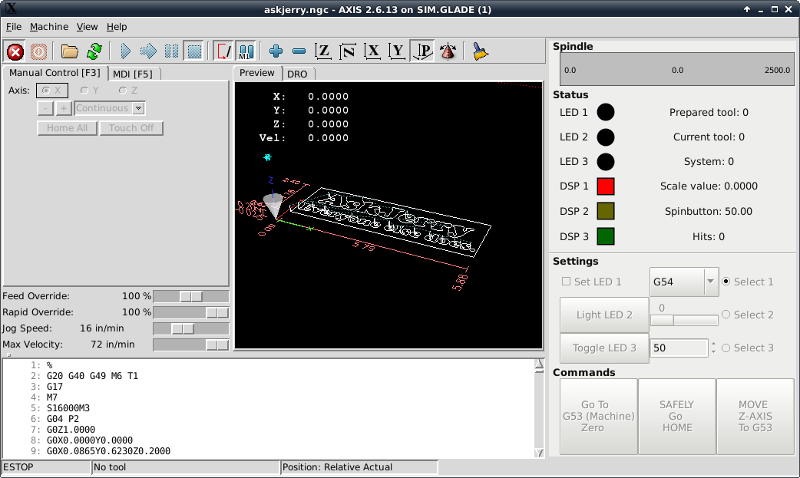
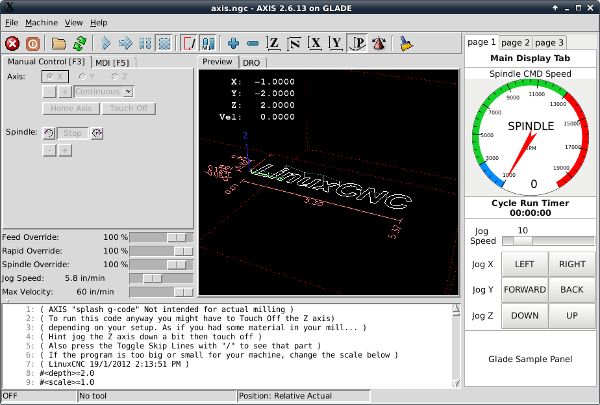
This is the default GLADE panel that I want to experiment on and use to help me learn. It is saved in the attached file as panel.glade should you need to find it.
I'd like to start out simple... perhaps make the background of the button "Light LED 2" a medium blue color... so I can learn how to apply a solid color. If someone knows how to apply a gradient... very cool.
The next step if possible would be to have the "Toggle LED 3" button change between two colors depending on the state.
Lastly... if you could apply one of the metallic color images to one or more of the bottom command buttons... then I should be able to get quite a bit done to make GLADE look better. (So far I've been working strictly in pyVCP.) I placed two metallic images in the IMAGES folder.
Thanks!
Jerry
After getting buttons to work properly... I wanted to start to decorate them better than the standard gray-blue tint. I moved the discussion here as it covers a different topic and will have SIMULATED machine files so that a parallel port or MESA card is not required. I figure that way... more people can assist me. (Thanks is advance!)
This is the default GLADE panel that I want to experiment on and use to help me learn. It is saved in the attached file as panel.glade should you need to find it.
I'd like to start out simple... perhaps make the background of the button "Light LED 2" a medium blue color... so I can learn how to apply a solid color. If someone knows how to apply a gradient... very cool.
The next step if possible would be to have the "Toggle LED 3" button change between two colors depending on the state.
Lastly... if you could apply one of the metallic color images to one or more of the bottom command buttons... then I should be able to get quite a bit done to make GLADE look better. (So far I've been working strictly in pyVCP.) I placed two metallic images in the IMAGES folder.
Thanks!
Jerry
Please Log in or Create an account to join the conversation.
- cmorley
- Offline
- Moderator
-

Less
More
- Posts: 7341
- Thank you received: 2164
06 Jan 2018 18:11 #104080
by cmorley
Replied by cmorley on topic GLADE BUTTON DECORATION
Ok here is the glade way.
I added an image (borrowed from Gmoccapy)- put it in your IMAGES folder.
(by the way linuxcnc comes with quite a few image files for buttons)
in a RIP /share/gmoccapy/images /share/axis/images share/gscreen/images
I modified your glade file.
One button uses the image file.
The trick here is the image is not resized to fit the button - so must be the proper size.
another button uses GTK's built in images.
Ill see about the python way later - if noone else has.
Chris M
Please Log in or Create an account to join the conversation.
- cmorley
- Offline
- Moderator
-
Less
More
- Posts: 7341
- Thank you received: 2164
06 Jan 2018 18:18 #104081
by cmorley
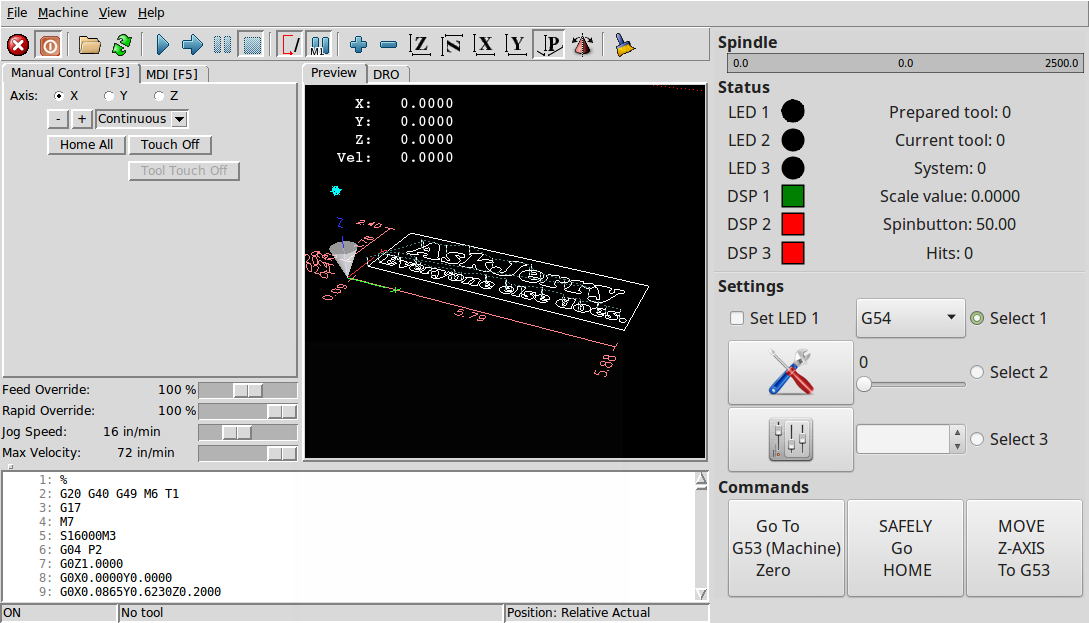
should look like this.
Chris M
Replied by cmorley on topic GLADE BUTTON DECORATION
should look like this.
Chris M
Please Log in or Create an account to join the conversation.
- cmorley
- Offline
- Moderator
-
Less
More
- Posts: 7341
- Thank you received: 2164
06 Jan 2018 19:36 #104083
by cmorley
Replied by cmorley on topic GLADE BUTTON DECORATION
Ok here is a way to do it in python.
The advantage here is we can display different images based on the state of the toggle button.
Or anything else for that matter.
in hitcounter.py you must change the path to the IMAGES file to your path.
Chris M
The advantage here is we can display different images based on the state of the toggle button.
Or anything else for that matter.
in hitcounter.py you must change the path to the IMAGES file to your path.
Chris M
Please Log in or Create an account to join the conversation.
- cmorley
- Offline
- Moderator
-
Less
More
- Posts: 7341
- Thank you received: 2164
06 Jan 2018 19:46 #104085
by cmorley
Replied by cmorley on topic GLADE BUTTON DECORATION
Oh and thanks for the sim config - worked perfect.
Chris M
Chris M
Please Log in or Create an account to join the conversation.
- Askjerry
-
Topic Author
- Offline
- Elite Member
-
Less
More
- Posts: 239
- Thank you received: 31
06 Jan 2018 20:04 #104086
by Askjerry
Replied by Askjerry on topic GLADE BUTTON DECORATION
First, thanks for the quick reply! 
Not sure yet how you assigned the image to the button... your method is different than what I found... both seem to have pretty much the same end result.
If I make an image much larger than the button... it stretches the button to fill that size... if not... it centers the image. When I told GLADE to use a "button with image" and specify the image... it gets treated like an icon and is placed next to the text.
If I use your method... it obliterates the text... so the image must have text on it. By using Inkscape and exporting as a PNG... transparency does work. I'm going to have to play around with it... and also see if I can tie the button state pressed/not pressed to the image used... that would be useful.
I'll fiddle with it a bit more then post the files when I have something useful. It also looks like you only need the image files and the GLADE file... not the whole machine set.
LED 2 Button = Image inserted with text method
LED 3 Button = Image inserted your way... and it is 90x35 pixels which "should" fill the button... but it scales it.
I'll experiment more... thanks again!
Please Log in or Create an account to join the conversation.
- Askjerry
-
Topic Author
- Offline
- Elite Member
-
Less
More
- Posts: 239
- Thank you received: 31
06 Jan 2018 20:06 - 06 Jan 2018 20:15 #104087
by Askjerry
Replied by Askjerry on topic GLADE BUTTON DECORATION
Looked like you posted as I was typing... I'll download now and add it to the experiment mix!
Thanks!
UPDATE: Made a path change so it works now...
Thanks!
UPDATE: Made a path change so it works now...
# a reference to the image path - adjust to your path
        self.IMAGES = os.path.expanduser('./IMAGES')
        print 'IMAGE PATH:', os.path.exists(self.IMAGES)
Last edit: 06 Jan 2018 20:15 by Askjerry.
Please Log in or Create an account to join the conversation.
- newbynobi
-
- Offline
- Platinum Member
-

Less
More
- Posts: 1931
- Thank you received: 394
07 Jan 2018 17:14 - 07 Jan 2018 17:17 #104122
by newbynobi
Replied by newbynobi on topic GLADE BUTTON DECORATION
Hallo Jerry,
find attached my example, all in one in one config folder.
I looked at your example and I allow myself to give some advise:
- never use several configs in one folder, you will get at one point that you edit one file and you are wondering why a shit does not work, until you are finding out, that you edited the wrong file.
- Whenever you make a glade panel or even a GUI, do not use the standard names. I edit the panel.glade to fit modern needs. If you use button1, button2, button3, etc. it will be difficult to follow your code, even you will be lost after you added 10 button. Use names with the meaning of the button. think about button1 or btn_led_1, what is easier to follow?
- use for every widget names with a leading part telling you what widget you are acting with:
my example shows:
lbl = Label
btn = momentary button
tbtn = Toggle Button
rbtn = Radio Button
chk = Check button
scl = scale
etc....
I also edit your ini file, as you loaded the glade panel without the hal part and you did the connections in a postgui. hal file. That can lead to a race condition, and the panel will not load.
Next I also added the panel to my own GUI gmoccapy (gee mocca py), so you have also for that GUI an example.
(Oh, I do not follow my own rules and added 2 INI Files in one folder, shame on me") ) you will find your macros added to the MDI Button part and the glade panel added on the right hand.
) you will find your macros added to the MDI Button part and the glade panel added on the right hand.
After you started the config, (please do start from command line, as you will get several print outs using the panel) you will see the panel with
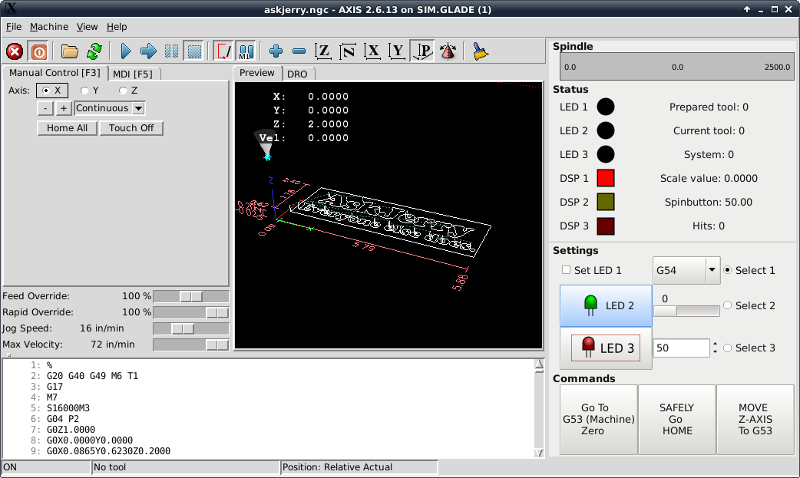
tbtn_led3 having different images according to the state.
tbtn_move_z with different background colors
btn_led2 will get a light blue background when pressed
lbl_hits will increase by one each time you click on btn_led2
if you open halshow and take a look at pin/gladevcp you will find two pins we created in the python file
gladevcp.count-clicks-out and gladevcp.pin-in
So you have most stuff in one python and glade file to do nearly what ever you want.
So hopefully the example does help you and others.
@Chris and all others, please do not use any more the old python print style, so do not use:
print "hallo"
print("hallo %s", %hallo)
actual is to use:
print("hallo this is {0} from pin {1}".format(value, pin)
This will be helpful if we ever update to python3
Norbert
find attached my example, all in one in one config folder.
I looked at your example and I allow myself to give some advise:
- never use several configs in one folder, you will get at one point that you edit one file and you are wondering why a shit does not work, until you are finding out, that you edited the wrong file.
- Whenever you make a glade panel or even a GUI, do not use the standard names. I edit the panel.glade to fit modern needs. If you use button1, button2, button3, etc. it will be difficult to follow your code, even you will be lost after you added 10 button. Use names with the meaning of the button. think about button1 or btn_led_1, what is easier to follow?
- use for every widget names with a leading part telling you what widget you are acting with:
my example shows:
lbl = Label
btn = momentary button
tbtn = Toggle Button
rbtn = Radio Button
chk = Check button
scl = scale
etc....
I also edit your ini file, as you loaded the glade panel without the hal part and you did the connections in a postgui. hal file. That can lead to a race condition, and the panel will not load.
Next I also added the panel to my own GUI gmoccapy (gee mocca py), so you have also for that GUI an example.
(Oh, I do not follow my own rules and added 2 INI Files in one folder, shame on me
) you will find your macros added to the MDI Button part and the glade panel added on the right hand.After you started the config, (please do start from command line, as you will get several print outs using the panel) you will see the panel with
tbtn_led3 having different images according to the state.
tbtn_move_z with different background colors
btn_led2 will get a light blue background when pressed
lbl_hits will increase by one each time you click on btn_led2
if you open halshow and take a look at pin/gladevcp you will find two pins we created in the python file
gladevcp.count-clicks-out and gladevcp.pin-in
So you have most stuff in one python and glade file to do nearly what ever you want.
So hopefully the example does help you and others.
@Chris and all others, please do not use any more the old python print style, so do not use:
print "hallo"
print("hallo %s", %hallo)
actual is to use:
print("hallo this is {0} from pin {1}".format(value, pin)
This will be helpful if we ever update to python3
Norbert
Last edit: 07 Jan 2018 17:17 by newbynobi.
Please Log in or Create an account to join the conversation.
- Askjerry
-
Topic Author
- Offline
- Elite Member
-
Less
More
- Posts: 239
- Thank you received: 31
07 Jan 2018 18:40 - 07 Jan 2018 19:37 #104129
by Askjerry
Replied by Askjerry on topic GLADE BUTTON DECORATION
Thank you Norbert!
I did not create the configuration... it was one of the standard samples in the SIM folder. I pulled it as it was and made only very minor changes to learn how it worked. That is why the names are as they are... I didn't change them.
I am creating a sample machine config with a simple X/Y/Z mill... it has JOG buttons and a spindle speed indicator. I will probably add to it to demonstrate a toggle button... MIST COOLING perhaps. In my YouTube video the same configuration will be built with pyVCP and GLADE VCP to show the differences. I am good at pyVCP but still learning GLADE.
When I make any panel... the HAL names are always descriptive...
If making LED buttons... I would have had things like btn-LED1 or tog-LED2 for example.
You can see the sample panels I created in THIS GLADE POST where I created the following basic panels...
pyVCP Panel
GLADE Panel
I'm not sure why they put all those panels and configurations in one folder... but I did not know what was required to make a "real" machine into a "SIM" machine... so I just included the entire folder contents.
I would love to know how to convert a CONFIG folder to become a SIM.CONFIG for demo and upload... but that is a topic for another post. I will download your file and look it over carefully. (I can only do this while home... I don't have a LinuxCNC laptop.) So it may take a bit... not sure.
I really appreciate your hard work.
Thanks again!
~ Jerry
UPDATE:
I see the new lines to add color in the panel.py and I see the slightly different line in the INI file. I will start on a new (blank) machine and attempt to replicate what you did to color the JOG buttons. If I can do that... I'll gain a much better understanding!
I did not create the configuration... it was one of the standard samples in the SIM folder. I pulled it as it was and made only very minor changes to learn how it worked. That is why the names are as they are... I didn't change them.
I am creating a sample machine config with a simple X/Y/Z mill... it has JOG buttons and a spindle speed indicator. I will probably add to it to demonstrate a toggle button... MIST COOLING perhaps. In my YouTube video the same configuration will be built with pyVCP and GLADE VCP to show the differences. I am good at pyVCP but still learning GLADE.
When I make any panel... the HAL names are always descriptive...
- x-jog-minus
x-jog-plus
y-jog-minus
y-jog-plus
If making LED buttons... I would have had things like btn-LED1 or tog-LED2 for example.
You can see the sample panels I created in THIS GLADE POST where I created the following basic panels...
pyVCP Panel
GLADE Panel
I'm not sure why they put all those panels and configurations in one folder... but I did not know what was required to make a "real" machine into a "SIM" machine... so I just included the entire folder contents.
I would love to know how to convert a CONFIG folder to become a SIM.CONFIG for demo and upload... but that is a topic for another post. I will download your file and look it over carefully. (I can only do this while home... I don't have a LinuxCNC laptop.) So it may take a bit... not sure.
I really appreciate your hard work.
Thanks again!
~ Jerry
UPDATE:
I see the new lines to add color in the panel.py and I see the slightly different line in the INI file. I will start on a new (blank) machine and attempt to replicate what you did to color the JOG buttons. If I can do that... I'll gain a much better understanding!
Last edit: 07 Jan 2018 19:37 by Askjerry. Reason: UPDATE
Please Log in or Create an account to join the conversation.
- Askjerry
-
Topic Author
- Offline
- Elite Member
-
Less
More
- Posts: 239
- Thank you received: 31
24 Nov 2018 00:31 #121277
by Askjerry
Replied by Askjerry on topic GLADE BUTTON DECORATION
It took me awhile to see what I was doing wrong... but I've got it now.
In the sample file... the net connections got moved to another file... and that was throwing me off because they were not working. I went back into my original file that worked... and only made two changes...
I changed the hitcounter.py to panel.py and I put a copy of the panel.py into my CONFIG folder.
Once I did that... everything worked... and the colors were correct. The main key was to go into the machine.ini file and be sure to install this under the [DISPLAY] section somewhere...
Then... have the actual panel.py installed which looks like this...
I am also putting the two sample files... one pyVCP and one gladeVCP on here you to download and play with.
Thanks everyone!
Jerry
In the sample file... the net connections got moved to another file... and that was throwing me off because they were not working. I went back into my original file that worked... and only made two changes...
I changed the hitcounter.py to panel.py and I put a copy of the panel.py into my CONFIG folder.
Once I did that... everything worked... and the colors were correct. The main key was to go into the machine.ini file and be sure to install this under the [DISPLAY] section somewhere...
GLADEVCP= -u ./panel.py ./panel.gladeThen... have the actual panel.py installed which looks like this...
# ========================================================================================
# 					panel.py
# ========================================================================================
import gtk		# Gets colors and access to widgets.
import os		# Needed to get access to paths.
import hal		# Needed to react to hal signals.
import hal_glib		# Needed to create our own hal pins
# ----------------------------------------------------------------------------------------
CONFIGPATH = os.environ['CONFIG_DIR']		# Get the path where the CONFIG lives.
IMAGEDIR = os.path.join(CONFIGPATH, "IMAGES")	# Add in the IMAGES subfolder path.
# ----------------------------------------------------------------------------------------
class HandlerClass:
    def __init__(self, halcomp,builder,useropts):

        self.halcomp = halcomp 	# Setup halcomp
        self.builder = builder	# Setup builder
        # self._make_hal_pin()	# Create a hal pin
# ----------------------------------------------------------------------------------------
# Set Jog Button Colors

	btn = self.builder.get_object('x-minus')
	btn.modify_bg(gtk.STATE_NORMAL, gtk.gdk.color_parse("#aa4444"))
	btn.modify_bg(gtk.STATE_ACTIVE, gtk.gdk.color_parse("#999933"))

	btn = self.builder.get_object('x-plus')
	btn.modify_bg(gtk.STATE_NORMAL, gtk.gdk.color_parse("#aa4444"))
	btn.modify_bg(gtk.STATE_ACTIVE, gtk.gdk.color_parse("#999933"))

	btn = self.builder.get_object('y-minus')
	btn.modify_bg(gtk.STATE_NORMAL, gtk.gdk.color_parse("#44aa44"))
	btn.modify_bg(gtk.STATE_ACTIVE, gtk.gdk.color_parse("#999933"))

	btn = self.builder.get_object('y-plus')
	btn.modify_bg(gtk.STATE_NORMAL, gtk.gdk.color_parse("#44aa44"))
	btn.modify_bg(gtk.STATE_ACTIVE, gtk.gdk.color_parse("#999933"))

	btn = self.builder.get_object('z-minus')
	btn.modify_bg(gtk.STATE_NORMAL, gtk.gdk.color_parse("#9999dd"))
	btn.modify_bg(gtk.STATE_ACTIVE, gtk.gdk.color_parse("#999933"))

	btn = self.builder.get_object('z-plus')
	btn.modify_bg(gtk.STATE_NORMAL, gtk.gdk.color_parse("#9999dd"))
	btn.modify_bg(gtk.STATE_ACTIVE, gtk.gdk.color_parse("#999933"))

# ----------------------------------------------------------------------------------------
# boiler code
def get_handlers(halcomp,builder,useropts):
    return [HandlerClass(halcomp,builder,useropts)]
# ========================================================================================
I am also putting the two sample files... one pyVCP and one gladeVCP on here you to download and play with.
Thanks everyone!
Jerry
Please Log in or Create an account to join the conversation.
Moderators: HansU
Time to create page: 0.225 seconds