custom gmoccapy.h-button.button-2 in manual mode
- gekonko
-
 Topic Author
- Offline
- New Member
-

Less
More
- Posts: 17
- Thank you received: 3
18 Oct 2021 17:01 #223477
by gekonko
custom gmoccapy.h-button.button-2 in manual mode was created by gekonko
Hello,
I use gmoccapy for LinuxCNC 3.1.3.8.
I don't have a touch screen, so I plan to control 10x horizontal buttons via hardware buttons around the monitor ( with: gmoccapy.h-button.button-XYZ)
In manual mode, 5 of the 10 horizontal buttons are used:
gmoccapy.h-button.button-0 == open homing button
gmoccapy.h-button.button-1 == open touch off stuff
gmoccapy.h-button.button-2 == Nothing
gmoccapy.h-button.button-3 == open tool dialogs
gmoccapy.h-button.button-4 == Nothing
gmoccapy.h-button.button-5 == Nothing
gmoccapy.h-button.button-6 == Nothing
gmoccapy.h-button.button-7 == Nothing
gmoccapy.h-button.button-8 == full-size preview
gmoccapy.h-button.button-9 == exit if machine is off, otherwise no reaction
The plan is as follows:
- display the buttons in empty places
- control: - cooling
- increment selection
- air, etc
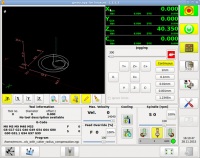
by editing the original gmoccapy.glade I can display the 3rd button also with the initial image (in a circle). the icon seems to be responsive to gmoccapy.h-button.button-2
How to proceed?
- I am not sure if my approach is correct. Is there any other way, how to display buttons in this location, which will be responsive to gmoccapy.h-button.button-xy without editing gmoccapy.glade file?
- can I link this button created in gmoccapy.glade to custom *.py and postgui.hal file?
I use gmoccapy for LinuxCNC 3.1.3.8.
I don't have a touch screen, so I plan to control 10x horizontal buttons via hardware buttons around the monitor ( with: gmoccapy.h-button.button-XYZ)
In manual mode, 5 of the 10 horizontal buttons are used:
gmoccapy.h-button.button-0 == open homing button
gmoccapy.h-button.button-1 == open touch off stuff
gmoccapy.h-button.button-2 == Nothing
gmoccapy.h-button.button-3 == open tool dialogs
gmoccapy.h-button.button-4 == Nothing
gmoccapy.h-button.button-5 == Nothing
gmoccapy.h-button.button-6 == Nothing
gmoccapy.h-button.button-7 == Nothing
gmoccapy.h-button.button-8 == full-size preview
gmoccapy.h-button.button-9 == exit if machine is off, otherwise no reaction
The plan is as follows:
- display the buttons in empty places
- control: - cooling
- increment selection
- air, etc
by editing the original gmoccapy.glade I can display the 3rd button also with the initial image (in a circle). the icon seems to be responsive to gmoccapy.h-button.button-2
Attachment not found
How to proceed?
- I am not sure if my approach is correct. Is there any other way, how to display buttons in this location, which will be responsive to gmoccapy.h-button.button-xy without editing gmoccapy.glade file?
- can I link this button created in gmoccapy.glade to custom *.py and postgui.hal file?
Please Log in or Create an account to join the conversation.
- newbynobi
-
- Offline
- Moderator
-

Less
More
- Posts: 1931
- Thank you received: 394
29 Oct 2021 20:22 #224672
by newbynobi
Replied by newbynobi on topic custom gmoccapy.h-button.button-2 in manual mode
This is only possible, if you first modify the gmoccapy.glade file to fit your needs and second edit the gmoccapy.py file to not modify your changes and add the control section for your buttons. It will be much easier, if you use an embedded panel and the halui pins to control cooling etc.
Norbert
Norbert
Please Log in or Create an account to join the conversation.
Moderators: newbynobi, HansU
Time to create page: 0.337 seconds