CNC Control Panel - Winter Project
- klopp
- Offline
- Senior Member
-

Less
More
- Posts: 45
- Thank you received: 33
22 Nov 2022 10:47 - 22 Nov 2022 10:48 #257316
by klopp
CNC Control Panel - Winter Project was created by klopp
Hello,
I got myself a new winter project and would love some of your feedback on it.
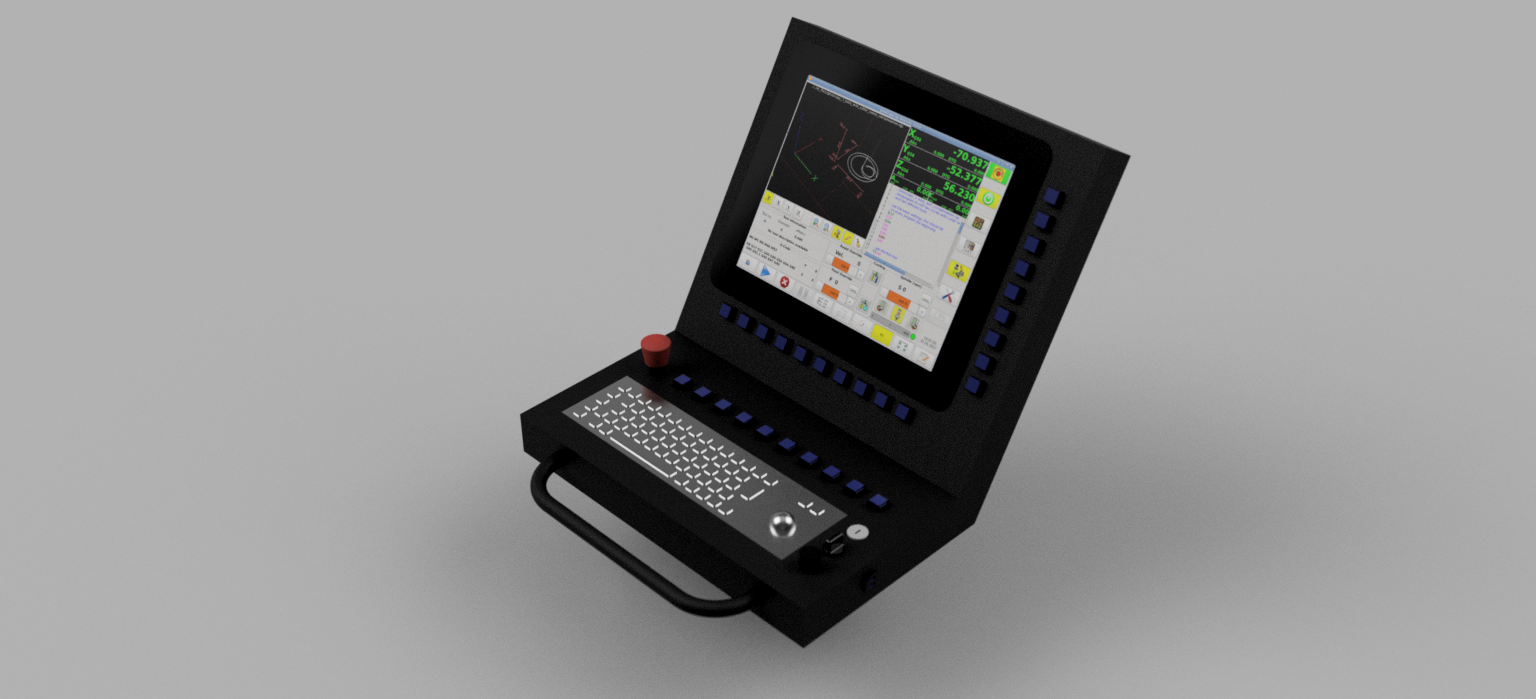
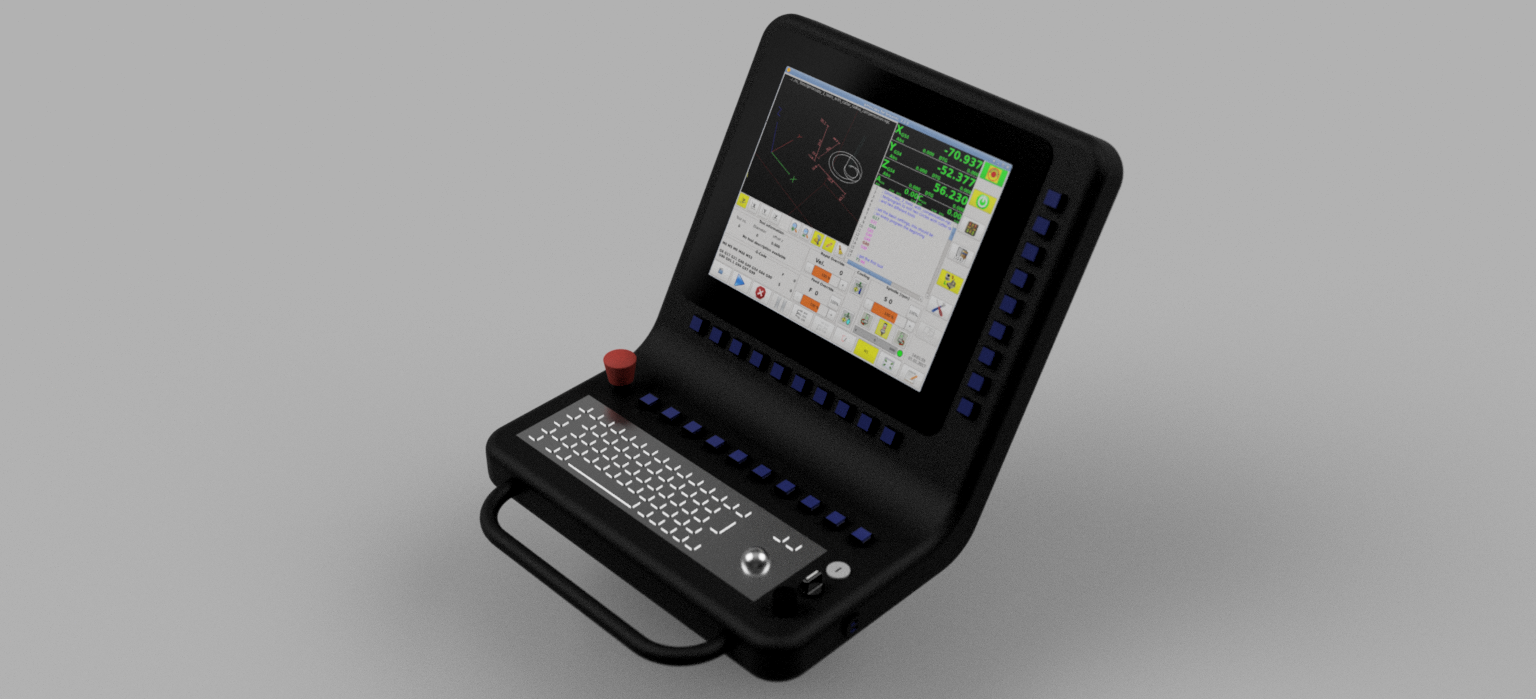
My "quick and dirty" control panel for my CNC never really got finished and now the touchscreen broke, too.
So I decided to design a completely new one.
I will build a few, as some of my friends really don't like their normal computer setup as control panel.
This means I will build a small series, so everything has to be cost effective.
Thats also the reason for the sharp corners, would love to have them round, but I think it will add a lot of extra cost.
The casing will be made out of aluminium.
The design is optimized for gmocappy, might create my own GUI later.
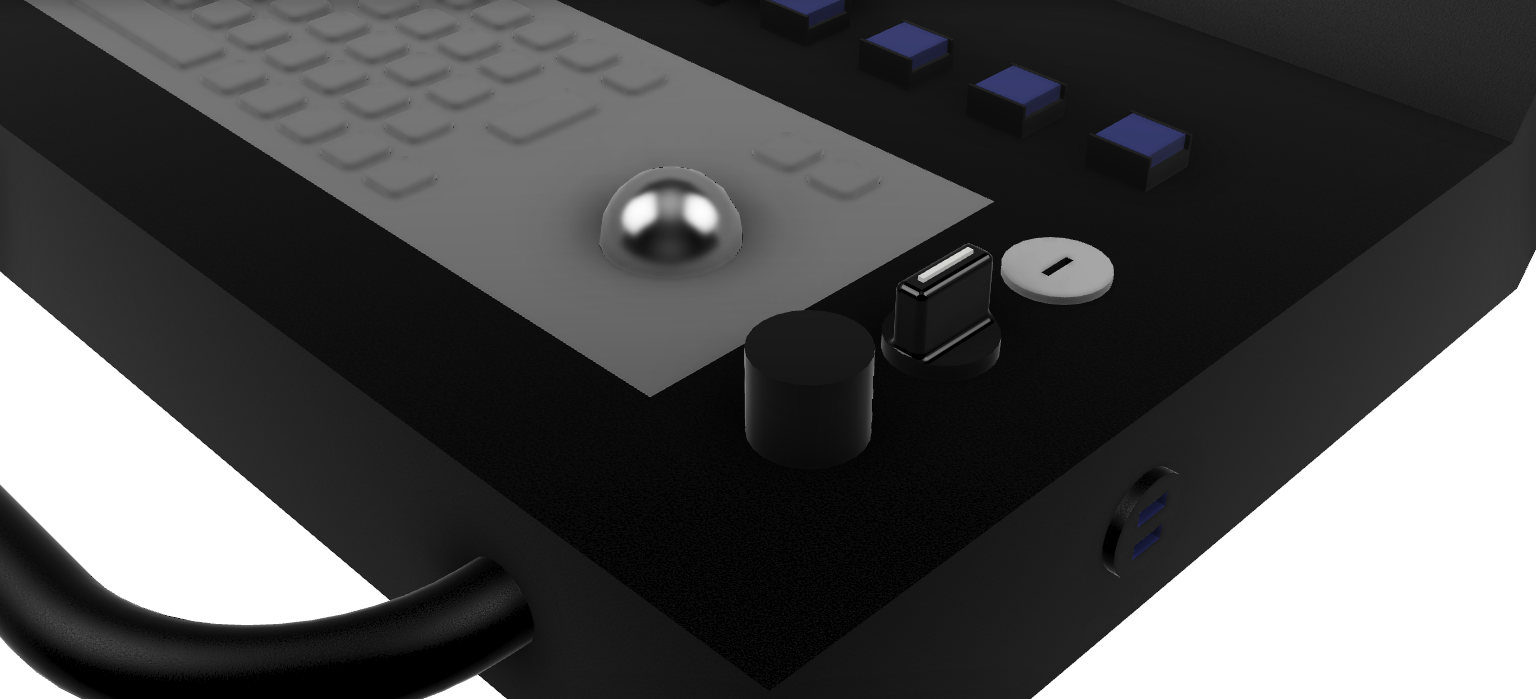
Enough switches so you can use the panel without touchscreen, some apparently don't like it, key switch is for locking the touchscreen.
The selector switch is used to switch between the overrides for the potentiometer.
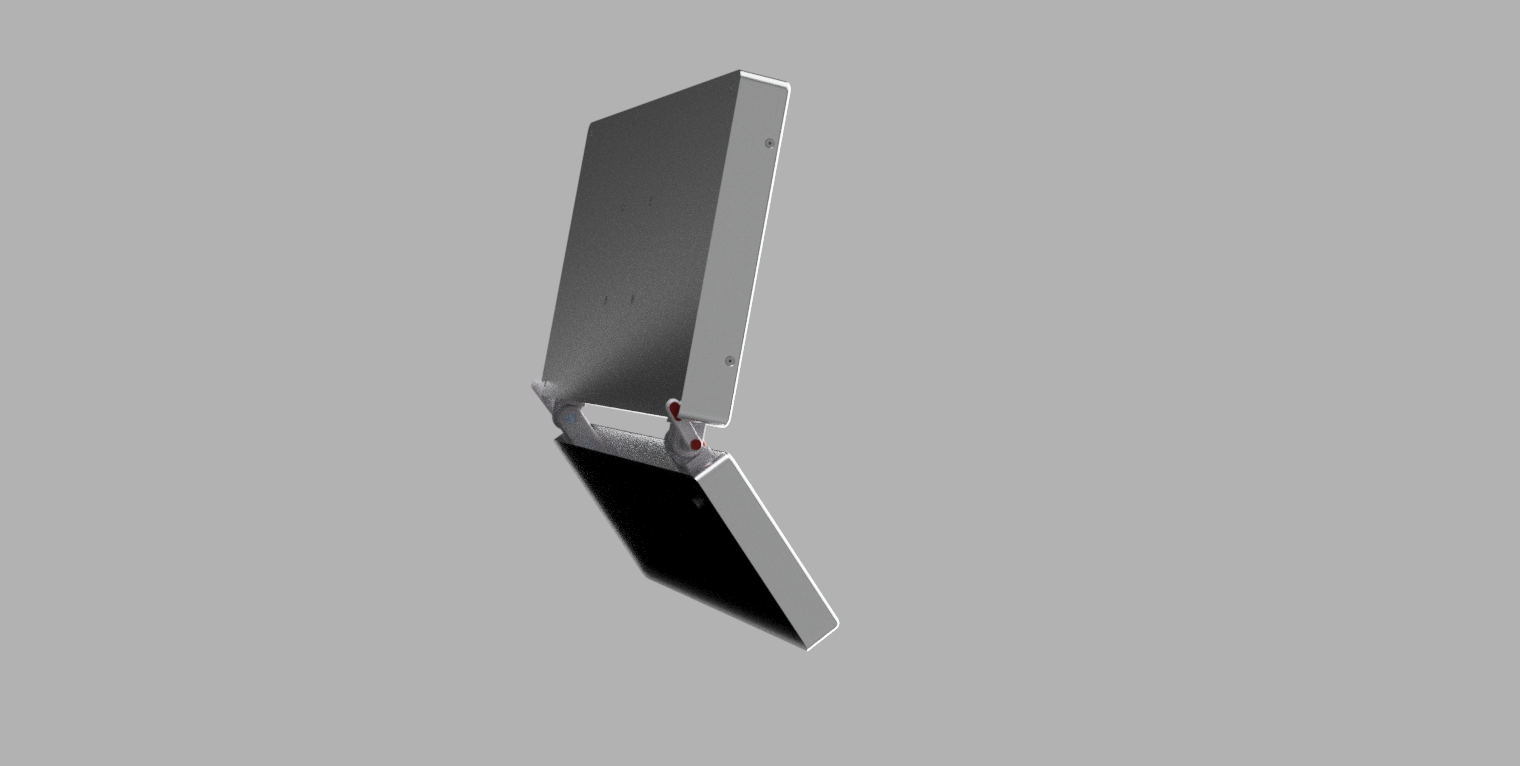
I came up with some first renders, let me know what you think and if I forgot something
I got myself a new winter project and would love some of your feedback on it.
My "quick and dirty" control panel for my CNC never really got finished and now the touchscreen broke, too.
So I decided to design a completely new one.
I will build a few, as some of my friends really don't like their normal computer setup as control panel.
This means I will build a small series, so everything has to be cost effective.
Thats also the reason for the sharp corners, would love to have them round, but I think it will add a lot of extra cost.
The casing will be made out of aluminium.
The design is optimized for gmocappy, might create my own GUI later.
Enough switches so you can use the panel without touchscreen, some apparently don't like it, key switch is for locking the touchscreen.
The selector switch is used to switch between the overrides for the potentiometer.
I came up with some first renders, let me know what you think and if I forgot something
Attachments:
Last edit: 22 Nov 2022 10:48 by klopp.
Please Log in or Create an account to join the conversation.
- tommylight
-

- Offline
- Moderator
-

Less
More
- Posts: 21738
- Thank you received: 7428
22 Nov 2022 12:01 #257324
by tommylight
Replied by tommylight on topic CNC Control Panel - Winter Project
Looks nice, thank you.
I might add, why so many buttons, and e-stop should be on the right side for right handed users but not a rule, humans are good at aiming with hands,
On the subject, i keep checking time after time shops that sell alu profiles for windows trying to find something usable for control panels, no luck so far, to big/wide, one sided, bulky, etc. Did find something that is barely usable but the space inside the frame is to narrow at under 4cm, so the only way of putting a monitor in is removing the shell and repositioning electronics, not easy with a 30 or 40 pin flat cable.
The search goes on...
Eager to see what you come up with.
Please Log in or Create an account to join the conversation.
- klopp
- Offline
- Senior Member
-
Less
More
- Posts: 45
- Thank you received: 33
22 Nov 2022 12:45 #257330
by klopp
Replied by klopp on topic CNC Control Panel - Winter Project
You are absolutely right about the estop, haven't thought of this, thank you!
There are 10 buttons to make the controller useable without the touchscreen.
Older people often have a problem with touchscreens, working with gloves doesn't work on a touchscreen etc.
Each button will be numbered 0-9 and will map to the buttons in the middle of the screen.
For example, in the MDI page the "spindle left" button will get a small (3) in it's corner. You can then turn spindle left either by touching on the screen or by pressing button nr 3. Hope this makes sense.
I will probably contact a few sheet metal companies and let them do the laser cutting and bending, just have to do some more research
The following user(s) said Thank You: tommylight
Please Log in or Create an account to join the conversation.
- HansU
-

- Offline
- Platinum Member
-

Less
More
- Posts: 723
- Thank you received: 217
22 Nov 2022 12:48 #257331
by HansU
Replied by HansU on topic CNC Control Panel - Winter Project
I would add some rotating knobs (potentiometers) for feed, rapid and spindle override.
And as Tommy already mentioned the buttons next to the screen should match the number of buttons in gmoccapy.
And as Tommy already mentioned the buttons next to the screen should match the number of buttons in gmoccapy.
Please Log in or Create an account to join the conversation.
- spumco
- Offline
- Platinum Member
-
Less
More
- Posts: 2126
- Thank you received: 882
22 Nov 2022 14:41 #257337
by spumco
Replied by spumco on topic CNC Control Panel - Winter Project
Very nice. Couple thoughts/suggestions (as I'm working on my own 3rd control panel revision)
Make sure you can easily get a nearly identical replacement monitor before committing to the enclosure. The good deal on ebay or Scamazon may bite you in the future if the touchscreen dies and you have to butcher the panel to fit something else. Don't ask me how I know about this...

Ditch the key switch for the touchscreen enable/disable. Keys get lost or broken off; just use a 2-pos selector and consider mounting it up high to the right of the screen. That switch likely won't be used frequently and it declutters the 'working' button/switch area. Keep 'admin' controls separated from 'CNC' controls.
One rotary encoder plus a selector switch can do the function of multiple encoders/pots. Selector can have SRO/FRO/RRO/MVO. Or you could even use an MPG handwheel and tie all the overrides to it plus axis jogs. (like the Haas MPG) Once I realized there was never going to be a situation where i needed to instantly adjust multiple overrides at once, I decided to do this on mine.
Selector & encoder knobs - round ones with a little line are compact & tidy looking, but a 'chicken-head' type with physical pointer makes it easy to know the position without looking at it.
Trackball - nice, but make sure it's easily removable without pulling the keyboard out of the panel. They get dirty. I hate trackpads but they're certainly dirt-friendly compared to mice and trackballs.
USB port - don't mount it low on the side or front. We all drop stuff (tools, coffee cups, etc.) and you don't want to snap off a thumb drive. Up high on the side would be more protected.
Another personal preference - a couple of dedicated "Oh crap!!!" buttons are nice. Feed hold, 5% rapids, cycle stop, etc. physical buttons are nice rather than fumbling for the trackball or on-screen controls. Some of these may not be needed based on your GUI choice.
Make sure you can easily get a nearly identical replacement monitor before committing to the enclosure. The good deal on ebay or Scamazon may bite you in the future if the touchscreen dies and you have to butcher the panel to fit something else. Don't ask me how I know about this...
Ditch the key switch for the touchscreen enable/disable. Keys get lost or broken off; just use a 2-pos selector and consider mounting it up high to the right of the screen. That switch likely won't be used frequently and it declutters the 'working' button/switch area. Keep 'admin' controls separated from 'CNC' controls.
One rotary encoder plus a selector switch can do the function of multiple encoders/pots. Selector can have SRO/FRO/RRO/MVO. Or you could even use an MPG handwheel and tie all the overrides to it plus axis jogs. (like the Haas MPG) Once I realized there was never going to be a situation where i needed to instantly adjust multiple overrides at once, I decided to do this on mine.
Selector & encoder knobs - round ones with a little line are compact & tidy looking, but a 'chicken-head' type with physical pointer makes it easy to know the position without looking at it.
Trackball - nice, but make sure it's easily removable without pulling the keyboard out of the panel. They get dirty. I hate trackpads but they're certainly dirt-friendly compared to mice and trackballs.
USB port - don't mount it low on the side or front. We all drop stuff (tools, coffee cups, etc.) and you don't want to snap off a thumb drive. Up high on the side would be more protected.
Another personal preference - a couple of dedicated "Oh crap!!!" buttons are nice. Feed hold, 5% rapids, cycle stop, etc. physical buttons are nice rather than fumbling for the trackball or on-screen controls. Some of these may not be needed based on your GUI choice.
The following user(s) said Thank You: tommylight
Please Log in or Create an account to join the conversation.
- klopp
- Offline
- Senior Member
-
Less
More
- Posts: 45
- Thank you received: 33
29 Dec 2023 22:52 #289343
by klopp
Replied by klopp on topic CNC Control Panel - Winter Project
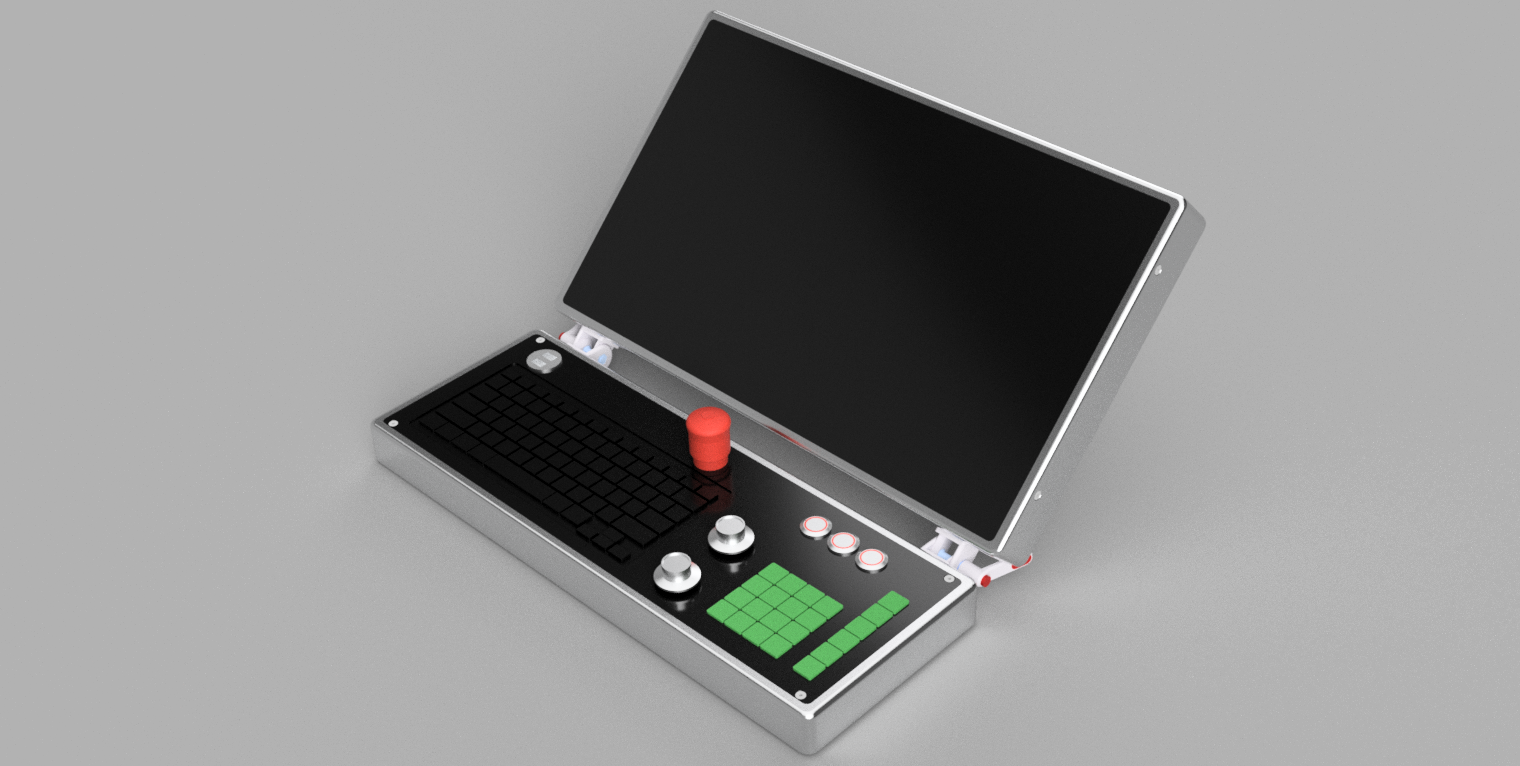
A whole year has gone by, but the need for a new HMI is still there.
I know a few people that also need one, so I had to change my plans to be more production friendly.
The old plan
The idea in my initial post was to use sheet metal for the whole enclosure. There are a few problems with this approach:
1. It's not as easy/cheap to manufacture as I first thought
2. It leaves gaps at the edges that would need to be filled
3. It's not very rigid (depends on the thickness ofc)
4. I need some maintenance/mounting openings which would make that design even more wobbly
As this thing is used by more people than just me, I want to make the keyboard/screen angle adjustable to different preferences. So the HMI will consist of 2 parts.
The new plan
The new approach is to use a milled frame out of aluminium. Each frame consisting out of 4 parts (top, left, bottom, right) connected via dowel pins and held together by the top and bottom plane.
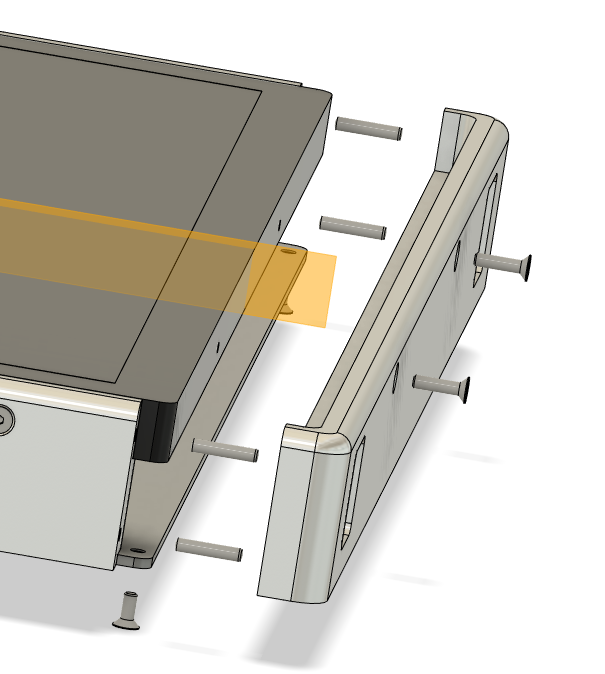
I hope that this will be a lot more stable and also have a higher quality feel.
Only downside is that the top and bottom parts need to be around 55cm long (because of the screen) and my mill only has a travel of 42cm. A first prototype machined in 2 clampings was a lot of work and also didn't turn out so nice, so I probably have to outsource this. Might also be a good reason to get another milling machine")

I also thought about 3D printing the frame, but metal looks and feels way nicee than plastic I think. Also more suited for an "industrial environment".
For the screen I'm using a 22" iiyama touchscreen. It's quite expensive (450€) but looks great and I'm not depending on some random chinese supplier.
Control layout
For the layout of the controls, I also made some changes.
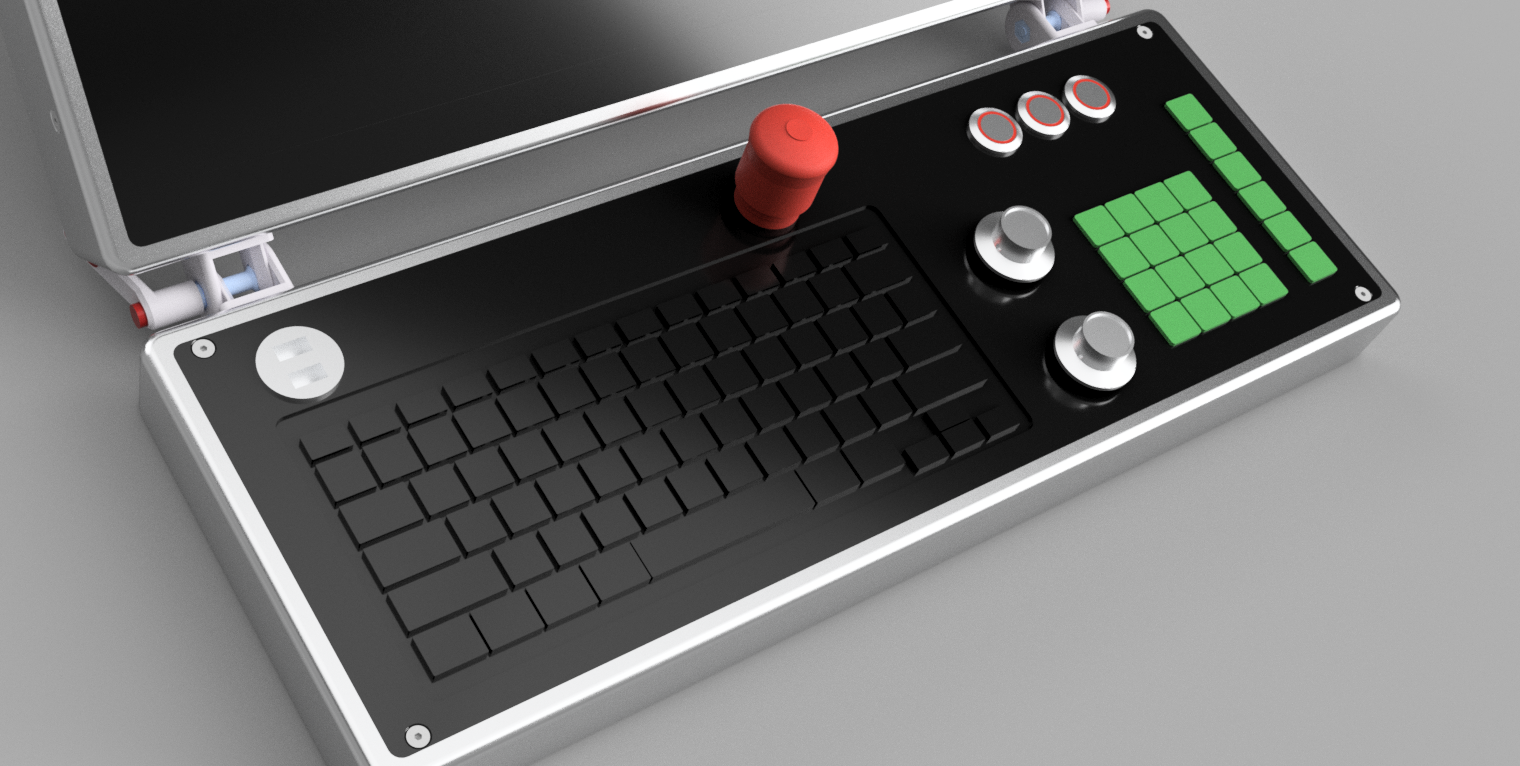
First of all, I ditched the trackball. It's main use would be when you can't use the touchscreen, for example because you are wearing gloves.
In that case, a trackball would get dirty even quicker and no one will probably dismount it every few days to clean it.
A trackpad is also useless when wearing gloves.
The new idea is to use a normal mouse with a "tray" that can be attached to the side of the HMI if needed. Otherwise, it's just touchscreen and function keys, no mouse.
The touchscreen "on/off" switch is also gone for now. If you really need to turn it off, you can just unplug the USB cable. A switch is needed too infrequently to put engineering time into it, atleast for this first version.
I want to use 2 rotary encoders, I think 3 is a bit overkill as I never use the spindle override, but rapid feed and normal feed is nice to have.
I'm using encoders instead of potentiometers, so I can override them via the touchscreen. I'm using buttons instead of switches for the same reason.
A block of 16 function keys + a column of 6 additional keys should be enough. I want to use low profile mx switches for them, so they have a similar feel like a normal keyboard. Each key has it's own WS2812B LED, so I can light them up in every color using software.
The keys directly next to the screen are gone. Reason being that I don't like the look and using GUIs other than gmoccapy would probably render them useless anyway. It's also more effort on the manufacturing side.
The emergency stop is now placed directly in the middle. That way left and right handed people should be able to access it fast, as mentioned by tommylight.
Spindle Left/Stop/Right are bigger physical buttons (with LEDs), you need them all the time.
The final part is the actual keyboard. I was first thinking about a custom PCB and I already made a prototype. The advantage is that you can decide on the switches and on the placement of the keys.
However it also has several downsides. It's way more effort to assemble and solder the keyboard. You don't just need the switches, but also a microcontroller that needs programming, keycaps, stabilizers etc. It's also way more expensive than some amazon keyboard.
Now I'm planning on just using a low profile keyboard off amazon, remove the top and integrate it into the top plate.
I don't like that the panel won't be waterproof, but I guess I don't have a choice there.
I hope with the new plan I can come up with a real prototype faster, I also have way more time now than last year.
I know a few people that also need one, so I had to change my plans to be more production friendly.
The old plan
The idea in my initial post was to use sheet metal for the whole enclosure. There are a few problems with this approach:
1. It's not as easy/cheap to manufacture as I first thought
2. It leaves gaps at the edges that would need to be filled
3. It's not very rigid (depends on the thickness ofc)
4. I need some maintenance/mounting openings which would make that design even more wobbly
As this thing is used by more people than just me, I want to make the keyboard/screen angle adjustable to different preferences. So the HMI will consist of 2 parts.
The new plan
The new approach is to use a milled frame out of aluminium. Each frame consisting out of 4 parts (top, left, bottom, right) connected via dowel pins and held together by the top and bottom plane.
I hope that this will be a lot more stable and also have a higher quality feel.
Only downside is that the top and bottom parts need to be around 55cm long (because of the screen) and my mill only has a travel of 42cm. A first prototype machined in 2 clampings was a lot of work and also didn't turn out so nice, so I probably have to outsource this. Might also be a good reason to get another milling machine
I also thought about 3D printing the frame, but metal looks and feels way nicee than plastic I think. Also more suited for an "industrial environment".
For the screen I'm using a 22" iiyama touchscreen. It's quite expensive (450€) but looks great and I'm not depending on some random chinese supplier.
Control layout
For the layout of the controls, I also made some changes.
First of all, I ditched the trackball. It's main use would be when you can't use the touchscreen, for example because you are wearing gloves.
In that case, a trackball would get dirty even quicker and no one will probably dismount it every few days to clean it.
A trackpad is also useless when wearing gloves.
The new idea is to use a normal mouse with a "tray" that can be attached to the side of the HMI if needed. Otherwise, it's just touchscreen and function keys, no mouse.
The touchscreen "on/off" switch is also gone for now. If you really need to turn it off, you can just unplug the USB cable. A switch is needed too infrequently to put engineering time into it, atleast for this first version.
I want to use 2 rotary encoders, I think 3 is a bit overkill as I never use the spindle override, but rapid feed and normal feed is nice to have.
I'm using encoders instead of potentiometers, so I can override them via the touchscreen. I'm using buttons instead of switches for the same reason.
A block of 16 function keys + a column of 6 additional keys should be enough. I want to use low profile mx switches for them, so they have a similar feel like a normal keyboard. Each key has it's own WS2812B LED, so I can light them up in every color using software.
The keys directly next to the screen are gone. Reason being that I don't like the look and using GUIs other than gmoccapy would probably render them useless anyway. It's also more effort on the manufacturing side.
The emergency stop is now placed directly in the middle. That way left and right handed people should be able to access it fast, as mentioned by tommylight.
Spindle Left/Stop/Right are bigger physical buttons (with LEDs), you need them all the time.
The final part is the actual keyboard. I was first thinking about a custom PCB and I already made a prototype. The advantage is that you can decide on the switches and on the placement of the keys.
However it also has several downsides. It's way more effort to assemble and solder the keyboard. You don't just need the switches, but also a microcontroller that needs programming, keycaps, stabilizers etc. It's also way more expensive than some amazon keyboard.
Now I'm planning on just using a low profile keyboard off amazon, remove the top and integrate it into the top plate.
I don't like that the panel won't be waterproof, but I guess I don't have a choice there.
I hope with the new plan I can come up with a real prototype faster, I also have way more time now than last year.
Attachments:
The following user(s) said Thank You: besriworld, spumco
Please Log in or Create an account to join the conversation.
- blazini36
- Offline
- Platinum Member
-
Less
More
- Posts: 972
- Thank you received: 167
30 Dec 2023 23:53 #289400
by blazini36
Replied by blazini36 on topic CNC Control Panel - Winter Project
I like the first one better, too many concessions on the 2nd one and I think the trackball is a good idea. It always kinda surprises me that nobody sells a "ready made" control panel that the user can wire up and throw some electronics into. Trying to find a suitable panel keyboard and stuff like that is the biggest problem.
Please Log in or Create an account to join the conversation.
- spumco
- Offline
- Platinum Member
-
Less
More
- Posts: 2126
- Thank you received: 882
31 Dec 2023 04:17 #289410
by spumco
Replied by spumco on topic CNC Control Panel - Winter Project
@klopp,
Very nice, can't wait to see it done.
Couple of thoughts if you're interested:
Good luck and thanks for the pics & update. Always enjoy seeing what other folks come up with.
Very nice, can't wait to see it done.
Couple of thoughts if you're interested:
- Estop - looks like it sticks up a bit. Locating it in the middle of the keyboard panel may interfere with reaching up to touch something at the bottom of the screen. One of those things that's hard to tell until you actually install it and it gets annoying (or doesn't).
- Overrides - if you're set on 2 (not 3), you can use LCNC's mux component to switch functions between RRO/SRO/FRO/JRO (either with an on-screen or hardware button). Maybe leave the FRO dedicated and the other one might be a multi-function encoder.
- Keyboard - if you want a waterproof, rubberized keyboard to get started with they're available. I found a company called "iKey" makes a line of panel-mountable wired & wireless keyboards for industrial use. They're pricey new, but lots of nice used ones on ebay.
- The one in particular I've installed on both my machines is an SB-97-TP. Like all rubberized keyboards typing is miserable, but it's backlit and seems to be resistant to coolant & oil so far. This one isn't designed for panel-mounting, but the rubber overlay forms a slight lip which makes it flush with a thin panel if the opening is just right.
- iKey has a wide range of shapes/sizes and they publish specs & dimensional drawings which makes integration in a panel much less of a gamble.
- Mouse
- I've got a mouse on one of my lathes, and it's not great. Machine vibrations cause it to walk off the 'tray' after a while. I should make a little lip to trap it one of these days.
- In addition the trackpad on my mill, I also rigged up a side tray with a thumb-type trackball. It doesn't seem to get as nasty as a whole-hand trackball and it also doesn't walk around like a mouse does.
Good luck and thanks for the pics & update. Always enjoy seeing what other folks come up with.
The following user(s) said Thank You: tommylight
Please Log in or Create an account to join the conversation.
- klopp
- Offline
- Senior Member
-
Less
More
- Posts: 45
- Thank you received: 33
24 Jan 2024 12:37 #291512
by klopp
Replied by klopp on topic CNC Control Panel - Winter Project
Okay some time has passed and I finally got to assemble and test my prototype for the function keys.
It uses an ATMega32U4 controller to control the RGB LEDs, encoders and keys via USB-C.
The plan is to keep the main keyboard separate from the function keys and read them via the hal_input module.

This is only a simple prototype to test functionality, as I knew I'd be making some mistakes anyway. Footprints for the keys were mirrored, used 5V instead of GND for the inputs and some other minor mistakes.
I fixed those mistakes and already ordered an improved PCB + parts.
There is still some work to do to be able to connect a handwheel, but I don't have enough IOs left on the ATMega, so I will probably need an IO expander and connect that via I²C.
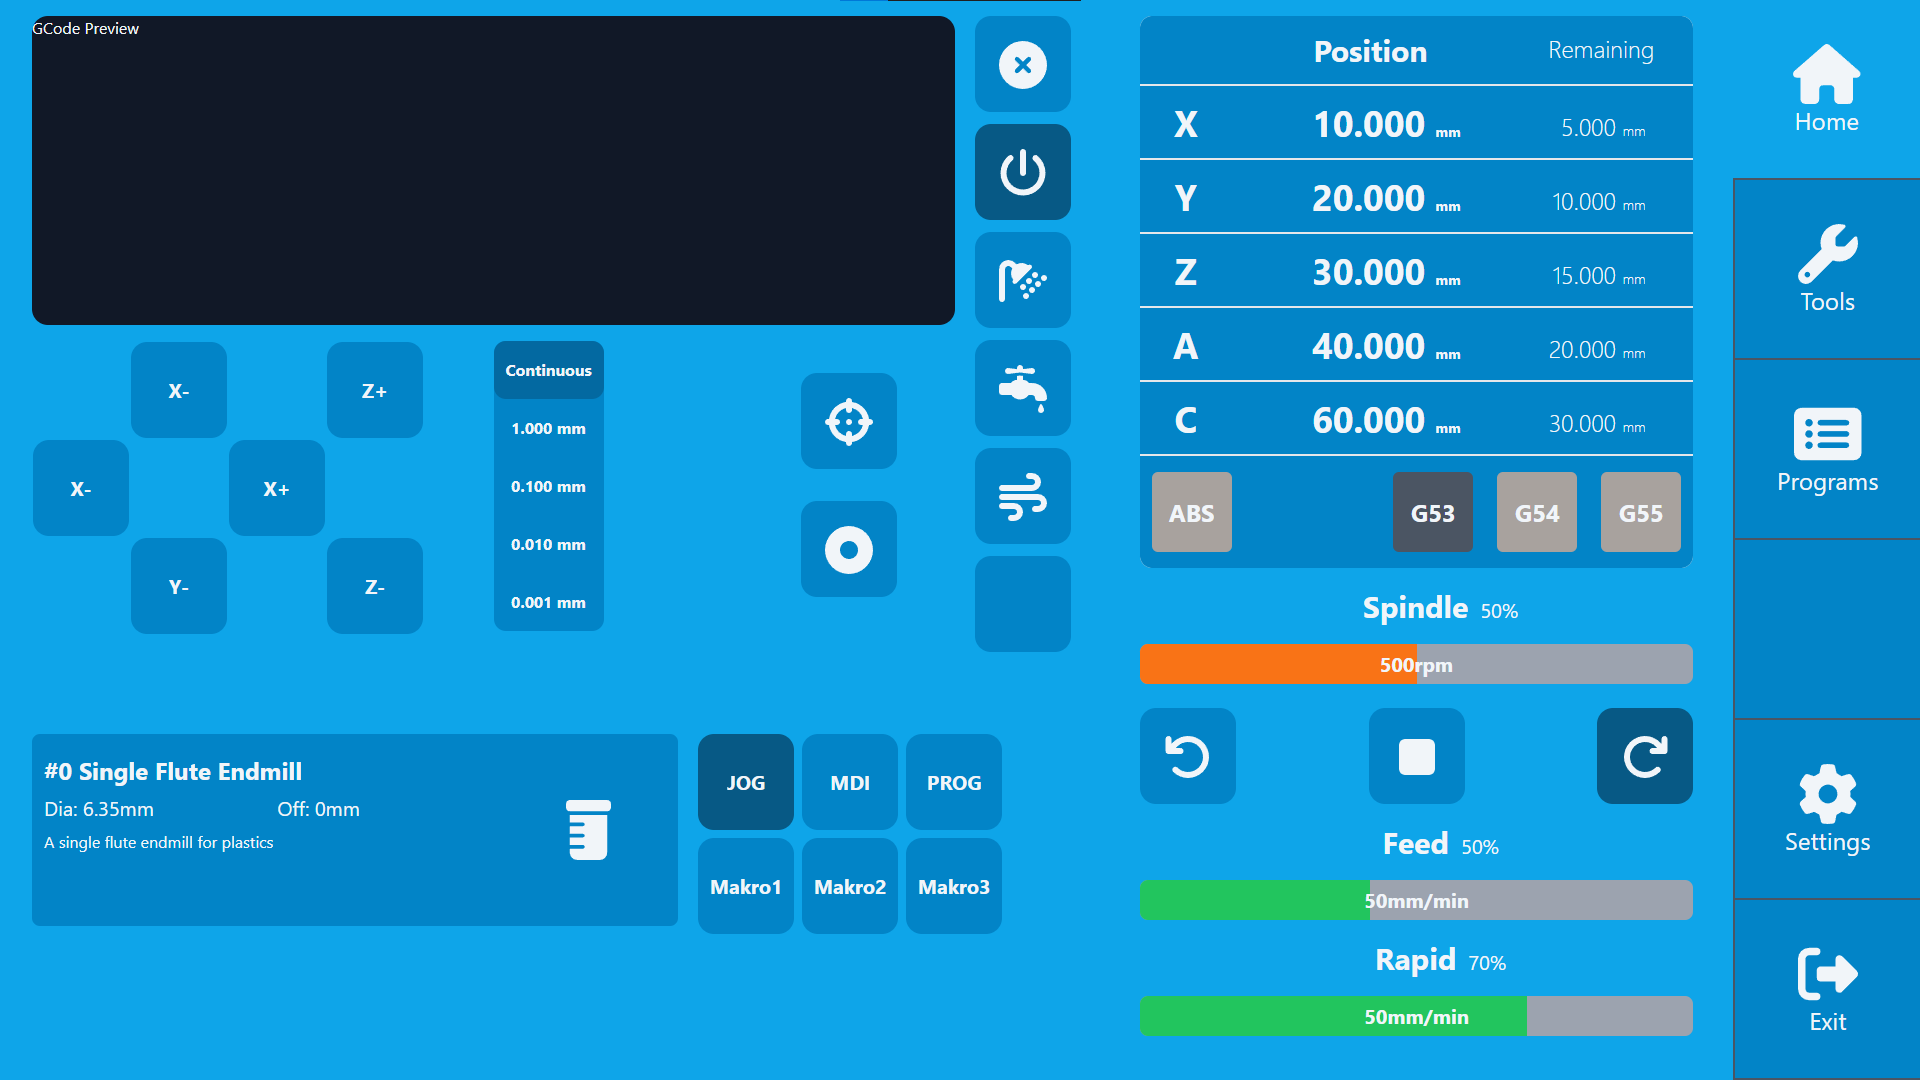
I'm also working on a new GUI concept to be used with the HMI. That's also part of the reason I went away from the "gmoccapy concept" with the buttons on the side.
While gmoccapy is very reliable and thought through, it also looks a bit outdated in my opinion. I know some people like the "functional approach" and I'm not really good at design myself, but here is a little preview of my implementation:
@spumco thank you very much for your feedback!
For the Estop you're right, but I guess I have to see it live to check if it really matters, changing it afterwards is not a big problem however.
The iKey keyboards look good, but 300€ for a used one is way to expensive for me. I could probably pour some silicone shell for my 10€ keyboard, but looking inside seems like it's not really prone to water damage anyway. Just some flexible PCB and a controller which is shielded pretty good.
For the mouse, I think it's just personal preference. I have one on my current setup and I really like it. Vibration has never been an issue for me but could cause problems on some other mills and lathes, I will keep that in mind.
It uses an ATMega32U4 controller to control the RGB LEDs, encoders and keys via USB-C.
The plan is to keep the main keyboard separate from the function keys and read them via the hal_input module.
This is only a simple prototype to test functionality, as I knew I'd be making some mistakes anyway. Footprints for the keys were mirrored, used 5V instead of GND for the inputs and some other minor mistakes.
I fixed those mistakes and already ordered an improved PCB + parts.
There is still some work to do to be able to connect a handwheel, but I don't have enough IOs left on the ATMega, so I will probably need an IO expander and connect that via I²C.
I'm also working on a new GUI concept to be used with the HMI. That's also part of the reason I went away from the "gmoccapy concept" with the buttons on the side.
While gmoccapy is very reliable and thought through, it also looks a bit outdated in my opinion. I know some people like the "functional approach" and I'm not really good at design myself, but here is a little preview of my implementation:
@spumco thank you very much for your feedback!
For the Estop you're right, but I guess I have to see it live to check if it really matters, changing it afterwards is not a big problem however.
The iKey keyboards look good, but 300€ for a used one is way to expensive for me. I could probably pour some silicone shell for my 10€ keyboard, but looking inside seems like it's not really prone to water damage anyway. Just some flexible PCB and a controller which is shielded pretty good.
For the mouse, I think it's just personal preference. I have one on my current setup and I really like it. Vibration has never been an issue for me but could cause problems on some other mills and lathes, I will keep that in mind.
Attachments:
The following user(s) said Thank You: tommylight, tivoi, spumco, TimP
Please Log in or Create an account to join the conversation.
- TimP
- Offline
- Senior Member
-
Less
More
- Posts: 68
- Thank you received: 9
25 Jan 2024 10:40 #291587
by TimP
Replied by TimP on topic CNC Control Panel - Winter Project
i really like UI design, good color scheme and simple stylish icons
Please Log in or Create an account to join the conversation.
Time to create page: 0.726 seconds