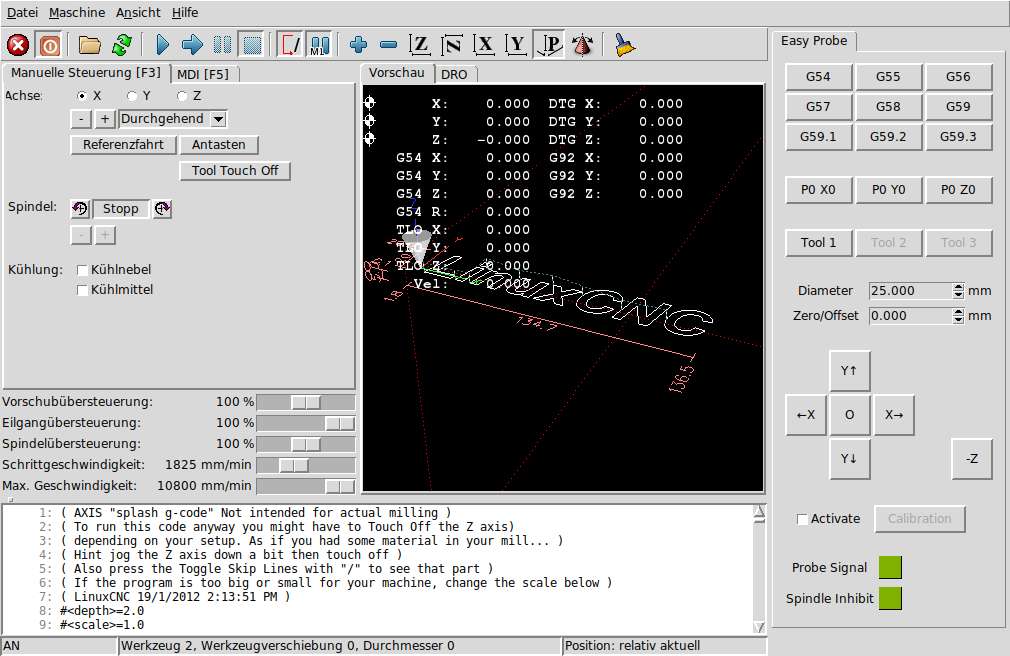
Probe panel for Axis GUI
- Tilman
- Offline
- New Member
-

Less
More
- Posts: 5
- Thank you received: 7
01 May 2023 18:16 #270418
by Tilman
Probe panel for Axis GUI was created by Tilman
Hi,
some weeks ago we decided to write a simple probe add-in that works regardless of the LinuxCNC version you use. The panel itself is a simple PyVCP which calls the macros through the halui section of your ini file. In other words: It's not more than a few lines XML and some nc files.
We tried to keep it as simple as possible so there is not much more than the basic functions of a probe add-in. You can use up to three different probe tools which needs to be added to your tool table since the calibration will store the data in the tool table, too. As long as any of the probe tools is active, spindle-inhibit is true so there is no risk of spooling your probe wire by accidently pusing the wrong button while probing.
All hal components are loaded in a seperate hal file so als you need to edit at your running configuration are a few lines of your ini.
Download: github.com/hausen8/EasyProbe
Screenshot of the probe panel:
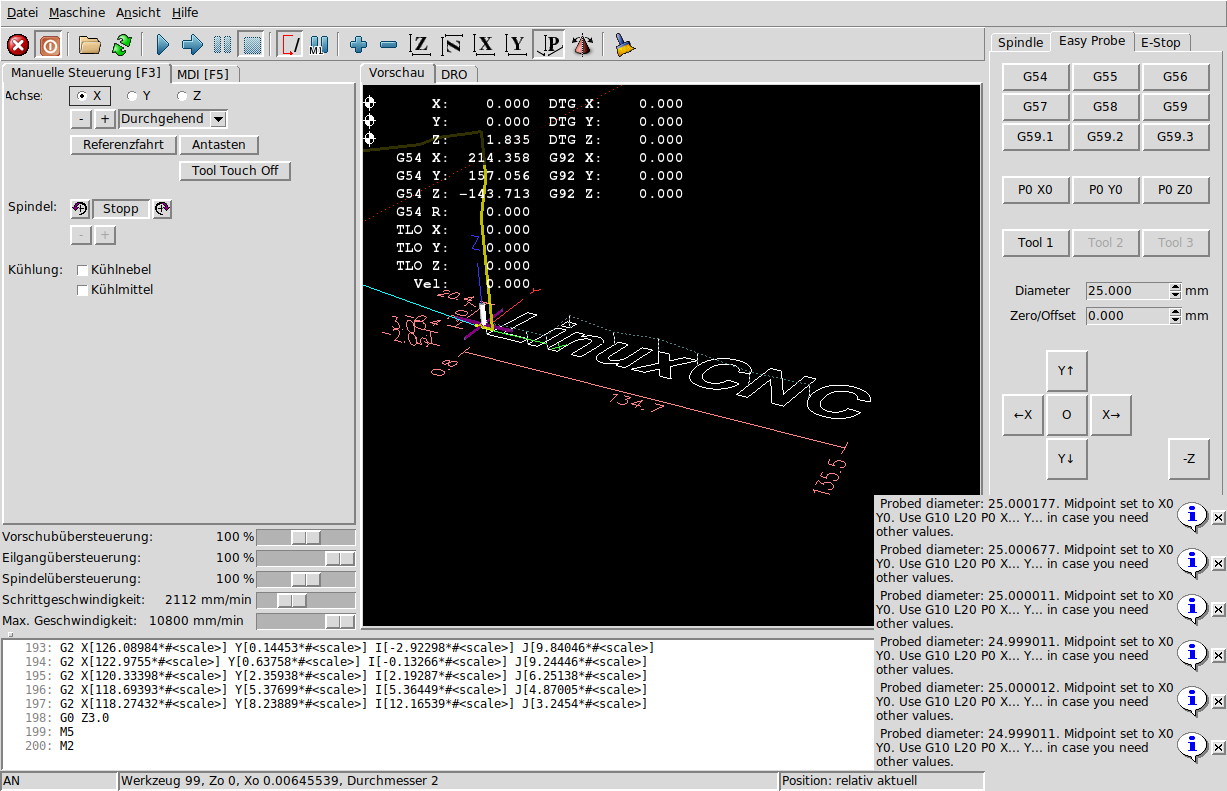
Repeat accuracy of probing the ring gauge after calibration:
Regards,
Tilman
some weeks ago we decided to write a simple probe add-in that works regardless of the LinuxCNC version you use. The panel itself is a simple PyVCP which calls the macros through the halui section of your ini file. In other words: It's not more than a few lines XML and some nc files.
We tried to keep it as simple as possible so there is not much more than the basic functions of a probe add-in. You can use up to three different probe tools which needs to be added to your tool table since the calibration will store the data in the tool table, too. As long as any of the probe tools is active, spindle-inhibit is true so there is no risk of spooling your probe wire by accidently pusing the wrong button while probing.
All hal components are loaded in a seperate hal file so als you need to edit at your running configuration are a few lines of your ini.
Download: github.com/hausen8/EasyProbe
Screenshot of the probe panel:
Repeat accuracy of probing the ring gauge after calibration:
Regards,
Tilman
Attachments:
The following user(s) said Thank You: tommylight, 0x2102, cakeslob, petmakris, smc.collins, Vector, ckuecker
Please Log in or Create an account to join the conversation.
- juliankoenig87
- Offline
- Premium Member
-

Less
More
- Posts: 119
- Thank you received: 55
02 May 2023 07:21 - 02 May 2023 07:25 #270453
by juliankoenig87
Replied by juliankoenig87 on topic Probe panel for Axis GUI
Hey Tilman,
hi everyone,
I would like to add some information. My part of this little project are/was to write the macros. We had some goals:
1) As Tilman mentioned. As easy as possible. On the one hand to implement and be sure that it will work in the future (no python). And on the other hand to be sure to be able to use it in the middle of the night")
2) Put any relevant parameter into the ini. This is because any change of some parameters will change the probe results. There is no need to change for example the probing speeds on the fly.
3) Save every calibration data to a save place. So I experimented al lot. Use a file and include it to the ini. Use parameters and made them persistent. In the end the tooltable is the best place in my opinion. Ofsets and ranges (x/y). I borrowed the lathe parameter I and J for the ranges.
4) Make a real calibration. So all 4 triggerpoints got recognized by the calibration macro. No need for manual tuning the runout and compensation of the (normally 120 degree) mechanic of the probe. For this a 180 degree rotation in the calibration is necessary. But no worry. As long as your runout is smaller than 0.1 mm you just need to hit the angle by 10 degrees. Eyeballing is sufficient. Otherwise you need some kind a of a stop for the rotational position.
In the end I checked the normal available probe macros. So Probe screen V1/V2 and NG. And also probe basic. In the end I decided to use the probe basic macros as a starting point. But I changed a lot
So if you have questions feel free to ask here or in the github.
Regards
Julian
hi everyone,
I would like to add some information. My part of this little project are/was to write the macros. We had some goals:
1) As Tilman mentioned. As easy as possible. On the one hand to implement and be sure that it will work in the future (no python). And on the other hand to be sure to be able to use it in the middle of the night
2) Put any relevant parameter into the ini. This is because any change of some parameters will change the probe results. There is no need to change for example the probing speeds on the fly.
3) Save every calibration data to a save place. So I experimented al lot. Use a file and include it to the ini. Use parameters and made them persistent. In the end the tooltable is the best place in my opinion. Ofsets and ranges (x/y). I borrowed the lathe parameter I and J for the ranges
.4) Make a real calibration. So all 4 triggerpoints got recognized by the calibration macro. No need for manual tuning the runout and compensation of the (normally 120 degree) mechanic of the probe. For this a 180 degree rotation in the calibration is necessary. But no worry. As long as your runout is smaller than 0.1 mm you just need to hit the angle by 10 degrees. Eyeballing is sufficient. Otherwise you need some kind a of a stop for the rotational position.
In the end I checked the normal available probe macros. So Probe screen V1/V2 and NG. And also probe basic. In the end I decided to use the probe basic macros as a starting point. But I changed a lot
So if you have questions feel free to ask here or in the github.
Regards
Julian
Last edit: 02 May 2023 07:25 by juliankoenig87.
The following user(s) said Thank You: tommylight, 0x2102, Donno, Vector
Please Log in or Create an account to join the conversation.
- ckuecker
- Offline
- Senior Member
-

Less
More
- Posts: 42
- Thank you received: 2
13 Nov 2023 18:39 #285295
by ckuecker
Replied by ckuecker on topic Probe panel for Axis GUI
Hello,
I've been trying to get the probe working on my router. Followed the instructions for the probe panel - I got the panel to appear, but no probe indicator. Figured out the problem there - but now, I get this error when I start.
RUN_IN_PLACE=no
LINUXCNC_DIR=
LINUXCNC_BIN_DIR=/usr/bin
LINUXCNC_TCL_DIR=/usr/lib/tcltk/linuxcnc
LINUXCNC_SCRIPT_DIR=
LINUXCNC_RTLIB_DIR=/usr/lib/linuxcnc/modules
LINUXCNC_CONFIG_DIR=
LINUXCNC_LANG_DIR=/usr/lib/tcltk/linuxcnc/msgs
INIVAR=inivar
HALCMD=halcmd
LINUXCNC_EMCSH=/usr/bin/wish8.6
LINUXCNC - 2.10.0~pre0
Machine configuration directory is '/home/cnc/linuxcnc/configs'
Machine configuration file is 'CNC1.ini'
INIFILE=/home/cnc/linuxcnc/configs/CNC1.ini
VERSION=1.1
PARAMETER_FILE=linuxcnc.var
TPMOD=
HOMEMOD=
TASK=milltask
HALUI=halui
DISPLAY=axis
COORDINATES=XYZ
KINEMATICS=trivkins coordinates=XYZ
Starting LinuxCNC...
Starting LinuxCNC server program: linuxcncsvr
task: machine: 'CNC1' version 'unknown'
after iniLoad()
emcCommandChannel==NULL, attempt to create
emcStatusChannel==NULL, attempt to create
Loading Real Time OS, RTAPI, and HAL_LIB modules
linuxcnc TPMOD=tpmod HOMEMOD=homemod EMCMOT=motmod
Starting TASK program: milltask
task: machine: 'CNC1' version 'unknown'
Starting HAL User Interface program: halui
task: machine: 'CNC1' version 'unknown'
twopass:invoked with <> options
twopass:found ./CNC1.hal
twopass:found ./custom.hal
USRMOT: ERROR: command 30 timeout
emcMotionInit: emcTrajInit failed
Starting DISPLAY program: axis
Shutting down and cleaning up LinuxCNC...
Running HAL shutdown script
task: 0 cycles, min=0.000018, max=0.025908, avg=-1.000000, 0 latency excursions (> 10x expected cycle time of 0.010000s)
hm2: loading Mesa HostMot2 driver version 0.15
hm2_eth: loading Mesa AnyIO HostMot2 ethernet driver version 0.2
hm2_eth: 192.168.1.121: INFO: Hardware address (MAC): 00:60:1b:16:86:a2
hm2_eth: discovered 7I96S
hm2/hm2_7i96s.0: Low Level init 0.15
hm2/hm2_7i96s.0: Smart Serial Firmware Version 43
hm2/hm2_7i96s.0: 51 I/O Pins used:
hm2/hm2_7i96s.0: IO Pin 000 (TB3-01): InM Input Module #0, pin in0,enca0 (Input)
hm2/hm2_7i96s.0: IO Pin 001 (TB3-02): InM Input Module #0, pin in1,encb0 (Input)
hm2/hm2_7i96s.0: IO Pin 002 (TB3-03): InM Input Module #0, pin in2,enca1 (Input)
hm2/hm2_7i96s.0: IO Pin 003 (TB3-04): InM Input Module #0, pin in3,encb1 (Input)
hm2/hm2_7i96s.0: IO Pin 004 (TB3-05): InM Input Module #0, pin in4,enca2 (Input)
hm2/hm2_7i96s.0: IO Pin 005 (TB3-06): InM Input Module #0, pin in5,encb2 (Input)
hm2/hm2_7i96s.0: IO Pin 006 (TB3-07): InM Input Module #0, pin in6,enca3 (Input)
hm2/hm2_7i96s.0: IO Pin 007 (TB3-08): InM Input Module #0, pin in7,encb3 (Input)
hm2/hm2_7i96s.0: IO Pin 008 (TB3-09): InM Input Module #0, pin in8 (Input)
hm2/hm2_7i96s.0: IO Pin 009 (TB3-10): InM Input Module #0, pin in9 (Input)
hm2/hm2_7i96s.0: IO Pin 010 (TB3-11): InM Input Module #0, pin in10 (Input)
hm2/hm2_7i96s.0: IO Pin 011 (TB3-13/TB3-14): SSR #0, pin Out-00 (Output)
hm2/hm2_7i96s.0: IO Pin 012 (TB3-15/TB3-16): SSR #0, pin Out-01 (Output)
hm2/hm2_7i96s.0: IO Pin 013 (TB3-17/TB3-18): SSR #0, pin Out-02 (Output)
hm2/hm2_7i96s.0: IO Pin 014 (TB3-19/TB3-20): SSR #0, pin Out-03 (Output)
hm2/hm2_7i96s.0: IO Pin 015 (TB3-21/TB3-22): OutM Output Module #0, pin Out-04 (Output)
hm2/hm2_7i96s.0: IO Pin 016 (TB3-23/TB3-24): OutM Output Module #0, pin Out-05 (Output)
hm2/hm2_7i96s.0: IO Pin 017 (TB1-02/TB1-03): StepGen #0, pin Step (Output)
hm2/hm2_7i96s.0: IO Pin 018 (TB1-04/TB1-05): StepGen #0, pin Direction (Output)
hm2/hm2_7i96s.0: IO Pin 019 (TB1-08/TB1-09): StepGen #1, pin Step (Output)
hm2/hm2_7i96s.0: IO Pin 020 (TB1-10/TB1-11): StepGen #1, pin Direction (Output)
hm2/hm2_7i96s.0: IO Pin 021 (TB1-14/TB1-15): StepGen #2, pin Step (Output)
hm2/hm2_7i96s.0: IO Pin 022 (TB1-16/TB1-17): StepGen #2, pin Direction (Output)
hm2/hm2_7i96s.0: IO Pin 023 (TB1-20/TB1-21): StepGen #3, pin Step (Output)
hm2/hm2_7i96s.0: IO Pin 024 (TB1-22-TB1-23): StepGen #3, pin Direction (Output)
hm2/hm2_7i96s.0: IO Pin 025 (TB2-02/TB2-03): StepGen #4, pin Step (Output)
hm2/hm2_7i96s.0: IO Pin 026 (TB2-04/TB2-05): StepGen #4, pin Direction (Output)
hm2/hm2_7i96s.0: IO Pin 027 (TB2-07/TB2-08): Encoder #0, pin A (Input)
hm2/hm2_7i96s.0: IO Pin 028 (TB2-10/TB2-11): Encoder #0, pin B (Input)
hm2/hm2_7i96s.0: IO Pin 029 (TB2-13/TB2-14): Encoder #0, pin Index (Input)
hm2/hm2_7i96s.0: IO Pin 030 (TB2-16/TB2-17): IOPort
hm2/hm2_7i96s.0: IO Pin 031 (TB2-18/TB2-19): IOPort
hm2/hm2_7i96s.0: IO Pin 032 (internal): IOPort
hm2/hm2_7i96s.0: IO Pin 033 (internal): SSR #0, pin AC Ref (internal) (Output)
hm2/hm2_7i96s.0: IO Pin 034 (P1-01/DB25-01): IOPort
hm2/hm2_7i96s.0: IO Pin 035 (P1-02/DB25-14): IOPort
hm2/hm2_7i96s.0: IO Pin 036 (P1-03/DB25-02): IOPort
hm2/hm2_7i96s.0: IO Pin 037 (P1-04/DB25-15): IOPort
hm2/hm2_7i96s.0: IO Pin 038 (P1-05/DB25-03): IOPort
hm2/hm2_7i96s.0: IO Pin 039 (P1-06/DB25-16): IOPort
hm2/hm2_7i96s.0: IO Pin 040 (P1-07/DB25-04): IOPort
hm2/hm2_7i96s.0: IO Pin 041 (P1-08/DB25-17): IOPort
hm2/hm2_7i96s.0: IO Pin 042 (P1-09/DB25-05): IOPort
hm2/hm2_7i96s.0: IO Pin 043 (P1-11/DB25-06): IOPort
hm2/hm2_7i96s.0: IO Pin 044 (P1-13/DB25-07): IOPort
hm2/hm2_7i96s.0: IO Pin 045 (P1-15/DB25-08): IOPort
hm2/hm2_7i96s.0: IO Pin 046 (P1-17/DB25-09): IOPort
hm2/hm2_7i96s.0: IO Pin 047 (P1-19/DB25-10): IOPort
hm2/hm2_7i96s.0: IO Pin 048 (P1-21/DB25-11): IOPort
hm2/hm2_7i96s.0: IO Pin 049 (P1-23/DB25-12): IOPort
hm2/hm2_7i96s.0: IO Pin 050 (P1-25/DB25-13): IOPort
hm2/hm2_7i96s.0: registered
hm2_eth: in hm2_eth_reset
hm2_eth: HostMot2 ethernet driver unloaded
hm2: unloading
Removing HAL_LIB, RTAPI, and Real Time OS modules
Removing NML shared memory segments
Debug file information:
Note: Using POSIX realtime
note: MAXV max: 1.667 units/sec 100.000 units/min
note: LJOG max: 1.667 units/sec 100.000 units/min
note: LJOG default: 0.250 units/sec 15.000 units/min
note: jog_order='XYZ'
note: jog_invert=set()
Probe_postgui.hal:14: Pin 'pyvcp.probe_led' does not exist
30833
30843
Stopping realtime threads
Unloading hal components
Note: Using POSIX realtime
Previously, I was getting warnings that "halui.mdi-command-00" did not exist - put "PYVCP = Probe_panel.xml" into custom_gvcp.hal and that went away.
I get the feeling it's something really simple, but i can't see it.
Please Log in or Create an account to join the conversation.
- ckuecker
- Offline
- Senior Member
-
Less
More
- Posts: 42
- Thank you received: 2
13 Nov 2023 18:45 #285298
by ckuecker
Replied by ckuecker on topic Probe panel for Axis GUI
Tried an experiment - moved the PYVCP = Probe_panel.xml line back into the machine.ini file and deleted it from custom_gvcp.hal - and got the "Probe_postgui.hal:18: Pin 'halui.mdi-command-00' does not exist" error back.
Please Log in or Create an account to join the conversation.
- cakeslob
- Offline
- Platinum Member
-

Less
More
- Posts: 926
- Thank you received: 278
14 Nov 2023 00:45 #285325
by cakeslob
Replied by cakeslob on topic Probe panel for Axis GUI
upload your hal/ini files , its easier that way
did you put this part in your ini file?
github.com/hausen8/EasyProbe/blob/v1.3/m...y_Probe_demo.ini#L22
did you put this part in your ini file?
github.com/hausen8/EasyProbe/blob/v1.3/m...y_Probe_demo.ini#L22
The following user(s) said Thank You: ckuecker
Please Log in or Create an account to join the conversation.
- ckuecker
- Offline
- Senior Member
-
Less
More
- Posts: 42
- Thank you received: 2
14 Nov 2023 00:55 #285326
by ckuecker
Replied by ckuecker on topic Probe panel for Axis GUI
Here's the files -
Attachments:
Please Log in or Create an account to join the conversation.
- ckuecker
- Offline
- Senior Member
-
Less
More
- Posts: 42
- Thank you received: 2
14 Nov 2023 00:57 #285327
by ckuecker
Replied by ckuecker on topic Probe panel for Axis GUI
All that is in the .ini file. Cut and pasted.
Please Log in or Create an account to join the conversation.
- cakeslob
- Offline
- Platinum Member
-
Less
More
- Posts: 926
- Thank you received: 278
14 Nov 2023 04:37 #285339
by cakeslob
Replied by cakeslob on topic Probe panel for Axis GUI
Im no expert, but probably this in the ini
probably should be something like this
[HALUI]

[KINS]
JOINTS = 3
KINEMATICS = trivkins coordinates=XYZ
MDI_COMMAND = G54
MDI_COMMAND = G55
MDI_COMMAND = G56
MDI_COMMAND = G57
MDI_COMMAND = G58
MDI_COMMAND = G59
MDI_COMMAND = G59.1
MDI_COMMAND = G59.2
MDI_COMMAND = G59.3
MDI_COMMAND = G10 L20 P0 X0
MDI_COMMAND = G10 L20 P0 Y0
MDI_COMMAND = G10 L20 P0 Z0
MDI_COMMAND = O <probe_toolchange>  CALL [1]
MDI_COMMAND = O <probe_toolchange>  CALL [2]
MDI_COMMAND = O <probe_toolchange>  CALL [3]
MDI_COMMAND = O <probe_x_plus>      CALL
MDI_COMMAND = O <probe_x_minus>     CALL
MDI_COMMAND = O <probe_y_plus>      CALL
MDI_COMMAND = O <probe_y_minus>     CALL
MDI_COMMAND = O <probe_z_minus>     CALL
MDI_COMMAND = O <probe_pocket>      CALL
MDI_COMMAND = O <probe_calibration> CALL
probably should be something like this
[HALUI]
MDI_COMMAND = G54
MDI_COMMAND = G55
MDI_COMMAND = G56
MDI_COMMAND = G57
MDI_COMMAND = G58
MDI_COMMAND = G59
MDI_COMMAND = G59.1
MDI_COMMAND = G59.2
MDI_COMMAND = G59.3
MDI_COMMAND = G10 L20 P0 X0
MDI_COMMAND = G10 L20 P0 Y0
MDI_COMMAND = G10 L20 P0 Z0
MDI_COMMAND = O <probe_toolchange>  CALL [1]
MDI_COMMAND = O <probe_toolchange>  CALL [2]
MDI_COMMAND = O <probe_toolchange>  CALL [3]
MDI_COMMAND = O <probe_x_plus>      CALL
MDI_COMMAND = O <probe_x_minus>     CALL
MDI_COMMAND = O <probe_y_plus>      CALL
MDI_COMMAND = O <probe_y_minus>     CALL
MDI_COMMAND = O <probe_z_minus>     CALL
MDI_COMMAND = O <probe_pocket>      CALL
MDI_COMMAND = O <probe_calibration> CALL

[KINS]
JOINTS = 3
KINEMATICS = trivkins coordinates=XYZ
The following user(s) said Thank You: tommylight, ckuecker
Please Log in or Create an account to join the conversation.
- ckuecker
- Offline
- Senior Member
-
Less
More
- Posts: 42
- Thank you received: 2
14 Nov 2023 13:23 #285376
by ckuecker
Replied by ckuecker on topic Probe panel for Axis GUI
That did it! Thanks!
I'm just beginning to learn the syntax of hal and G-code. Spent the last 30+ years doing microprocessor assembly and C.
I'm just beginning to learn the syntax of hal and G-code. Spent the last 30+ years doing microprocessor assembly and C.
Please Log in or Create an account to join the conversation.
- ckuecker
- Offline
- Senior Member
-
Less
More
- Posts: 42
- Thank you received: 2
14 Nov 2023 13:57 #285379
by ckuecker
Replied by ckuecker on topic Probe panel for Axis GUI
Playing with the probe panel - man page says to calibrate each tool before use - activated calibration button - clicked it - nothing happens.
Man page says to follow LinuxCNC messages - where do I find these?
Man page says to follow LinuxCNC messages - where do I find these?
Please Log in or Create an account to join the conversation.
Time to create page: 0.406 seconds