Feature Request: ramp piercing (aka moving piercing)
- Joco
-

- Offline
- Platinum Member
-

Less
More
- Posts: 532
- Thank you received: 327
27 Oct 2023 18:23 #283912
by Joco
Replied by Joco on topic Feature Request: ramp piercing (aka moving piercing)
A quick update, I have a working trio now in the qtplasmac sim.
cheers - J
- Customised plasmac supporting sheetcam wiggle pierce and hypertherm style moving pierce (ramp)
- New M259 that sets the appropriate pins on plasmac for the new pierce types so internal plasmac logic has the info it needs
- Sheetcam PP which extends the qtplasmac version to support M259
cheers - J
The following user(s) said Thank You: tommylight, Clive S, caretech
Please Log in or Create an account to join the conversation.
- Joco
-
- Offline
- Platinum Member
-
Less
More
- Posts: 532
- Thank you received: 327
07 Nov 2023 08:20 #284755
by Joco
Replied by Joco on topic Feature Request: ramp piercing (aka moving piercing)
Well team, time for an update. Have been working on this a little and refined/resolved some key bugs. Still need to solve the PP for sheetcam, not 100% happy with that and how the M words are playing.
Anyway, the meat is how things perform. The test:
Cutskill 60 - this is a Cigweld branded machine under the ESAB group. It has been enhanced for THC and remote on/off.
16mm mild steel.
PTM80 torch running at 60amps and a 1.1mm unshielded tip.
The test cut (number two as someone insisted it needed to not blow out the side of the metal to prove it pierces)
You can clearly see when the pierce happens. It also behaves just as designed regarding the means of evacuating all the excess material as part of the pierce process.
To be clear, this is a MOVING pierce (ramp style) and it creates the needed trench to cause all the molten material to be evacuated.
Cheers - James.
The following user(s) said Thank You: rodw
Please Log in or Create an account to join the conversation.
- rodw
-
 Topic Author
- Offline
- Platinum Member
-
Less
More
- Posts: 12035
- Thank you received: 4107
07 Nov 2023 08:28 #284757
by rodw
Replied by rodw on topic Feature Request: ramp piercing (aka moving piercing)
Looks great Joco. I seem to remember some one saying this will never work....
Great to know its allowing you to easilly pierce material thicker than what a machine of that amperage usually can achieve without destroying consumables...
My take twas that it ramped in during the leadin, not circular motion.
That will never pierce through thick material as it will consistently have to pierce the same amount of material.
Great to know its allowing you to easilly pierce material thicker than what a machine of that amperage usually can achieve without destroying consumables...
The following user(s) said Thank You: tommylight
Please Log in or Create an account to join the conversation.
- Joco
-
- Offline
- Platinum Member
-
Less
More
- Posts: 532
- Thank you received: 327
07 Nov 2023 09:38 #284760
by Joco
Replied by Joco on topic Feature Request: ramp piercing (aka moving piercing)
Some supporting photos.
Top side cut:
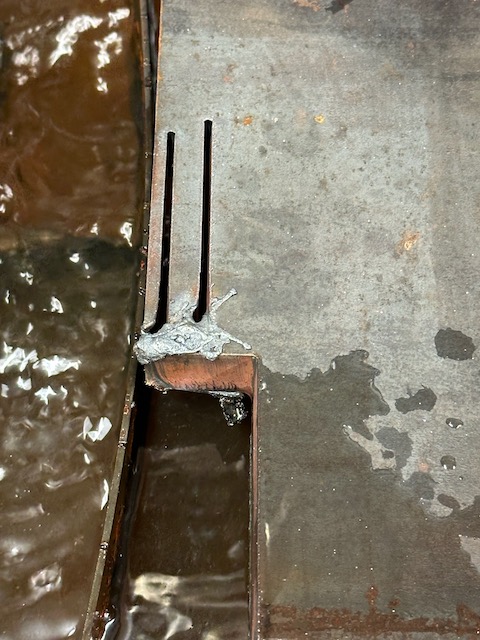
Bottom of cut. Left most cut has been cleaned the ritgh side cut has not been cleaned.
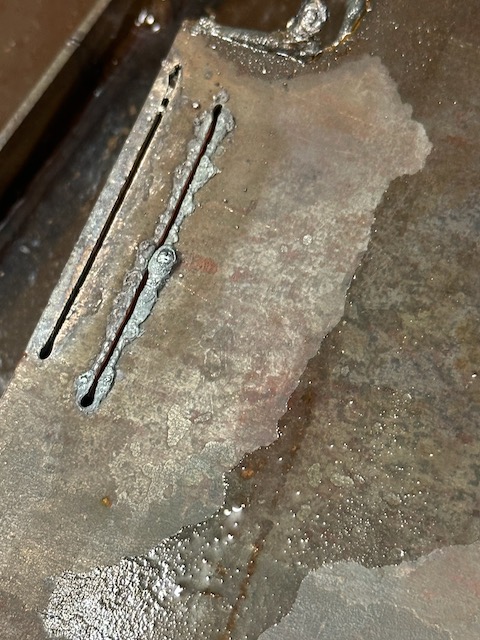
The cowling and tip post 2 pierces.
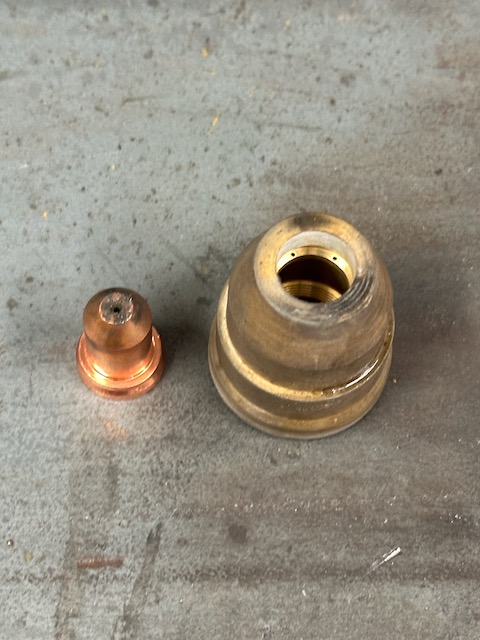
Cheers - James.
Top side cut:
Bottom of cut. Left most cut has been cleaned the ritgh side cut has not been cleaned.
The cowling and tip post 2 pierces.
Cheers - James.
Attachments:
The following user(s) said Thank You: tommylight, rodw
Please Log in or Create an account to join the conversation.
- tommylight
-

- Offline
- Moderator
-

Less
More
- Posts: 21741
- Thank you received: 7430
07 Nov 2023 13:22 #284771
by tommylight
")
Thank you, both.
Replied by tommylight on topic Feature Request: ramp piercing (aka moving piercing)
I stand corrected!Looks great Joco. I seem to remember some one saying this will never work....
My take twas that it ramped in during the leadin, not circular motion.
That will never pierce through thick material as it will consistently have to pierce the same amount of material.
Great to know its allowing you to easilly pierce material thicker than what a machine of that amperage usually can achieve without destroying consumables...
Thank you, both.
The following user(s) said Thank You: rodw, Joco
Please Log in or Create an account to join the conversation.
- RDA
- Offline
- Premium Member
-

Less
More
- Posts: 157
- Thank you received: 43
08 Nov 2023 07:30 - 08 Nov 2023 07:36 #284844
by RDA
Replied by RDA on topic Feature Request: ramp piercing (aka moving piercing)
I can also give my 2cents about different pierce styles from the industrial world.
Pre-pierce, so when you first pierce and then come around a second time to actually cut the part.
This has some advantages to maintain better cut quality and very nice hole quality in example small stainless holes. You can example use "bad" consumables to do all your piercings and then use a fresh set to do the actual cutting. Like some stated if you just pierce and come around the second time to cut you may run into an issue where the pilot doesn't transfer to the plate as the pierce hole is so big. The size of the pierce hole gets bigger and bigger based on the thickness you try to cut.
Typically the CNC pierces then the second time it comes to cut, it moves 1/2 the kerf width in the cutting path to ensure its on the edge of the hole. But it also has a multiplier related to the thickness of the plate, so the thicker you cut the more it will move. Piercing above 1 1/2" the piercing hole can be quite big from the top side and just gets bigger and bigger the ticker you go.
This is a very handy feature. The CNC would also pause after doing the pre-pierces so you can clean the plate from the slag before continuing to cut.
Moving pierce, X/Y motion begins immediately after arc transfer.
This is also very handy to cut thick plates and allows you to control where the slag builds up. Not only can you pierce thicker, you can also use shorter leadins as the slag doesn't build up as a "mound". It flies away from the direction of travel and you can control the direction on how and where you place your leadins. Typically you would use 10-25% of the cut speed for the duration of pierce time (or slightly longer).
Wiggle pierce, you basically gouge through the plate.
Like some stated this should not be done in a small circle as you want to avoid the slag shooting up to the torch and destroying the consumables. Kjellberg calls their wiggle pierce "ProPierce", they cut/gouge a slot behind the leadin, you can see it here Kjellberg ProPierce
The first 2 will come a long way and I have used those techniques to push beyond 3" thick plates.
EDIT: Forgot to say about the pierce time, the plasma arc needs to somewhat pierce even on edge start (pre-pierce) so keep the same pierce time even if you start from the edge.
This edit may of broken the hyperlink, if it did, just put "Kjellberg pro pierce" to youtube.
Last edit: 08 Nov 2023 07:36 by RDA.
The following user(s) said Thank You: Joco
Please Log in or Create an account to join the conversation.
- Joco
-
- Offline
- Platinum Member
-
Less
More
- Posts: 532
- Thank you received: 327
08 Nov 2023 08:37 #284847
by Joco
Replied by Joco on topic Feature Request: ramp piercing (aka moving piercing)
Thanks for this info/insight.
On the wiggle front the model I have enable support for is the standard wiggle generated by sheetcam. This is literally a forward/back motion on a straight lead-in. So no circle. I have not yet tested that method. But I intuitively like the ramp model as it creates quite a directed evacuation path for the molten metal. I worry the wiggle will be more prone to spurting some stuff straight up.
Cheers - James.
Please Log in or Create an account to join the conversation.
- rodw
-
Topic Author
- Offline
- Platinum Member
-
Less
More
- Posts: 12035
- Thank you received: 4107
08 Nov 2023 10:17 #284852
by rodw
Replied by rodw on topic Feature Request: ramp piercing (aka moving piercing)
RDA, thanks for your input, I found it very interesting. I am sure you can contribute further as we work through this further.
Please Log in or Create an account to join the conversation.
- Joco
-
- Offline
- Platinum Member
-
Less
More
- Posts: 532
- Thank you received: 327
08 Nov 2023 18:04 #284886
by Joco
Replied by Joco on topic Feature Request: ramp piercing (aka moving piercing)
I had a look at the pro pierce video. It appears they are doing a back/forth slot shape. Ie small offset with arc each end a few times then stop at one end of the slot and wait, then after pierce (probably just a time period) start forward for a section of length/time at a slower speed and atill at pierce heigh,. Then transition to cut height and speed.
i note the circle cut also seems to be user high definition hole mechanics with a different speed and over burn on the last arc segment of the hole. I have cracked the system already in monokrom.
cheers - J.
i note the circle cut also seems to be user high definition hole mechanics with a different speed and over burn on the last arc segment of the hole. I have cracked the system already in monokrom.
cheers - J.
Please Log in or Create an account to join the conversation.
- RDA
- Offline
- Premium Member
-
Less
More
- Posts: 157
- Thank you received: 43
08 Nov 2023 19:27 #284892
by RDA
Replied by RDA on topic Feature Request: ramp piercing (aka moving piercing)
@Joco
I don't think you need to wiggle or move back and forth at all. Ill give you some parameters to test, these are not real values but should give you a pretty good starting point. I will use "units" so that people don't need to think about metric/imperial conversions.
Plate thickness 10 units
Cutting speed 1000 units
Piercing speed 150 units (15% of the cutting speed)
Leadin length 10 units (straight line, 1:1 relation to plate thickness, probably needs to be a little bit longer)
The idea of piercing speed is to be low enough to be able to pierce in a relatively short distance but high enough so that the spatter flies to the side of the torch. If you see the molten crap hitting the torch, go faster, if you cant pierce the plate in reasonable distance, go slower.
Start the cut and stay at pierce height for the duration of the piercing speed, start by using a feedrate with piercing speed for the leadin element. Then drop down to cut height and ramp up to the cutting speed. While piercing, check where the slag flies and adjust speed if necessary. After you have cut the piece see how long it took to go trough the plate and adjust the length of your pierce speed. At the end you want to be in the proper cut heigh and cut speed before the torch moves from leadin to the cut path.
Should not take more than a couple tries to get the hang of it.
The following user(s) said Thank You: rodw
Please Log in or Create an account to join the conversation.
Moderators: snowgoer540
Time to create page: 0.294 seconds