about my 48" X 48" X 5" Techno/ISEL woodworking router build

More
5 years 9 months ago #195528 by travis036
progress has been slow, due to... lack of ambition, maybe.

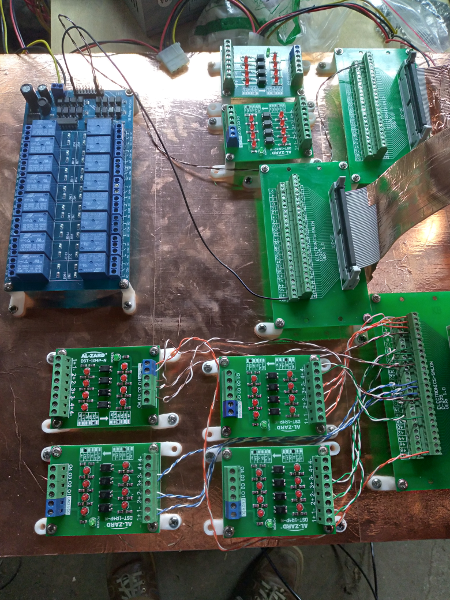
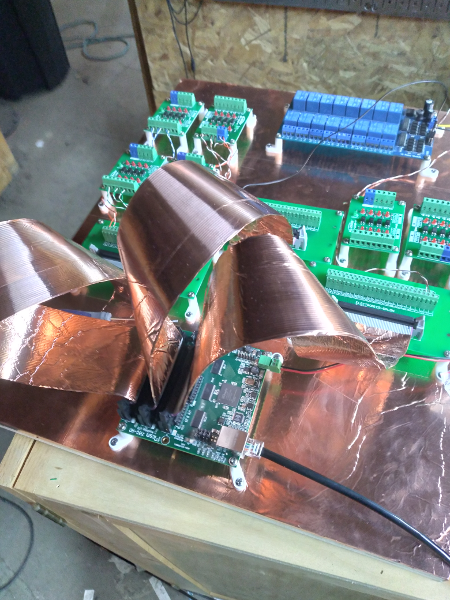
I have so far selected a mounting board (3/4" birch plywood), and covered the surface in copper foil tape for shielding. i then mounted the Mesa card to it using some L PCB mounting feet. i did the same for the 50-pin breakout boards, and the 5v <--> 24v optoisolation modules (each is 4 channel). the ribbon cables from the Mesa card to the breakout boards have been wrapped with copper foil tape, and grounded to the mounting board shielding. the mounting board, when complete, will have a perimeter of wood wrapped in copper foil tape, and a cover that is also shielded. the idea being that all of the control logic will be shielded, and the wires coming in and out will also be shielded (shield drain tied to the mounting board copper).

next to do, is to connect jumper wires from the breakout boards to the optoisolation modules. these are short runs (3" to 6"), so i may be fine with unshielded twisted-pair wires, only because shielding them will be a PITA. i may shield them in the future, if needed.

the stepper drivers will not be mounted on the control mounting board, simply because the mounting board i selected didn't have as much room as i thought it did. they will be mounted to the base of the enclosure, with shielded cable (CAT5e STP) feeding the logic. the power wires feeding the stepper drivers will be made to be twisted-pair.

now, i have changed my mind on the source of power for the system. previously, the power was a few switch-mode power supplies (120Vac input), as well as a ATX computer power supply (supplying 5Vdc, and 12Vdc), and a 24Vdc wall-wort. what i will be changing to, is rather than relying on 120Vac grid power, i will use a couple 12V lead-acid (or AGM) batteries, kept up with an automatic 120Vac charger, and solar power. this way, the power is stable during a power failure, giving me time to either save and shutdown the machine, or with enough battery storage, keep running. the LCNC computer will have a UPS as well, and eventually a standby generator. so with this in mind, i will use a series of step-up and step-down DC-to-DC converters to get the 5V, 12V, 24V, 36V power buses. the only thing that will not get power, will be the spindle, so likely i won't keep running, but will save and pause, and enable a resume button when the power is restored via either grid power, or from the standby generator. so i will need to wire a relay to the grid power, and connect it to activate the E-Stop on power failure.

as for shielding the control enclosure, my choices are to either cover the inside in copper foil tape, or use sheet metal screws to bond the painted panels together. the screws may be easier, but i think the copper foil may be more reliable. i will have to think on that portion.

i also have plans for this spring/summer to move my machine from the old gutted out camper, to a to-be-built shed. working inside the old camper has a lot of disadvantages, mainly lack of room around the machine. with the larger shed, i can also feed it with a sub-panel, and 6AWG wire from the main power panel, as opposed to the 10AWG wire feeding the camper. this will enable more available power for a larger dust-collection system, rather than the shop-vacuum i have currently.

i hope to have the control mounting board more complete by tomorrow, and i will try to remember to take a few pictures. the shiny copper foil definitely adds to the appearance. ;)

~Travis

Please Log in or Create an account to join the conversation.

More
5 years 9 months ago #197176 by travis036
Not a huge amount of progress, due to lack of ambition, but i am almost done the control board wiring. i have not added the shielding walls to the backer board yet, nor have i made the shielded cover. i was going good with shielding the wires, but on the many short wires between the Mesa board's breakout boards, and the 5v to 24v opto modules, i resolved myself to just twisted pairs. the relay board really should be shielded from the rest of the controls. perhaps i will just add a shielded partition to isolate it.
thought i would add a couple pics of my slow progress.


~Travis
The following user(s) said Thank You: tommylight

Please Log in or Create an account to join the conversation.

More
5 years 8 months ago #198839 by travis036
made some progress today. i installed the control board into the cabinet, and made some test power hookups with both the 7i80HD-16 and the LCNC computer connected to the remote LAN out in the shed. they talk, and work with the signals correctly! well, i did have to invert some outputs, but when i did, all was well in the kingdom.
my next stage will be to connect the stepper drivers, and the homing signals, and see if i can make some first moves (for the 7i80HD-16).

this may not seem like huge progress, but with all i have going, it is moving along well.
i also still have to make the shielded surrounds and cover for the control board, but when my wiring is completely done, then i will know better where to make the openings for wires.

i have not connected the machine to the control board yet, as i wanted to make sure i would be sending it the correct signals, before i hooked it up and broke something. when i had things up and running, i used my digital oscilloscope to visually verify some signals from the stepgen signals.

as i was unhappy with the number of switching power-supplies cluttering up the bottom of the cabinet, i am changing to a different plan with the power. i will likely use some buck-boost converters to get my stable 5Vdc and 24Vdc from a single 12Vdc switching power-supply. so all power will be in a different cabinet, leaving three 36Vdc power buses, and a 12Vdc power bus to power the whole machine. the buck-boost converters may not be very efficient, but i had them on hand, along with a 12Vdc PSU, and the three 36Vdc PSUs. but the cables between the power and control cabinets will be reduced from 17 (ground, 5, 12, 24, 36, 36, 36) to 5 (ground, 12, 36, 36, 36).

Question, the 36Vdc switch-mode power-supplies, can they all connect in parallel, or will they screw with each other? if so, i can reduce from 5 to 3 power wires from the power cabinet.
the 36Vdc PSUs are 10A, and my steppers call for about 4.5A under max load. so i rounded up to 5A, and doubled the current capacity, just in case.

~Travis

Please Log in or Create an account to join the conversation.

More
5 years 8 months ago #198851 by tommylight
You can safely run 3 axis with 4.5A motors/drives from a single 36V 10A power supply.
The following user(s) said Thank You: travis036

Please Log in or Create an account to join the conversation.

More
5 years 8 months ago #199142 by travis036
I have uploaded my LCNC configs to my GitHub ( github.com/travis-farmer/linuxcnc ) if anyone is interested. unfortunately, i did not save a backup before my recent changes, and i have not tested the recent changes, yet. but i will try and remember to keep it up to date, for troubleshooting things. so there may be tons of errors, at least until i am able to test it, and make the corrections. though if anyone finds blatant errors, feel free to let me know how to correct them.

there is, i hope, config values for two spindles, if i copy-and-pasted correctly. spindle 0 is controlled via a HY VFD over Modbus, and spindle 1 is a PWM controlled laser for cutting and burning. hopefully i have configured those somewhat correctly.

~Travis

Please Log in or Create an account to join the conversation.

More
5 years 8 months ago #199550 by travis036
worked on some config changes today to get my HY VFD to communicate over RS485. first i had to add the current user to the "dialout" group to be able to init communication.
i ended up commenting out the PWM for Laser configs, as apparently i do not know how to add a second spindle, or maybe i was doing it wrong. i will attack that when i know more.
anyway, i pushed the latest configs to the Github above.

I am waiting on delivery of more wire to finish connecting things up, so wiring progress is slow.
major todo's are:
finish power supply connections.
install and connect stepper drivers.
connect home switches.
connect relay to control Z-axis stepper brake.

then i should be able to see some first moves. i really should lube the machine axis again too. been sitting awhile.
after i get in some first moves, i need to fine tune some parameters regarding stepper direction, homing direction, tie back in my tool probe and 3D probe.

when i go to make first moves, i will try to remember to drag out my video camera, and pop a video on my YouTube. could either be boring (if everything goes right the first time), or entertaining when it all goes to heck.

~Travis

Please Log in or Create an account to join the conversation.

Time to create page: 0.095 seconds
Powered by Kunena Forum