- Configuring LinuxCNC
- Advanced Configuration
- Servo Wiring and Tuning detailed How To example Mesa 7i77.
Servo Wiring and Tuning detailed How To example Mesa 7i77.
- tommylight
-
 Topic Author
- Away
- Moderator
-

Less
More
- Posts: 21163
- Thank you received: 7227
19 Feb 2017 00:48 - 29 Dec 2019 15:03 #88210
by tommylight
Servo Wiring and Tuning detailed How To example Mesa 7i77. was created by tommylight
Servo tuning how to:
Thanks to all the Linuxcnc developers, maintainers, forum members.
Side note: I am fully aware that i am not good at explaining things, all the work i have done on this forum has been and still is my way of trying to correct that drawback. Thank you for your continued support.
This how to relates to using a Mesa 7i77 servo card, but everything mentioned here can be used for other hardware cards and servo drives. Most of the procedures apply to any and all hardware retrofits, especially the parts pertaining to safety and wiring.
I take no responsibility for any damage, injury or whatever, this is intended as educative information and as such caries no liabilities, implicit or otherwise.
Safety procedures should be followed at all times.
>>>Preparations for tuning:
===Make sure you have proper grounding to the machine, make sure the grounding safety works properly.
===Clear everything around the machine so it does not interfere while moving.
===Make sure limit switches work, most machines have limit switches wired through the e-stop loop to disable or cut power to drives.
===From here on, be sure you have the e-stop button near and make sure it functions properly, killing power to servo drives or the whole machine in case something goes wrong.
===Make sure you know what wire does what, wires for enable, encoders, servo input etc should be labelled as such, especially the encoders power polarity as reversing that will most probably destroy the encoders.
===Do not wire everything and power on the machine and boards, that usually ends up with smoke or destroyed machine parts, even injury or.....
===Wear shoes with rubber soles, they will save your life in case you accidentally touch a live wire.
===Do not leave loose wires without isolation.
===Isolate any part of the machine with live wires that you do not need during this set-up, but you might accidentally come in touch with during working.
>>>MESA<<<
===Check that the Mesa cards are powered and nothing is connected to the 7i77 except power, take out all the plugs except power. Make sure you have 5V logic power, Vin and Vfield, or at least Vin with the jumper set for Vfield. Anything from 8 to 28V can be used. Refer to Mesa user manuals for details on how the jumpers should be set.
>>>Wiring and Tuning<<<
===Wire the encoders and plug them on the board one by one while checking the DRO and making sure they count up and down properly, also make sure they count up while moving on the positive side and vice versa. If you can not move the motors by hand, wire and plug all the encoders.
===Try to get the scaling right for the encoders if you have info on the /encoder counts/lead screw pitch/reduction ratio/belt pulley teeth etc. Any change of the scale on a tuned axis will mess up the tuning, depending on how much it changed.
===Wire the drive enable wires to the respective connectors but do not plug them.
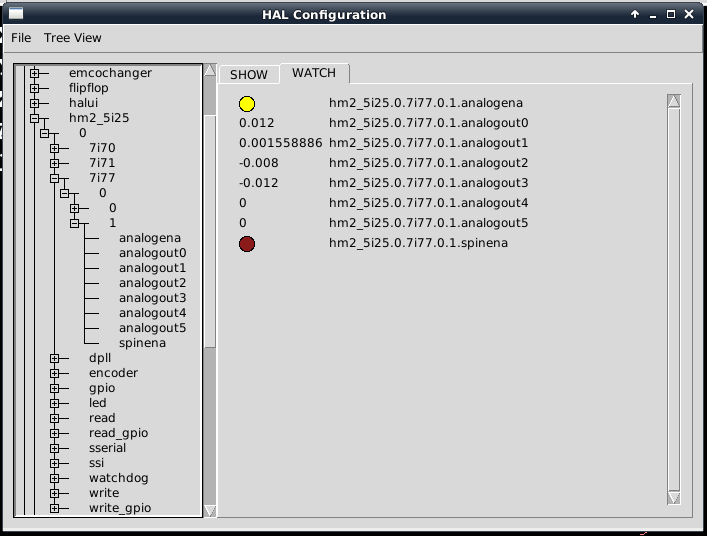
===Open the "Show hal configuration" from the "Machine" menu in Linuxcnc, navigate to "pins", "hm2_5i25", "0", "7i77", "0", "1" you should have the image below:
===Plug only one connector with "enable" wired and check if it functions properly enabling the drive when you press F2 on Linuxcnc, also watch the "hm2_5i25.0.7i77.0.1.analogena" on the window as shown above, you should see the LED change color. If it works, plug in the next one, if not, reverse the wires on the plug and test again, repeat for each drive separately. While checking this also check the DRO, if the servo drives are working properly you should see the DRO slowly changing while the drive is on.
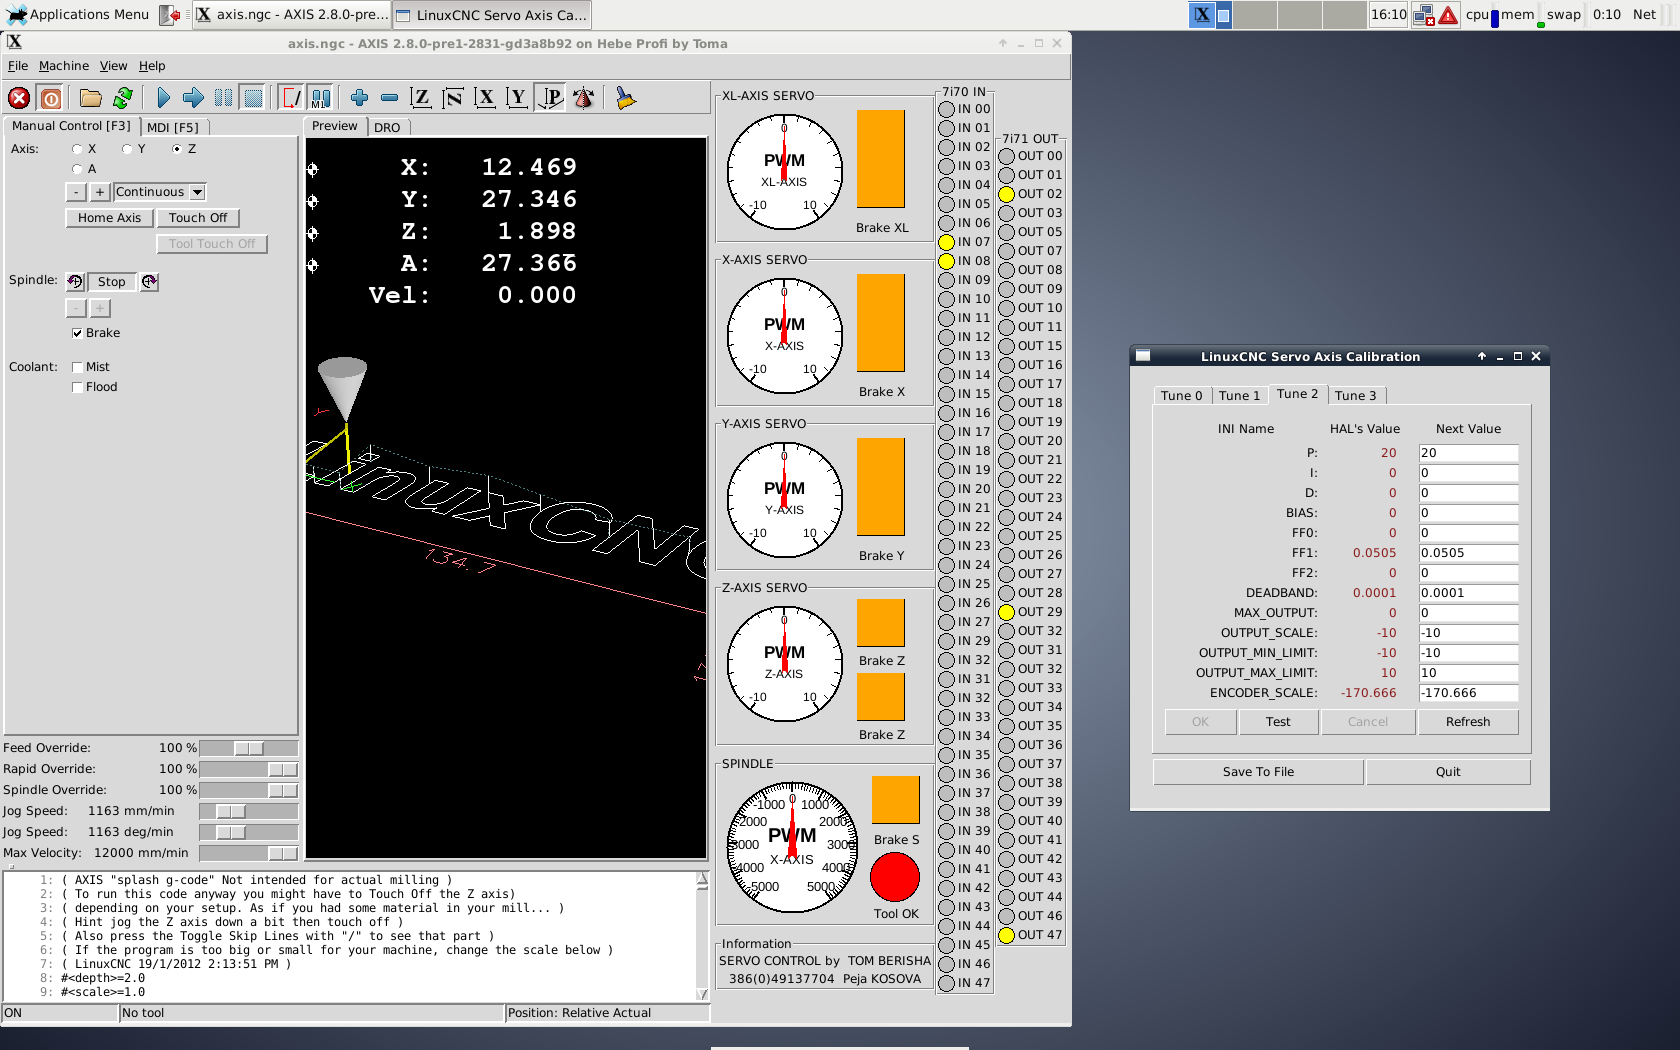
===Wire the drive "+-10V"signal wires to analogue outputs on the mesa card, in this case the + - 10V. Again only for one drive, plug in the connector to the Mesa board. Press F2 on Linuxcnc and follow the DRO, if the last digits bounce up and down, set the jog speed to something low like 50mm/minute or 2in/minute, try jogging it slowly by short pressing the corresponding axis key on the keyboard watching the DRO, at some point it will fault with joint.N.f-error so it is all good. If the machine makes an audible sound from one of the axis jumping as soon as you press the jog button, open the "calibration" menu from the "machine" menu in Linuxcnc (picture below), chose the axis or joint you are tuning and add a "-" to the "output scale" and press "test". Enable Linuxcnc and try to jog at a low jog speed, no jumping should occur after 2 or 3 short presses, only fault with joint.N.f-error. Check that you have counting up on the DRO when jogging on the positive side of the machine and vice versa. It is slow but it is enough to see that it is all working properly. If you have reversed movement, you need to change both "encoder scale" and "output scale" values to negative or positive, depending on how they were before in the INI file and restart Linuxcnc.
When you get this right, meaning you can do 2-3 very short jogs in both directions before an joint.N.f-error fault occurs, DRO changing accordingly and at joint.N.f-error the drives are disabled, move on to tuning that axis. One by one.
===On the calibration window, you should set the ff1 to 0, add something like 0.00001 to the dead-band field, leave the rest as is, meaning everything at 0 except the P value. Do this for all the axis. Press OK and "save to file" on the "calibration" screen.
>>>Fine tuning procedure:
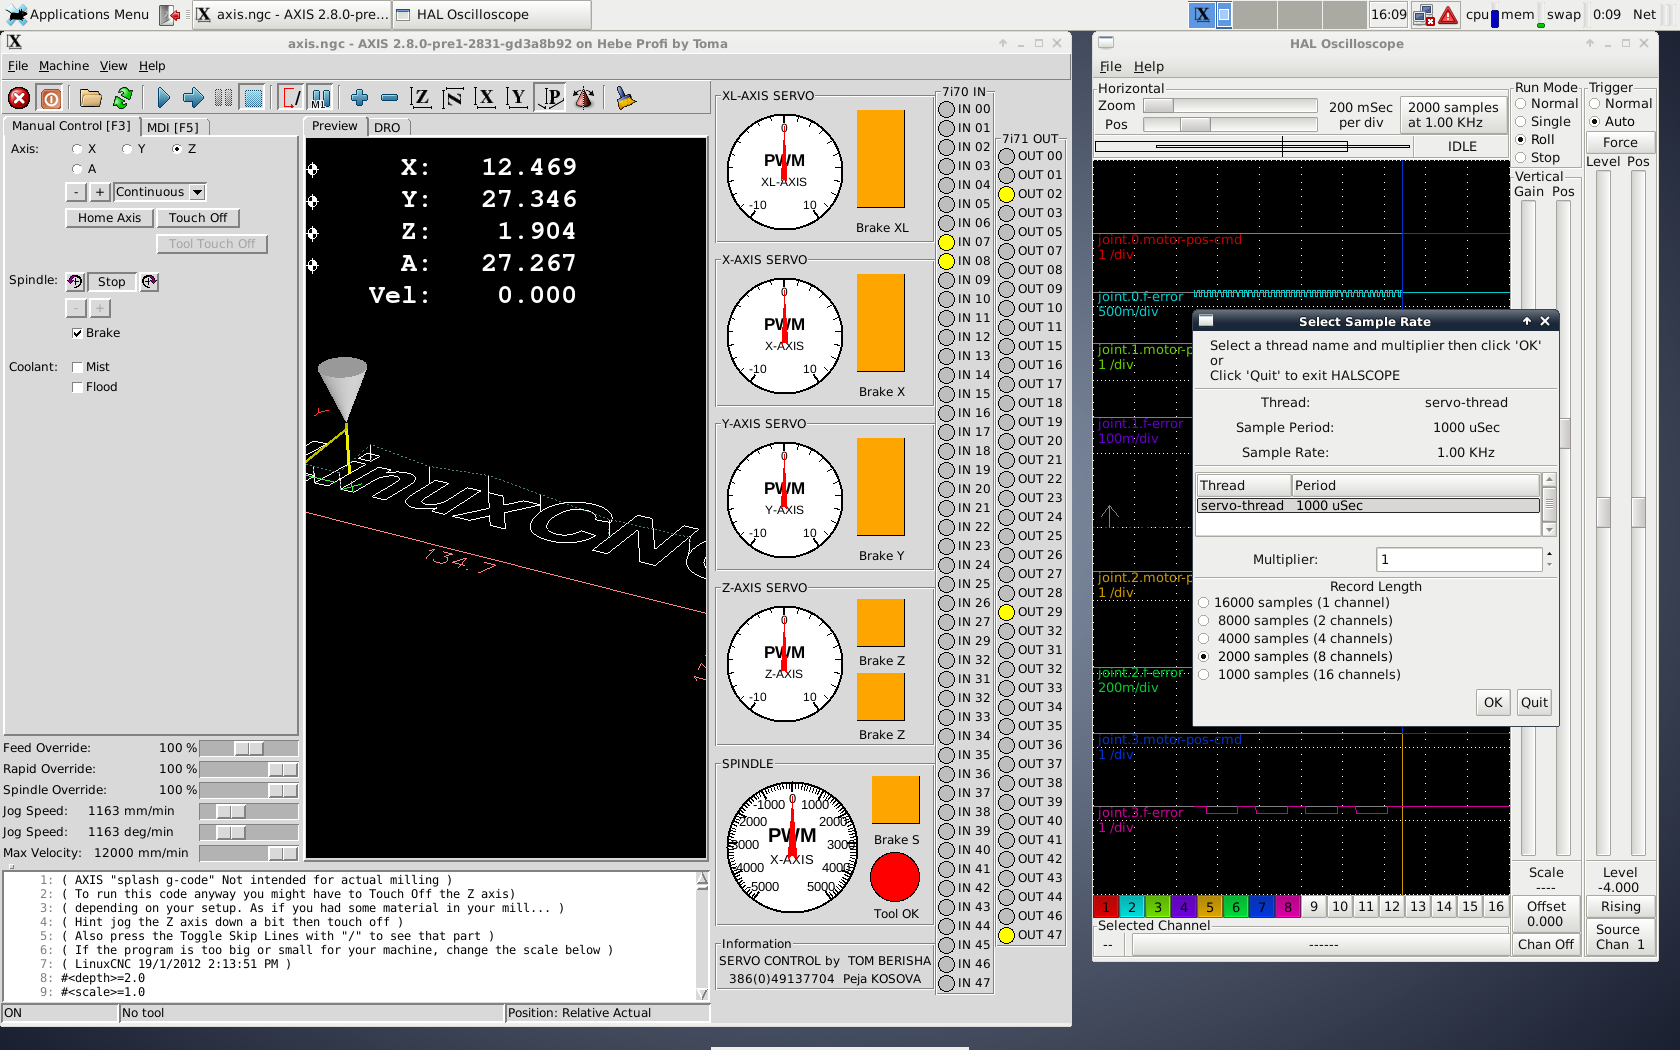
===If you get the above window when you open the "hal scope", just click OK.
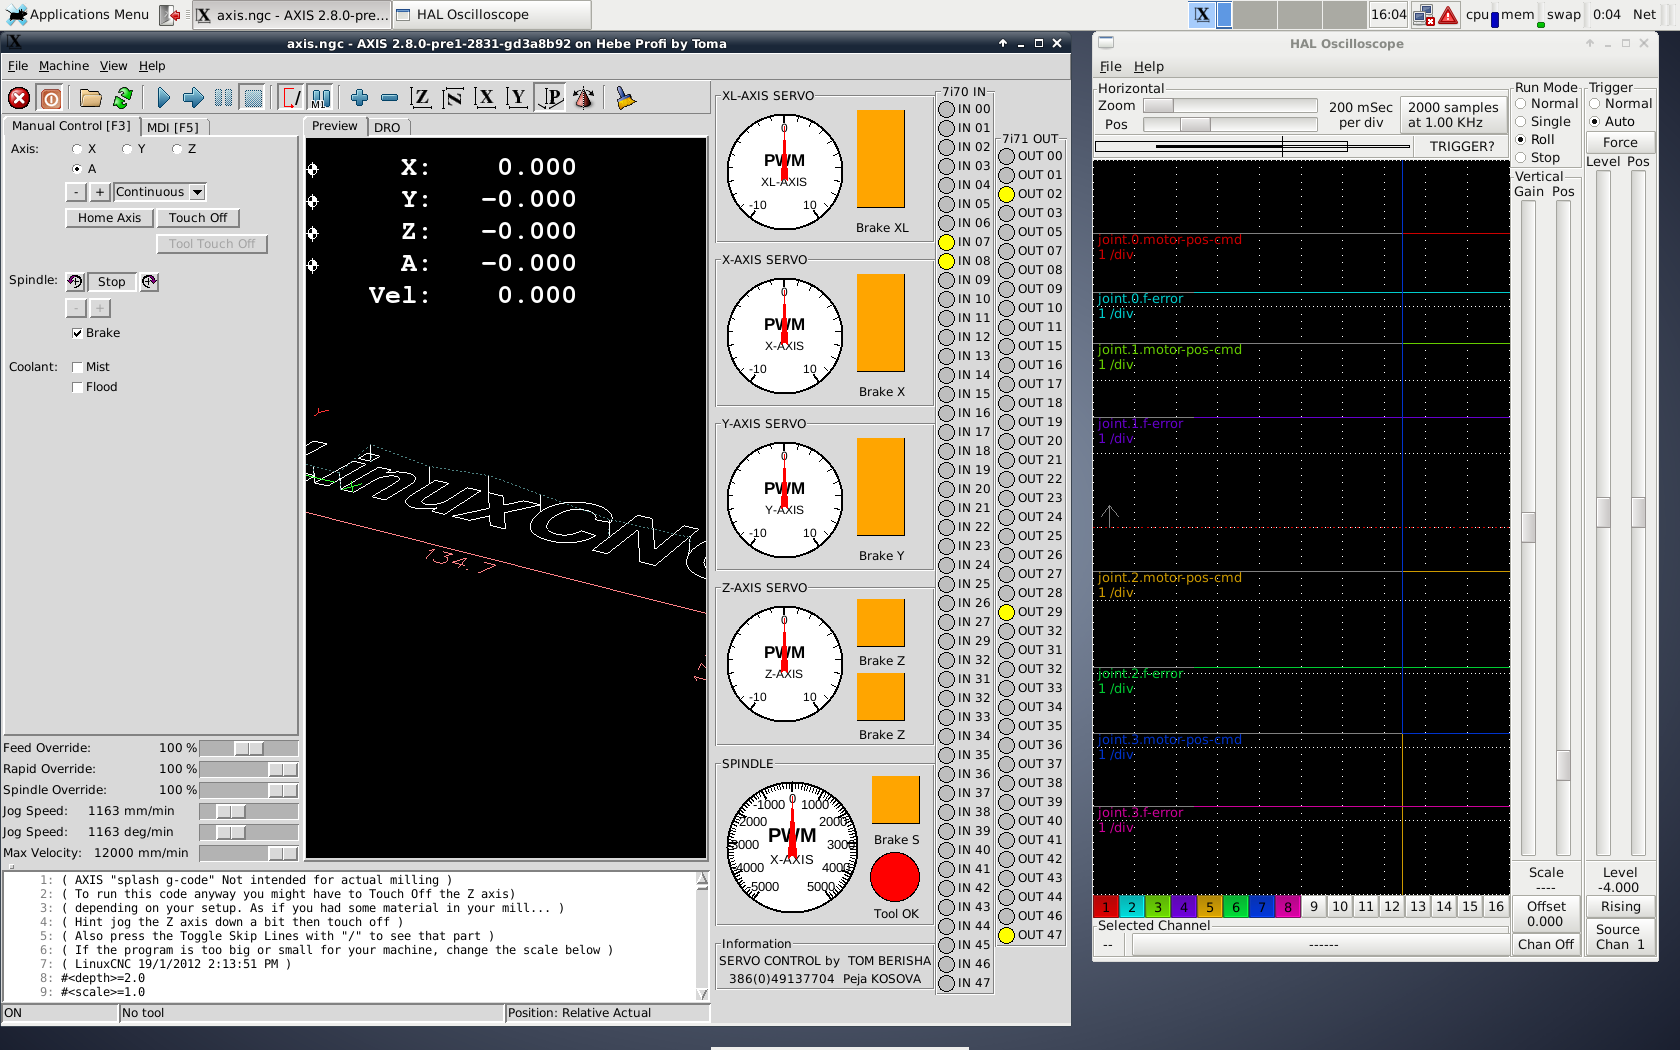
===Open the "hal scope" and "calibration" from the Machine menu, arrange windows so you can see "hal scope" and "linuxcnc" up to the DRO part at the same time, best way to do this is by moving the Linuxcnc window to the right beyond the visible area till the DRO part and the "hal scope" on the left side of the screen. On the "hal scope" press "1" at the bottom left and chose "joint.N.motor-pos-cmd" by scrolling down, press "2" and find and choose "joint.N.f-error", set it at "auto" and "roll" on the upper right corner.
I set the halscope for all the axis at the same time and save that configuration in the same folder where the config is, that way after restart i can just load and press "roll", as in the below picture.
===In Linuxcnc enable with F2 and very short press in one direction for the axis you are tuning while watching the scope. You will see the "joint.N.f-error" line jump all over the place. Do a very short jog and leave it, go check the motor for vibration, or even better, use a mobile phone with an accelerometer app and place it on a moving part on the machine so you can see the vibrations of the machine on the phone screen--- to much vibration->lower the P value, no vibration->increase the P value on the "calibration" window for that axis. Test again with a short jog and check for vibrations. When you get it to the point where you can barely feel vibrations with your hand on the motor, leave it at that P value and move on to tuning the FF1.
when changing values on the "calibration" window, do not forget to press "test" after each change and "cancel" after the test and before you change any value
===Tuning FF1 requires a bit of care and a lot of attention to details on the "joint.N.f-error" line on the "hal scope". Start with a low value of 0.01 and try to move the axis slowly with short presses on the keyboard, while watching the "joint.N.f-error" line on the halscope. Change the value to 0.5 and do the same as above. Based on how fast the line of "joint.N.f-error" went up or down during the 2 tests, chose the value that caused a slower rise or fall and add or lower the FF1 value.
Example:
say the 0.5 value had a slower rise or fall of the f-error line on the scope, put 0.4 and test again. If the move of the f-error line was slower, lower it a bit more say 0.3 and test again, it it was faster, increase it a bit to 0.45 and test again.
End of example
===Repeat that procedure making smaller and smaller changes to FF1 value as required, soon you should see a nice horizontal line with really small changes and move the axis without causing a fault.
===Now increase the jog velocity to 500mm/minute or 20in/minute
Repeat the above procedure again with really small changes of the FF1 value until you can jog back and forth without error and with a nice horizontal line on the scope.
===Increase the jog velocity again to twice that, repeat the above procedure.
===After several minor adjustments you will have a smooth and fast moving axis with a nice nearly flat f-error line on the scope and stopping on a dime ! If you have a bit of oscillation at the start and the end of a move on the scope line, try to add a REALLY small amount of FF2, 10 times smaller than FF1 at least, or lower.
===Added on 07.05.2017===
===In case you get a jagged line that goes slowly up or down while joging at a higher speed, you should add a bit of I-gain and D-gain. The values for this should be realy smal in most cases but sometimes I might need to be up to half of the P value. D should be extreemly smal, and from experience in most cases should be left at 0 as any smal value will mess the tuning.
+++Advice+++
Never try to gues the values, you end up loosing to much time. Servo tuning is not hard, especialy after reading the very concise tutorial by JT, and a perfect explanation on how PID loop works using a car analogy by Andy, both of them on this forum. It is a procedure, and as such should be followed with great attention to details, and no skipping on anything. If something is not working as it should, stop, check everything, read on what the causes could be, and try again.
Added 22.08.2019
-PCW mentioned several times that the FF1 value can be:
You either calculate FF1 (10/velocity@10V)
or
scale the analog output in velocity in which case FF1 = 1.0
Explanation: that is in case you know the maximum velocity the drive/motor combo can do at 10V analog input to the drive.
An initial P value of 1 is probably OK
Remove the maxerror lines in the hal file, if you dont have the maxerror lines removed, you will no be able to tune.
Thank you, PCW
Added 29.12.2019
Blatantly copied and pasted from a post made by PCW regarding H bridge drives:
Bare H-bridge drives running PM DC motors behave somewhat like velocity mode servos
(with quite low velocity feedback gain) So they end up being somewhere between velocity
and torque mode.
That is, you are setting the average motor drive voltage with the PWM value. This sets the
approximate motor velocity because the motor will accelerate to a velocity where the generated
back EMF is close to the supplied voltage. If the motor impedance was zero, you would have close
to a perfect velocity mode servo, but the impedance is substantial which leads to the low
inherent feedback gain.
Normally for Hbridges, I would start with a low P value and tune the D term as high as
possible without excessive buzzyness, then set FF1 so that the actual position does
not lead or lag the commanded position at full speed, then I would tune FF2 so that
the actual position does not lead or lag the commanded position during acceleration
Then I would tune P as high as possible without oscillation, overshoot and then when
everything else is close, add as much I term as possible without instability.
Thank you, PCW.
Please feel free to voice your advice, critique, additional info etc.
Regards,
Tom
Last edit: 29 Dec 2019 15:03 by tommylight. Reason: Added more info
The following user(s) said Thank You: kostas, viesturs.lacis, chimeno, akb1212, arvidb, Clive S, MacGalempsy, bkt, pommen, jamby and 25 other people also said thanks.
Please Log in or Create an account to join the conversation.
- rodw
-

- Offline
- Platinum Member
-

Less
More
- Posts: 11624
- Thank you received: 3911
19 Feb 2017 01:20 #88217
by rodw
Tommy, you sell yourself short here (sorry local saying)... You've always got the message across to me. Plus a little bit of humor to break up those sleepless nights always helps
Replied by rodw on topic Servo Wiring and Tuning detailed How To example Mesa 7i77.
Side note: I am fully aware that i am not good at explaining things, all the work i have done on this forum has been and still is my way of trying to correct that drawback. Thank you for your continued support.Tommy, you sell yourself short here (sorry local saying)... You've always got the message across to me. Plus a little bit of humor to break up those sleepless nights always helps
Please Log in or Create an account to join the conversation.
- tommylight
-
 Topic Author
- Away
- Moderator
-

Less
More
- Posts: 21163
- Thank you received: 7227
19 Feb 2017 02:04 #88221
by tommylight
Replied by tommylight on topic Servo Wiring and Tuning detailed How To example Mesa 7i77.
Much apreciated, as always.
I also got over the writing problem during this time on the forum, meaning i really did not like writing, i love reading and i do read a LOT. A couple of years back i noticed i can read english about 7 times faster than i can read my native language! Talk about geting used to something.
Thank you for your support and help in improving Linuxcnc.
Please Log in or Create an account to join the conversation.
- tommylight
-
 Topic Author
- Away
- Moderator
-

Less
More
- Posts: 21163
- Thank you received: 7227
20 Feb 2017 20:56 #88392
by tommylight
Replied by tommylight on topic Servo Wiring and Tuning detailed How To example Mesa 7i77.
1000 post !
Please Log in or Create an account to join the conversation.
- tommylight
-
 Topic Author
- Away
- Moderator
-

Less
More
- Posts: 21163
- Thank you received: 7227
23 Feb 2017 00:36 #88524
by tommylight
Replied by tommylight on topic Servo Wiring and Tuning detailed How To example Mesa 7i77.
Added more info and pictures to the first post.
Please Log in or Create an account to join the conversation.
- cncnoob1979
-

- Offline
- Platinum Member
-

Less
More
- Posts: 403
- Thank you received: 75
07 Mar 2017 16:27 #89138
by cncnoob1979
Replied by cncnoob1979 on topic Servo Wiring and Tuning detailed How To example Mesa 7i77.
Well written Tommy!
I followed this in my mind very well. I do not have any suggestions for you. I was planning on doing a video to "show" this procedure. Perhaps I can complete it sometime soon, I have a lot of prior commitments as of now. I would like to donate that to you when complete, if you would like to include it in your HOW-TO posted here.
I followed this in my mind very well. I do not have any suggestions for you. I was planning on doing a video to "show" this procedure. Perhaps I can complete it sometime soon, I have a lot of prior commitments as of now. I would like to donate that to you when complete, if you would like to include it in your HOW-TO posted here.
The following user(s) said Thank You: tommylight
Please Log in or Create an account to join the conversation.
- tommylight
-
 Topic Author
- Away
- Moderator
-

Less
More
- Posts: 21163
- Thank you received: 7227
07 Mar 2017 18:11 #89142
by tommylight
Replied by tommylight on topic Servo Wiring and Tuning detailed How To example Mesa 7i77.
Yes please.
That would be very nice of you, you are much beter at explaining stuff.
Thank you very much.
With utmost respect,
Tom
That would be very nice of you, you are much beter at explaining stuff.
Thank you very much.
With utmost respect,
Tom
Please Log in or Create an account to join the conversation.
- superlen
- Offline
- Junior Member
-

Less
More
- Posts: 33
- Thank you received: 8
07 Mar 2017 18:22 #89145
by superlen
Replied by superlen on topic Servo Wiring and Tuning detailed How To example Mesa 7i77.
Tommy,
Thanks for posting this. I am closer still to powering up my gantry (mesa cards came in yesterday) and I will be following this thread for sure. My servos are linear motors, not ball screws, and from reading the manual on my drives it appears that there is a lot of the same tuning parameters/procedures available in the servo drive it'self. Am I correct in thinking if the drives are tuned (using the mnf supplied software), then LCNC could be configured to just output a position, or would I still need to tune LCNC around the drive? The encoder wiring routes back to the servo drive & the drive then is configured to pass the encoder signal along to LCNC, so both entities have the encoder available to them.
Len
Please Log in or Create an account to join the conversation.
- Todd Zuercher
-
- Offline
- Platinum Member
-

Less
More
- Posts: 4693
- Thank you received: 1438
07 Mar 2017 18:38 #89148
by Todd Zuercher
Replied by Todd Zuercher on topic Servo Wiring and Tuning detailed How To example Mesa 7i77.
A drive that is configured to run from a position commend generally takes a digital command, like step-dir, and there usually isn't any tuning to be done in Linuxcnc. What Mesa cards did you get?
Please Log in or Create an account to join the conversation.
- superlen
- Offline
- Junior Member
-

Less
More
- Posts: 33
- Thank you received: 8
07 Mar 2017 23:50 #89181
by superlen
Replied by superlen on topic Servo Wiring and Tuning detailed How To example Mesa 7i77.
Todd,
I have the 7i93 (ethernet in, 2 50-pin out) & the 7I33TA pwm daughter card for the analog control. I also have a 7I47 for some additional IO & a side project to play with. The drives are configurable so I can configure them for velocity or torque mode and let Linuxcnc do the tuning if necessary. I take it that is the most common way of configuring Linuxcnc (with it handling motion control). I keep thinking that the motion control should be outside the PC in embedded hardware, but I realize that with the power of Linux & RTOS this isn't as prevalent as it once was, particularly with a FPGA doing some of the heavy lifting in between.
I originally thought that the drives were doing the motion control in this machines existing setup, but after studying the current setup in more detail, they aren't. They are receiving an analog voltage from a PCI motion card (similar to Mesa, but not supported by Linux CNC), so replacing that card with Mesa hardware and some tuning should get me going.
Len
Please Log in or Create an account to join the conversation.
- Configuring LinuxCNC
- Advanced Configuration
- Servo Wiring and Tuning detailed How To example Mesa 7i77.
Time to create page: 0.291 seconds

