Mesa 5i25 and 7176 getting started
- PCW
-

- Away
- Moderator
-

Less
More
- Posts: 18844
- Thank you received: 5203
20 May 2015 05:48 #58877
by PCW
Replied by PCW on topic Mesa 5i25 and 7176 getting started
Between 5V and the A,B outputs of the MPG
Please Log in or Create an account to join the conversation.
- amhfabs
- Offline
- Junior Member
-

Less
More
- Posts: 21
- Thank you received: 0
20 May 2015 20:23 - 20 May 2015 20:24 #58894
by amhfabs
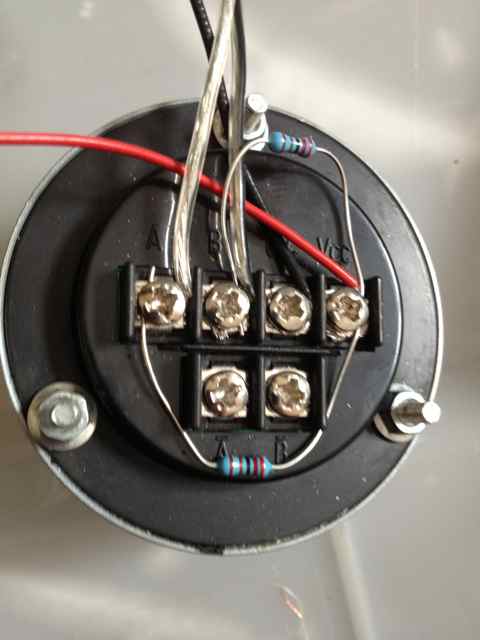
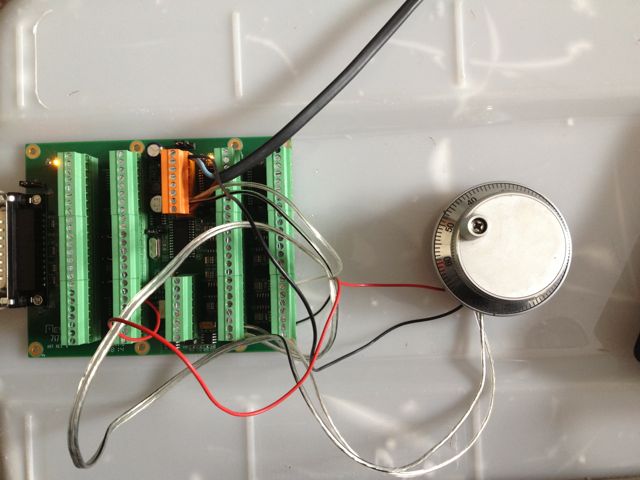
Ok, So I've added 2.2K resistors (I've run out of 2K) between 5v and the A B outputs, this gives me 0V on A and B? Also, if I measure between +5v and Gnd this is also 0v
I've added some pics to show how I've got it set up.
I can't get my head around the wiring, I've had this MPG set up before with a pokeys board with no issues. I would have thought that if the MPG gnd was connected to field gnd then it would need to get its Vcc also from field power? But this is 24Vdc....
Replied by amhfabs on topic Mesa 5i25 and 7176 getting started
Between 5V and the A,B outputs of the MPG
Ok, So I've added 2.2K resistors (I've run out of 2K) between 5v and the A B outputs, this gives me 0V on A and B? Also, if I measure between +5v and Gnd this is also 0v
I've added some pics to show how I've got it set up.
I can't get my head around the wiring, I've had this MPG set up before with a pokeys board with no issues. I would have thought that if the MPG gnd was connected to field gnd then it would need to get its Vcc also from field power? But this is 24Vdc....
Last edit: 20 May 2015 20:24 by amhfabs.
Please Log in or Create an account to join the conversation.
- PCW
-
- Away
- Moderator
-
Less
More
- Posts: 18844
- Thank you received: 5203
20 May 2015 21:30 #58898
by PCW
Replied by PCW on topic Mesa 5i25 and 7176 getting started
Looks like you do not have the field power ground connected to 5V ground so the MPG has no 5V
Please Log in or Create an account to join the conversation.
- amhfabs
- Offline
- Junior Member
-
Less
More
- Posts: 21
- Thank you received: 0
20 May 2015 22:28 #58899
by amhfabs
Replied by amhfabs on topic Mesa 5i25 and 7176 getting started
No, thats what I thought. The 5v is currently supplied via the host power option W2 jumper on the 7i76, so 5v is coming from the PC through my 5i25 board and I guess the gnd is iscolated from field power with this option enabled?
I'm going to try a 5v power supply instead of host power option, maybe this ties the gnd terminals? I wanted this configuration in the end anyway as it seems more robust and the PC power is eliminated from the system. It was just handy on my test bench at home...
I'm going to try a 5v power supply instead of host power option, maybe this ties the gnd terminals? I wanted this configuration in the end anyway as it seems more robust and the PC power is eliminated from the system. It was just handy on my test bench at home...
Please Log in or Create an account to join the conversation.
- PCW
-
- Away
- Moderator
-
Less
More
- Posts: 18844
- Thank you received: 5203
20 May 2015 22:40 - 20 May 2015 22:43 #58900
by PCW
Replied by PCW on topic Mesa 5i25 and 7176 getting started
Field power is _always_ isolated from the logic side so the way you currently
have the MPG connected (MPG 5V from PC 5V, MPG GND from Field ground)
The MPG has no power.
To make this work you would need to connect 5V GND to Field GND
(This applies whether 5V comes from the PC or not)
have the MPG connected (MPG 5V from PC 5V, MPG GND from Field ground)
The MPG has no power.
To make this work you would need to connect 5V GND to Field GND
(This applies whether 5V comes from the PC or not)
Last edit: 20 May 2015 22:43 by PCW.
The following user(s) said Thank You: amhfabs
Please Log in or Create an account to join the conversation.
- amhfabs
- Offline
- Junior Member
-
Less
More
- Posts: 21
- Thank you received: 0
21 May 2015 01:44 #58904
by amhfabs
Replied by amhfabs on topic Mesa 5i25 and 7176 getting started
Huraahh!!
Finally I got the counts to show in HAL config for this MPG
So, what I did in the end (with a lot of direction from PCW and andypugh):
Power supplies: 24vdc and 5vdc
5i25: W1 and W2 jumpers both in the down position (breakout power disabled)
7i76: W1 jumper LEFT (VIN + Field power shared 24v), W2 jumper RIGHT (host power disabled)
7i76 in software mode 2: in (my machine).hal string: sserial_port_0=2x *I'm yet to work out if this is correct for my board / setup*
+5V supply on TB3 pin 22, gnd on TB3 pin 24 (control voltage side)
+24V supply on TB1 pin1, gnd on TB1 pin 8 (VIN and Field voltage side)
I have linked the gnds for +5V and +24V supplies
MPG Vcc to 5v, MPG gnd to shared gnd
MPG A to TB5 pin 1 (input 16) MPG B to TB5 pin 2 (input 17)
I'm chuffed, as I've been ready to box this thing back up again and go cry in a dark room
So, now I've got to figure out how to get these MPG counts to actually do something and change the position indicated in the DRO.... this could be fun!
Please Log in or Create an account to join the conversation.
- andypugh
-

- Offline
- Moderator
-
Less
More
- Posts: 23377
- Thank you received: 4966
21 May 2015 02:05 - 21 May 2015 02:05 #58905
by andypugh
What do you want them to do?
If you are using the Axis GUI you can use that to choose the jog increment by adding this to a HAL file:
net jog-inc axisui.jog.increment => axis.0.jog-scale axis.2.jog-scale
Then connect the mpg to each axis:
net x-jog hm2_5i25.0.7i76.0.0.enc0.count => axis.0.jog-counts
net z-jog hm2_5i25.0.7i76.0.0.enc1.count => axis.2.jog-counts
And assuming you want those jog wheels to always be active:
setp axis.0.wheel-jog-active 1
setp axis.2.wheel-jog-active 1
Of course there are literally several other ways to configure this. For example to use one wheel for all axes, with the axis chosen on the Axis GUI you would use
net x-jog-enable axisui.jog.x => axis.0.wheel-jog-active
net y-jog-enable axisui.jog.y => axis.1.wheel-jog-active
...
And net the same enc0.count pin to the jog-counts pin of every axis.
Things to note. The "signal" name after the "net" does not have any special meaning to the system. You can choose them freely. The pin names have to exist and do have special meanings to the system. You can see them all in Machine->show HAL config, or by opening a terminal and typing "halcmd show pin" when LinuxCNC is running.
Replied by andypugh on topic Mesa 5i25 and 7176 getting started
So, now I've got to figure out how to get these MPG counts to actually do something and change the position indicated in the DRO.... this could be fun!
What do you want them to do?
If you are using the Axis GUI you can use that to choose the jog increment by adding this to a HAL file:
net jog-inc axisui.jog.increment => axis.0.jog-scale axis.2.jog-scale
Then connect the mpg to each axis:
net x-jog hm2_5i25.0.7i76.0.0.enc0.count => axis.0.jog-counts
net z-jog hm2_5i25.0.7i76.0.0.enc1.count => axis.2.jog-counts
And assuming you want those jog wheels to always be active:
setp axis.0.wheel-jog-active 1
setp axis.2.wheel-jog-active 1
Of course there are literally several other ways to configure this. For example to use one wheel for all axes, with the axis chosen on the Axis GUI you would use
net x-jog-enable axisui.jog.x => axis.0.wheel-jog-active
net y-jog-enable axisui.jog.y => axis.1.wheel-jog-active
...
And net the same enc0.count pin to the jog-counts pin of every axis.
Things to note. The "signal" name after the "net" does not have any special meaning to the system. You can choose them freely. The pin names have to exist and do have special meanings to the system. You can see them all in Machine->show HAL config, or by opening a terminal and typing "halcmd show pin" when LinuxCNC is running.
Last edit: 21 May 2015 02:05 by andypugh.
Please Log in or Create an account to join the conversation.
- amhfabs
- Offline
- Junior Member
-
Less
More
- Posts: 21
- Thank you received: 0
21 May 2015 02:44 #58906
by amhfabs
Replied by amhfabs on topic Mesa 5i25 and 7176 getting started
Well eventually I want to end up with a shared MPG for X, Y, Z, A, Feed over ride and Spindle over ride.
I've got a 6 pos and a 4 pos selector switch ordered, the 6 pos for the "axis" selection and the 4 pos for increment when using X Y Z or A (I don't have an A yet, but want to implement it for the future)
I guess I can play around with some code first though until I've got some stuff hard wired.
I've got a 6 pos and a 4 pos selector switch ordered, the 6 pos for the "axis" selection and the 4 pos for increment when using X Y Z or A (I don't have an A yet, but want to implement it for the future)
I guess I can play around with some code first though until I've got some stuff hard wired.
Please Log in or Create an account to join the conversation.
- andypugh
-
- Offline
- Moderator
-
Less
More
- Posts: 23377
- Thank you received: 4966
21 May 2015 03:23 #58907
by andypugh
OK, when the time comes you would wire the inputs relating to the axis selectors directly to the wheel-jog-enables and use a partially populated mux16 for the increment
(partially populated as mux16 has an output for every combination of the bit inputs). Unless you prefer to save pins and leave one position unconnected, the other taking 1 input high, the other a second bit and the fourth both bits high, and then you could use mux4
Replied by andypugh on topic Mesa 5i25 and 7176 getting started
I've got a 6 pos and a 4 pos selector switch ordered, the 6 pos for the "axis" selection and the 4 pos for increment when using X Y Z or A
OK, when the time comes you would wire the inputs relating to the axis selectors directly to the wheel-jog-enables and use a partially populated mux16 for the increment
(partially populated as mux16 has an output for every combination of the bit inputs). Unless you prefer to save pins and leave one position unconnected, the other taking 1 input high, the other a second bit and the fourth both bits high, and then you could use mux4
Please Log in or Create an account to join the conversation.
- amhfabs
- Offline
- Junior Member
-
Less
More
- Posts: 21
- Thank you received: 0
21 May 2015 04:09 #58908
by amhfabs
Replied by amhfabs on topic Mesa 5i25 and 7176 getting started
I think I'll have to read up on using mux16, literally this is the first time I've ever heard of it. I'm just reading through parts of the basic hal tutorial in the manual.
I think parts are slowly sinking in now, whereas before I was just staring at the screen blankly
I will read through some hal examples and "borrow" some code from there
I think parts are slowly sinking in now, whereas before I was just staring at the screen blankly
I will read through some hal examples and "borrow" some code from there
Please Log in or Create an account to join the conversation.
Moderators: PCW, jmelson
Time to create page: 0.224 seconds