Work with probe
- verser
-
 Topic Author
- Offline
- Senior Member
-

Less
More
- Posts: 78
- Thank you received: 69
13 May 2015 14:00 - 16 Jul 2019 16:56 #58620
by verser
Work with probe was created by verser
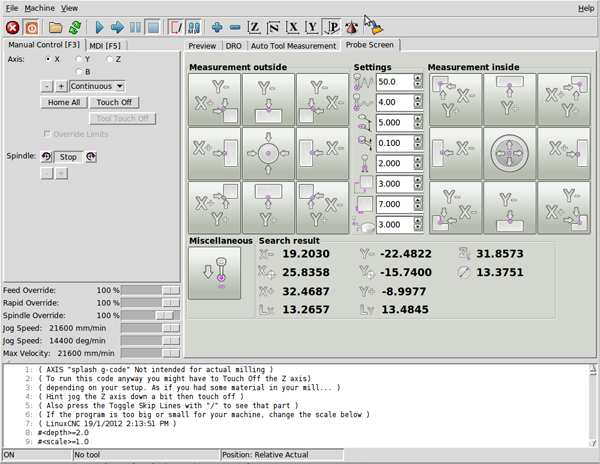
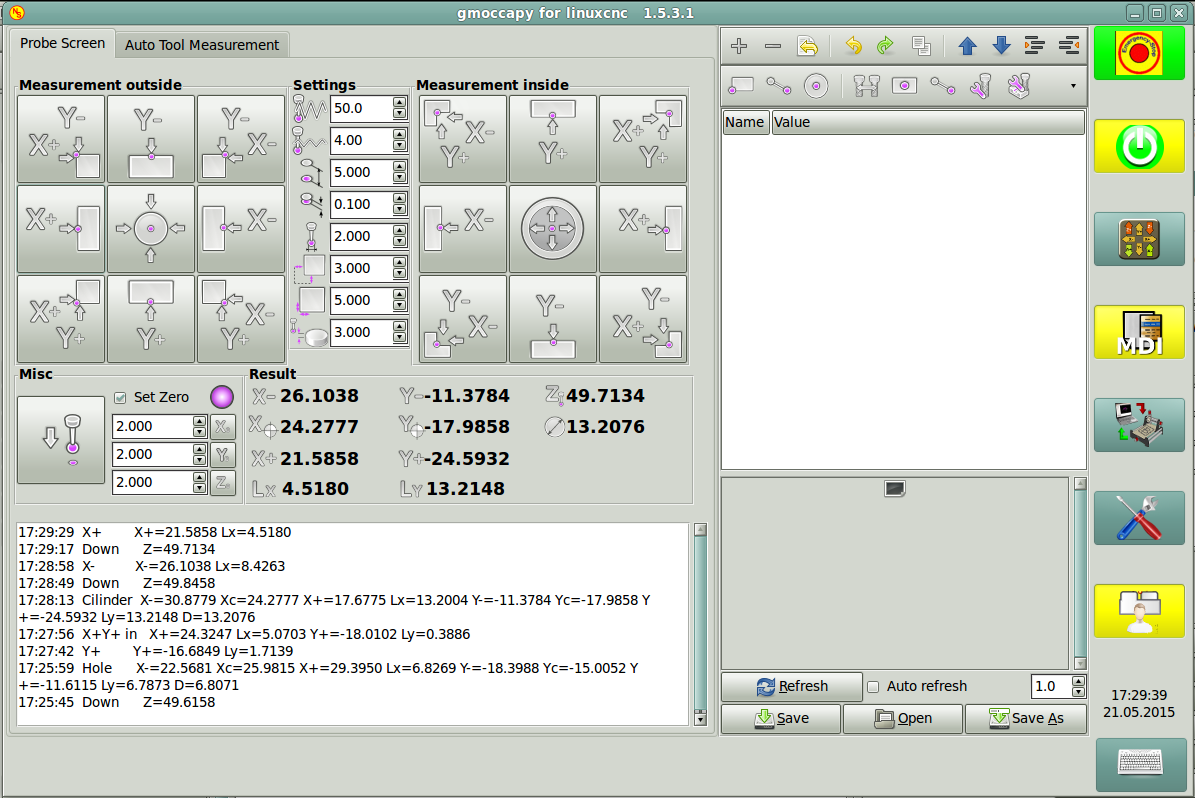
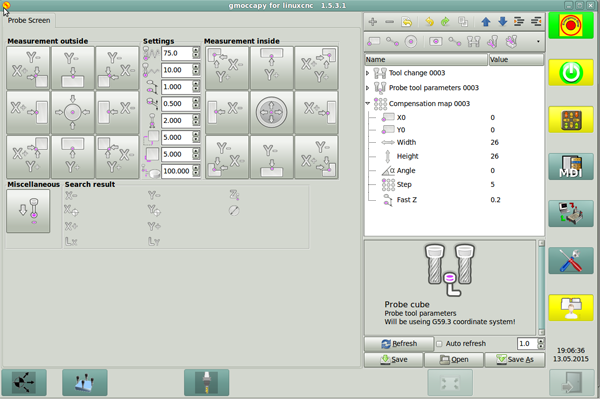
For full and comfortable working with the probe in linuxcnc I wrote the application Probe Screen.
In this article, I will share the description and source code.
Attention! Measuring operations are very intolerant of incorrect settings. It is strongly recommended to do preliminary tests on loose object that will not damage the probe when unexpected movements. It is recommended to carefully check each setting before measuring the workpiece.
Installation.
Use.
Set the probe in the spindle.
Move manually probe for Z about 2-10 mm above the workpiece surface,
and for XY about the position indicated by the colored dot on the appropriate button Probe Screen.
Fill parameters. Meaning of the parameters should be clear from the names and pictures (the name pop up when approaching the mouse). If you change the parameters are automatically saved in manualtoolchange.pref .
Hit only! the button that corresponds to the position of the probe above the workpiece. For the other buttons - another position above the workpiece.
You do not need to expose offsets for tool "Probe", the program desired zero offsets for the current tool makes herself, and G-code works off all in relative coordinates.
In fact, you can use the application immediately after the Home.
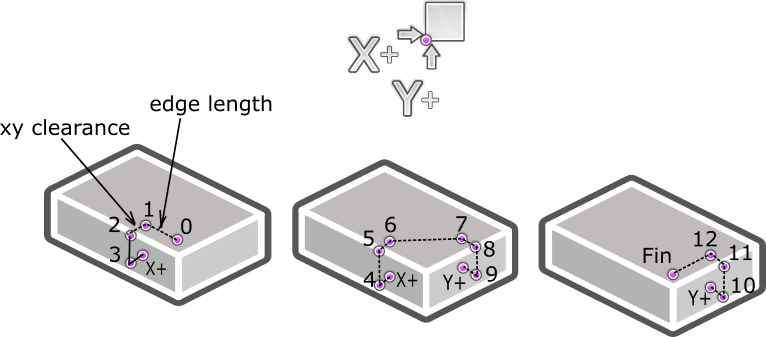
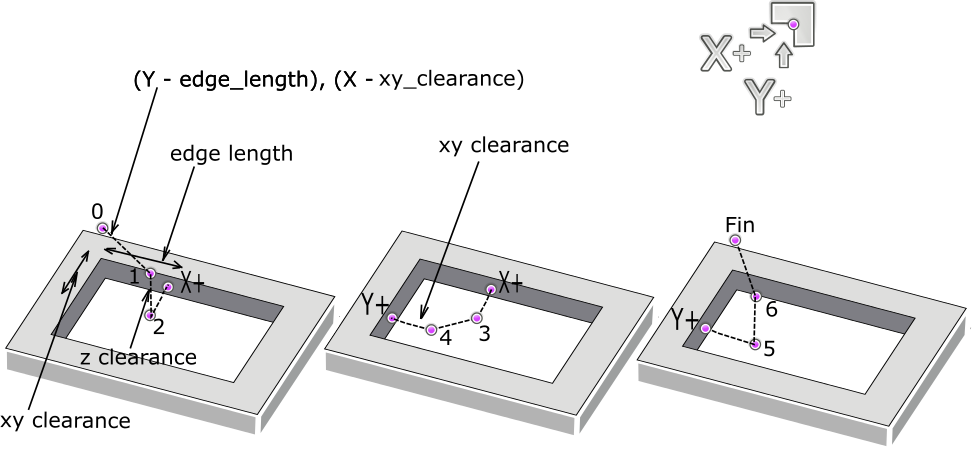
The trajectory of the probe by the example of measurement outside corner X+Y+
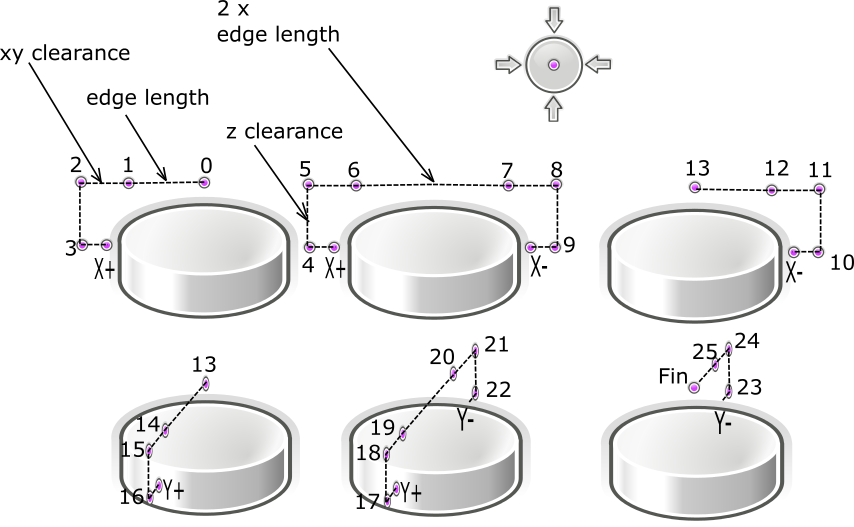
Path measurement cylinder, edge length should be approximately equal to the radius of the cylinder measured, xy clearance - outside offset from the walls of the cylinder
The trajectory of the probe by the example of measurement inside corner X+Y+
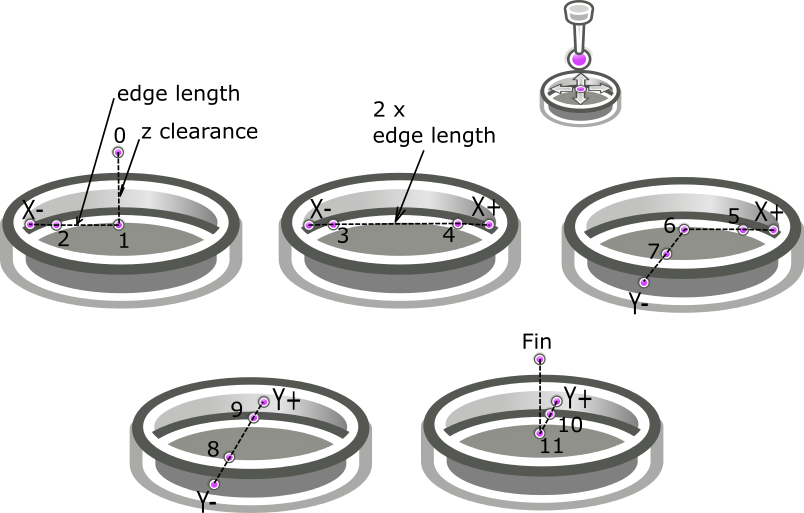
Path measurement hole, edge length should be approximately equal to the radius of the hole measured, xy clearance - inside offset from the walls of the hole.
Any of the search ends at XY moving at the desired point (or edge, or corner, or center), Z remains in the original position.
Sources
P.S. Style of Nick's for Features great decorates Probe Screen. For him, huge gratitude!
P.S.S. Sorry for my English.
In this article, I will share the description and source code.
Attention! Measuring operations are very intolerant of incorrect settings. It is strongly recommended to do preliminary tests on loose object that will not damage the probe when unexpected movements. It is recommended to carefully check each setting before measuring the workpiece.
Installation.
Warning: Spoiler!
1. Add to your .ini these settingsThis application can be easily connected to Gmoccapy, differ only in lines for panel connection
2. The following files from the archive are placed in:
your-folder-configuration/pyton
probe_screen.py
your-folder-configuration/your_subroutine_path
all from folder "macros"
your-folder-configuration/probe_icons
all from folder "probe_icons"
~/
.axisrc
If you are already using .axisrc, then only add to your file contents of this .axisrc.
[DISPLAY]

DISPLAY = axis

EMBED_TAB_NAME=Probe Screen
EMBED_TAB_COMMAND=halcmd loadusr -Wn gladevcp gladevcp -c gladevcp -u python/probe_screen.py -x {XID} probe_icons/probe_screen.glade

......
[RS274NGC]

FEATURES=30

......
[TOOLSENSOR]
# Control probe rapid feed
RAPID_SPEED = 600EMBED_TAB_NAME=Probe Screen
EMBED_TAB_LOCATION = ntb_user_tabs
EMBED_TAB_COMMAND = gladevcp -x {XID} -u python/probe_screen.py probe_icons/probe_screen.glade2. The following files from the archive are placed in:
your-folder-configuration/pyton
probe_screen.py
your-folder-configuration/your_subroutine_path
all from folder "macros"
your-folder-configuration/probe_icons
all from folder "probe_icons"
~/
.axisrc
If you are already using .axisrc, then only add to your file contents of this .axisrc.
Use.
Set the probe in the spindle.
Move manually probe for Z about 2-10 mm above the workpiece surface,
and for XY about the position indicated by the colored dot on the appropriate button Probe Screen.
Fill parameters. Meaning of the parameters should be clear from the names and pictures (the name pop up when approaching the mouse). If you change the parameters are automatically saved in manualtoolchange.pref .
Hit only! the button that corresponds to the position of the probe above the workpiece. For the other buttons - another position above the workpiece.
You do not need to expose offsets for tool "Probe", the program desired zero offsets for the current tool makes herself, and G-code works off all in relative coordinates.
In fact, you can use the application immediately after the Home.
The trajectory of the probe by the example of measurement outside corner X+Y+
Path measurement cylinder, edge length should be approximately equal to the radius of the cylinder measured, xy clearance - outside offset from the walls of the cylinder
The trajectory of the probe by the example of measurement inside corner X+Y+
Path measurement hole, edge length should be approximately equal to the radius of the hole measured, xy clearance - inside offset from the walls of the hole.
Any of the search ends at XY moving at the desired point (or edge, or corner, or center), Z remains in the original position.
Sources
P.S. Style of Nick's for Features great decorates Probe Screen. For him, huge gratitude!
P.S.S. Sorry for my English.
Last edit: 16 Jul 2019 16:56 by verser.
The following user(s) said Thank You: Mike_Eitel, BigJohnT, andypugh, Nick, billykid, PKM, RotarySMP, RayJr, nkp, blacksmith99 and 30 other people also said thanks.
Please Log in or Create an account to join the conversation.
- mariusl
-

- Offline
- Platinum Member
-

13 May 2015 22:36 - 13 May 2015 22:55 #58641
by mariusl
Regards
Marius
www.bluearccnc.com
Replied by mariusl on topic Work with probe
Hi
What is the attached file's proper extension please? I renamed to all the know compressed file extensions but nothing works.
What is the attached file's proper extension please? I renamed to all the know compressed file extensions but nothing works.
Regards
Marius
www.bluearccnc.com
Last edit: 13 May 2015 22:55 by mariusl.
Please Log in or Create an account to join the conversation.
- andypugh
-

- Offline
- Moderator
-

Less
More
- Posts: 19753
- Thank you received: 4586
13 May 2015 23:09 #58643
by andypugh
Replied by andypugh on topic Work with probe
It was a .rar file.
I swapped it for a .zip
I swapped it for a .zip
The following user(s) said Thank You: verser
Please Log in or Create an account to join the conversation.
- mariusl
-

- Offline
- Platinum Member
-

14 May 2015 00:07 #58647
by mariusl
Regards
Marius
www.bluearccnc.com
Replied by mariusl on topic Work with probe
It is looking very promising so far. I have not got it to work on Gmoccapy yet but I can see one very big requirement.
One must have the option to choose an offset (G55 etc) and then choose to set the coordinate system to zero in stead of just making a measurement. If I probe a hole I would want to set the tool to the middle of the hole and make X and Y both zero. Now one can start doing bolt patterns or mill threading etc. Similarly for a corner or an edge. You would have to have a parameter for the probe tip diameter and then set the probed edge as zero for the axis involved if the option was ticked.
As I said looking good and very close to the thing we are all looking for
Regards
Marius
www.bluearccnc.com
Please Log in or Create an account to join the conversation.
- verser
-
 Topic Author
- Offline
- Senior Member
-

Less
More
- Posts: 78
- Thank you received: 69
14 May 2015 00:45 - 14 May 2015 02:15 #58651
by verser

Replied by verser on topic Work with probe
Now you can insert the probe into the hole, set Z_clearance=0, start measure without worrying about any offsets, and tool will be placed to the middle of the hole. Parameter for the probe tip diameter is present and accounted for in the measurementsOne must have the option to choose an offset (G55 etc) and then choose to set the coordinate system to zero in stead of just making a measurement. If I probe a hole I would want to set the tool to the middle of the hole and make X and Y both zero. Now one can start doing bolt patterns or mill threading etc. Similarly for a corner or an edge. You would have to have a parameter for the probe tip diameter and then set the probed edge as zero for the axis involved if the option was ticked.
Last edit: 14 May 2015 02:15 by verser.
Please Log in or Create an account to join the conversation.
- mariusl
-

- Offline
- Platinum Member
-

14 May 2015 13:14 #58663
by mariusl
Regards
Marius
www.bluearccnc.com
Replied by mariusl on topic Work with probe
Ah you see I cannot run it yet on Gmoccapy so I did not test anything. Just observations.
So for a hole, it will place the probe in the middle of the hole and I can then do a manual offset.
How does that work for the edges?
So for a hole, it will place the probe in the middle of the hole and I can then do a manual offset.
How does that work for the edges?
Regards
Marius
www.bluearccnc.com
Please Log in or Create an account to join the conversation.
- verser
-
 Topic Author
- Offline
- Senior Member
-

Less
More
- Posts: 78
- Thank you received: 69
14 May 2015 14:50 #58665
by verser
Replied by verser on topic Work with probe
I just fixed a bug in the source code. Take, please, the new version.Ah you see I cannot run it yet on Gmoccapy so I did not test anything. Just observations.
Please Log in or Create an account to join the conversation.
- verser
-
 Topic Author
- Offline
- Senior Member
-

Less
More
- Posts: 78
- Thank you received: 69
14 May 2015 14:57 - 14 May 2015 17:39 #58666
by verser
 .
.
Replied by verser on topic Work with probe
In the beginning you need to install the tip of the probe just above the measured corner or edge(as indicated by the colored dot on the appropriate button Probe Screen). Z_clearance sets the depth. Set all parameters. And goHow does that work for the edges?
Last edit: 14 May 2015 17:39 by verser.
Please Log in or Create an account to join the conversation.
- mariusl
-

- Offline
- Platinum Member
-

14 May 2015 19:48 #58680
by mariusl
Regards
Marius
www.bluearccnc.com
Replied by mariusl on topic Work with probe
Thanks I uploaded the new software and now it loads. Not tested yet but will do so soon.
What is the other piece of software next to you probing stuff on your picture a couple of posts back?
What is the other piece of software next to you probing stuff on your picture a couple of posts back?
Regards
Marius
www.bluearccnc.com
Please Log in or Create an account to join the conversation.
- mariusl
-

- Offline
- Platinum Member
-

14 May 2015 20:11 #58684
by mariusl
Regards
Marius
www.bluearccnc.com
Replied by mariusl on topic Work with probe
Hi
Gmoccapy loads with the probing stuff loaded in the usertab but when I run it the system goes to MDI mode and nothing further happens. Is there some other stuff that must be installed or not?
Gmoccapy loads with the probing stuff loaded in the usertab but when I run it the system goes to MDI mode and nothing further happens. Is there some other stuff that must be installed or not?
Regards
Marius
www.bluearccnc.com
Please Log in or Create an account to join the conversation.
Time to create page: 0.338 seconds

