Hurco KMB-IS CNC update
- CORBETT
-

- Offline
- Elite Member
-

Less
More
- Posts: 286
- Thank you received: 113
05 Aug 2020 17:00 #177407
by CORBETT
Leith,
Ok just a couple of quick comments, I am super busy and can't answer all at the moment but this should help.
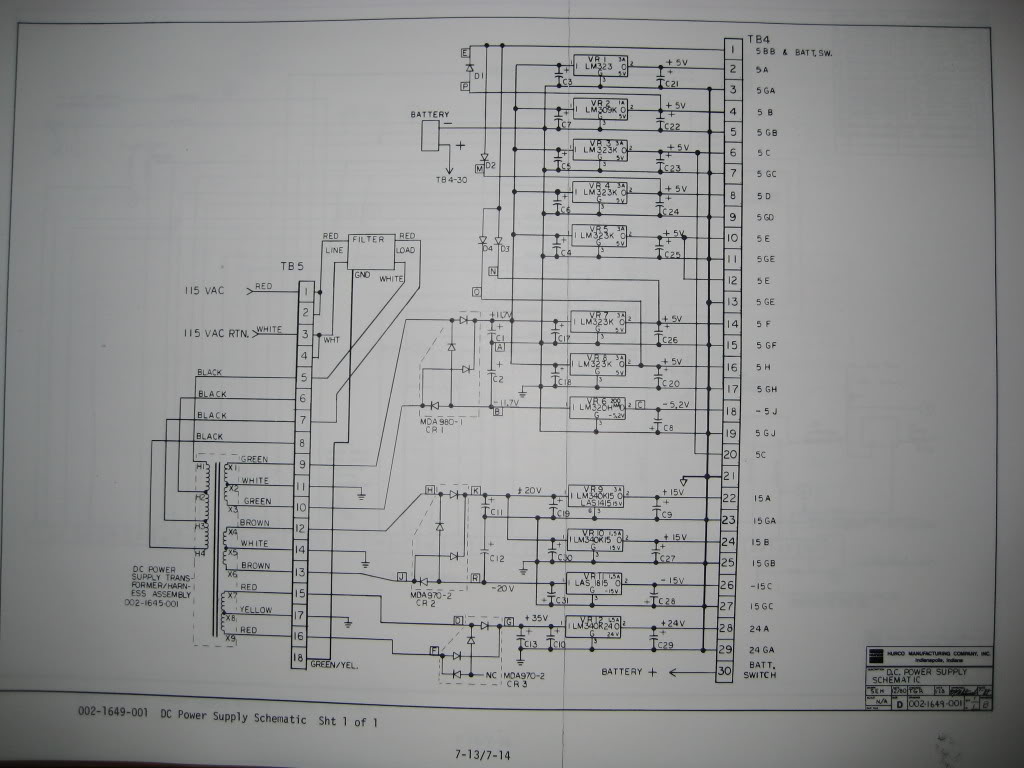
Ok you are seeing the Power Supply in the right cabinet that has the long bank of TO-3's. What that is exactly was a way Hurco isolated all of the cards and boards in the computer card cage, limit switches, encoders, and other low voltage. If you see the schematic (I will find it and attach), you will see that each TO-3 was independent of each other and simply was the transistor for each broken apart power supply. When you look at that big power supply board, you see the full bank of TO-3's at the top. BUT they are not all tied together forming one output or two. When you look at the schematic, you will see that each one has its own voltage output and to a specific card or place in the machine controller, roughly about 20-25 outputs. I am sure Hurco did this to isolate each card and board, so that if one TO-3 shorted or something went wrong elsewhere, it would only burn up that one section of the control instead of frying everything. I took out the entire power supply and added the Allen Bradley power supplies you see in the picture at the bottom of my cabinet.
Ok the reason you end up with only a couple of power supplies instead of all those multiple supplies in the OEM power supply is the fact that you will not need to split all of the voltages or even have a lot of different voltages. The OEM supply had +5, -5, +15, -15, +24, and -24. Multiples of all so that each could be isolated. You will not need multiples when you convert to the Mesa card and you will not need 15v anywhere as that was between the computer cards and the analog cards. The 24v and 5v are all that you need and hence why I have the few Allen Bradley power supplies in the bottom of my cabinet. I only have 5V and 24V supplies at this point. 5V for the existing encoders and OEM proximity switches. 24V for the K5 relays and other control areas.
You could use the existing OEM power supply, but it is missing the transformer off of it. IF you look at mine in the throwback picture you will see the "Danger High Voltage" sticker and you are missing that transformer. I completely took that entire power supply out as I did not need it, plus I needed the space. If it were me and you are going to retrofit to LinuxCNC, then I would remove the OEM power supply and just add the 2 different voltages that you need. I am not sure what Mesa uses, but I would think 5 or 24V. Tom or Pete will be able to tell you for sure.
I have attached another schematic of that power supply so you can understand what I am saying about all of the TO-3's being independent and making multiple independent little power supplies, once again I am sure this was for isolation protecting the cards.
I am super swamped this week with work, but will do my best to try and catch you at times through the day.
Robert
Replied by CORBETT on topic Hurco KMB-IS CNC update
Leith,
Ok just a couple of quick comments, I am super busy and can't answer all at the moment but this should help.
Ok you are seeing the Power Supply in the right cabinet that has the long bank of TO-3's. What that is exactly was a way Hurco isolated all of the cards and boards in the computer card cage, limit switches, encoders, and other low voltage. If you see the schematic (I will find it and attach), you will see that each TO-3 was independent of each other and simply was the transistor for each broken apart power supply. When you look at that big power supply board, you see the full bank of TO-3's at the top. BUT they are not all tied together forming one output or two. When you look at the schematic, you will see that each one has its own voltage output and to a specific card or place in the machine controller, roughly about 20-25 outputs. I am sure Hurco did this to isolate each card and board, so that if one TO-3 shorted or something went wrong elsewhere, it would only burn up that one section of the control instead of frying everything. I took out the entire power supply and added the Allen Bradley power supplies you see in the picture at the bottom of my cabinet.
Ok the reason you end up with only a couple of power supplies instead of all those multiple supplies in the OEM power supply is the fact that you will not need to split all of the voltages or even have a lot of different voltages. The OEM supply had +5, -5, +15, -15, +24, and -24. Multiples of all so that each could be isolated. You will not need multiples when you convert to the Mesa card and you will not need 15v anywhere as that was between the computer cards and the analog cards. The 24v and 5v are all that you need and hence why I have the few Allen Bradley power supplies in the bottom of my cabinet. I only have 5V and 24V supplies at this point. 5V for the existing encoders and OEM proximity switches. 24V for the K5 relays and other control areas.
You could use the existing OEM power supply, but it is missing the transformer off of it. IF you look at mine in the throwback picture you will see the "Danger High Voltage" sticker and you are missing that transformer. I completely took that entire power supply out as I did not need it, plus I needed the space. If it were me and you are going to retrofit to LinuxCNC, then I would remove the OEM power supply and just add the 2 different voltages that you need. I am not sure what Mesa uses, but I would think 5 or 24V. Tom or Pete will be able to tell you for sure.
I have attached another schematic of that power supply so you can understand what I am saying about all of the TO-3's being independent and making multiple independent little power supplies, once again I am sure this was for isolation protecting the cards.
I am super swamped this week with work, but will do my best to try and catch you at times through the day.
Robert
Attachments:
Please Log in or Create an account to join the conversation.
- _big_
- Offline
- Premium Member
-

Less
More
- Posts: 87
- Thank you received: 13
05 Aug 2020 20:11 - 05 Aug 2020 20:24 #177418
by _big_
Replied by _big_ on topic Hurco KMB-IS CNC update
Hi Robert,
Thanks again for the data.
The mystery of the Hurco deepens...
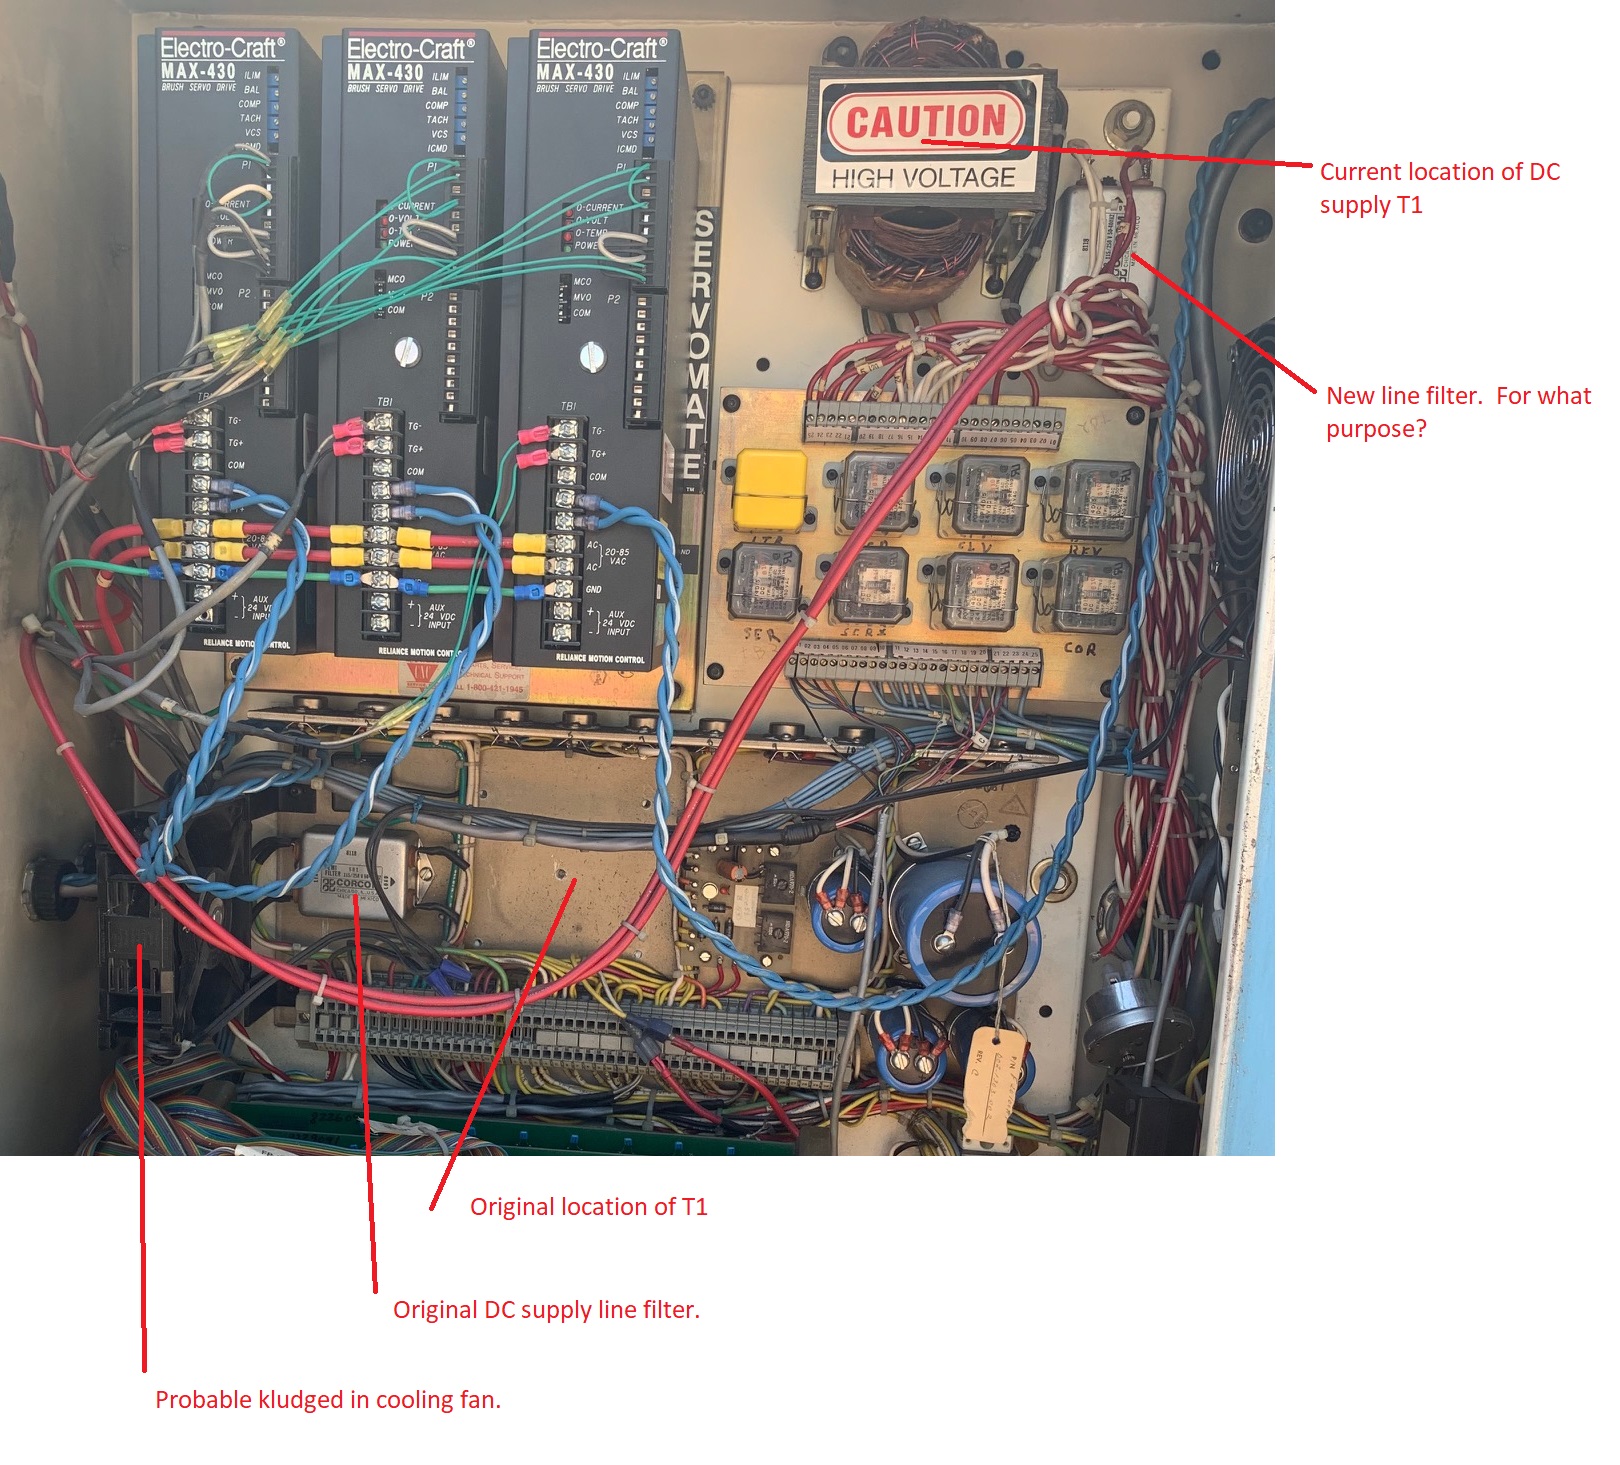
It looks like someone moved the DC supply T1 from the power supply frame to up higher in the cabinet. It also looks like they added a cooling fan on the left side of the supply. My guess is the rectifier board was overheating. So they added the fan but had to get the rectifier board out of the airflow shadow of the transformer. So they moved the transformer. A semi major hack actually.
The line filter on the DC supply frame shows in the schematic. Looks like wires were soldered and heat shrinked. So probably this line filter is still upstream of the relocated T1 transformer. And it looks like they added another line filter next to the relocated T1 transformer. Don't know what that's for.
I believe the T1 transformer takes 120VAC. The left cabinet schematic you sent me shows another transformer labeled T1 that appears to be deriving this 120VAC from the 220VAC 3 phase input. Don't see this T1 in the left cabinet. Suspect I'll have to find a replacement.
It looks like there are about seven +5VDC outputs. I don't think Hurco did it this way for "isolation". Generally speaking if any of the 5VDC supplies dies, the whole computer dies. TTL logic thresholds are referenced off the ground rail. Proper logic operation is not so dependent on all the logic parts having exactly the same VCC (+5VDC). It is not possible to simply parallel the outputs of LM323 and LM309 regulators. I think the multiple supplies was just there as a simple way of generating sufficient 5VDC.
Here's a picture that shows some of this stuff.
Thanks again for the data.
The mystery of the Hurco deepens...
It looks like someone moved the DC supply T1 from the power supply frame to up higher in the cabinet. It also looks like they added a cooling fan on the left side of the supply. My guess is the rectifier board was overheating. So they added the fan but had to get the rectifier board out of the airflow shadow of the transformer. So they moved the transformer. A semi major hack actually.
The line filter on the DC supply frame shows in the schematic. Looks like wires were soldered and heat shrinked. So probably this line filter is still upstream of the relocated T1 transformer. And it looks like they added another line filter next to the relocated T1 transformer. Don't know what that's for.
I believe the T1 transformer takes 120VAC. The left cabinet schematic you sent me shows another transformer labeled T1 that appears to be deriving this 120VAC from the 220VAC 3 phase input. Don't see this T1 in the left cabinet. Suspect I'll have to find a replacement.
It looks like there are about seven +5VDC outputs. I don't think Hurco did it this way for "isolation". Generally speaking if any of the 5VDC supplies dies, the whole computer dies. TTL logic thresholds are referenced off the ground rail. Proper logic operation is not so dependent on all the logic parts having exactly the same VCC (+5VDC). It is not possible to simply parallel the outputs of LM323 and LM309 regulators. I think the multiple supplies was just there as a simple way of generating sufficient 5VDC.
Here's a picture that shows some of this stuff.
Attachments:
Last edit: 05 Aug 2020 20:24 by _big_.
Please Log in or Create an account to join the conversation.
- _big_
- Offline
- Premium Member
-
Less
More
- Posts: 87
- Thank you received: 13
05 Aug 2020 20:45 #177419
by _big_
Replied by _big_ on topic Hurco KMB-IS CNC update
Was over on industryarena.com looking at a Hurco upgrade thread.
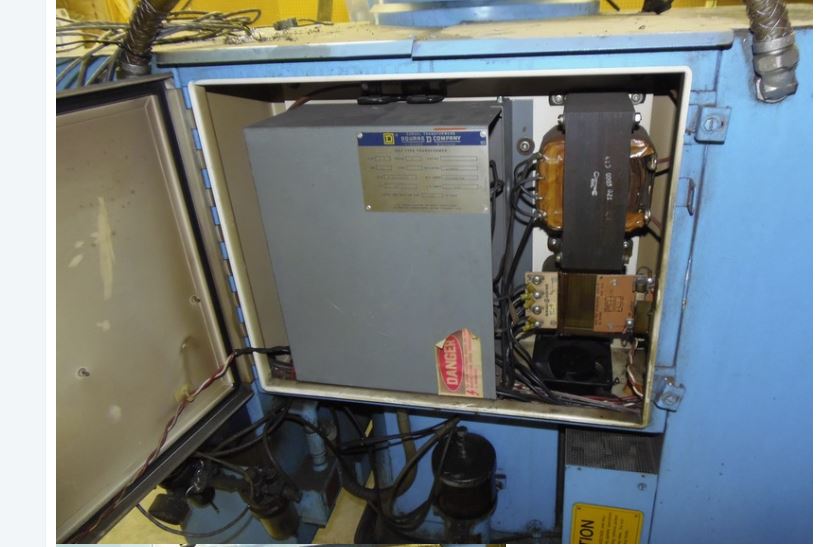
Discovered there is apparently a third cabinet on the rear of the machine. See pic below. It doesn't have an access latch handle like the left and right cabinets.
I expect this is where the missing T1 transformer lives. I'll have to check into this the next time I visit the machine.
This pic is a snip off the industryarena.com thread.
Please Log in or Create an account to join the conversation.
- CORBETT
-
- Offline
- Elite Member
-
Less
More
- Posts: 286
- Thank you received: 113
05 Aug 2020 22:09 #177427
by CORBETT
Leith,
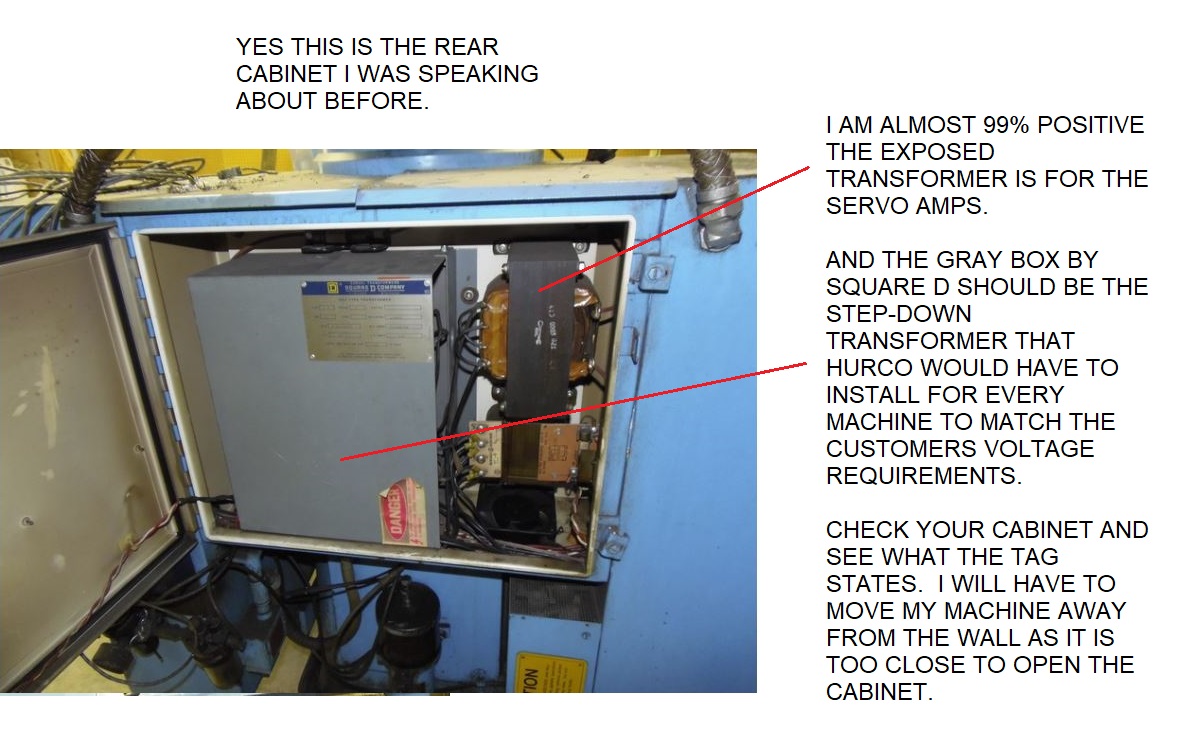
Yes this is the rear cabinet I was speaking about. For some reason I was thinking they were in two separate cabinets, but that is what I vaguely remember for the transformers. Just been a really long time since I have been in them. Ok the right hand exposed transformer should definitely be the single phase transformer to the servo amps. I know that is the one. The gray box by Square D would be the step-down transformer that every machine would need before leaving Hurco headed to the customer. This makes total sense also as there is a tag on the gray box and I am sure they would have simply ordered the step-down transformer for whatever they needed to match. They would have only kept a few of the main type you use, such as 220/440V. Anything like 575V that they showed in the manual would have been ordered when they received a order from a customer and therefore that is why it is packaged. Should definitely be able to read the tag and see what it states. I will see what mine says so you have a idea.
I am going to the shop and I will take a quick look and get back on here in a bit to let you know something. Mine is almost against the wall, so I may have to take a little time and move it off the wall.
Will be back.
Replied by CORBETT on topic Hurco KMB-IS CNC update
Leith,
Yes this is the rear cabinet I was speaking about. For some reason I was thinking they were in two separate cabinets, but that is what I vaguely remember for the transformers. Just been a really long time since I have been in them. Ok the right hand exposed transformer should definitely be the single phase transformer to the servo amps. I know that is the one. The gray box by Square D would be the step-down transformer that every machine would need before leaving Hurco headed to the customer. This makes total sense also as there is a tag on the gray box and I am sure they would have simply ordered the step-down transformer for whatever they needed to match. They would have only kept a few of the main type you use, such as 220/440V. Anything like 575V that they showed in the manual would have been ordered when they received a order from a customer and therefore that is why it is packaged. Should definitely be able to read the tag and see what it states. I will see what mine says so you have a idea.
I am going to the shop and I will take a quick look and get back on here in a bit to let you know something. Mine is almost against the wall, so I may have to take a little time and move it off the wall.
Will be back.
Attachments:
Please Log in or Create an account to join the conversation.
- CORBETT
-
- Offline
- Elite Member
-
Less
More
- Posts: 286
- Thank you received: 113
05 Aug 2020 22:52 #177430
by CORBETT
Replied by CORBETT on topic Hurco KMB-IS CNC update
Ok I was able to squeeze in enough to get pics and I am uploading to my computer now. Mine is identical to the pic from industry arena.
I am positive the gray box will be where the step down trans is at. Will know soon, have pics of my tag.
Be back in a bit.
I am positive the gray box will be where the step down trans is at. Will know soon, have pics of my tag.
Be back in a bit.
Please Log in or Create an account to join the conversation.
- CORBETT
-
- Offline
- Elite Member
-
Less
More
- Posts: 286
- Thank you received: 113
05 Aug 2020 22:54 #177431
by CORBETT
Replied by CORBETT on topic Hurco KMB-IS CNC update
Also forgot to say that I will get with you about your other cabinet pic and tell you a few things, but will finish up about transformers first
Please Log in or Create an account to join the conversation.
- CORBETT
-
- Offline
- Elite Member
-
Less
More
- Posts: 286
- Thank you received: 113
05 Aug 2020 23:20 #177439
by CORBETT
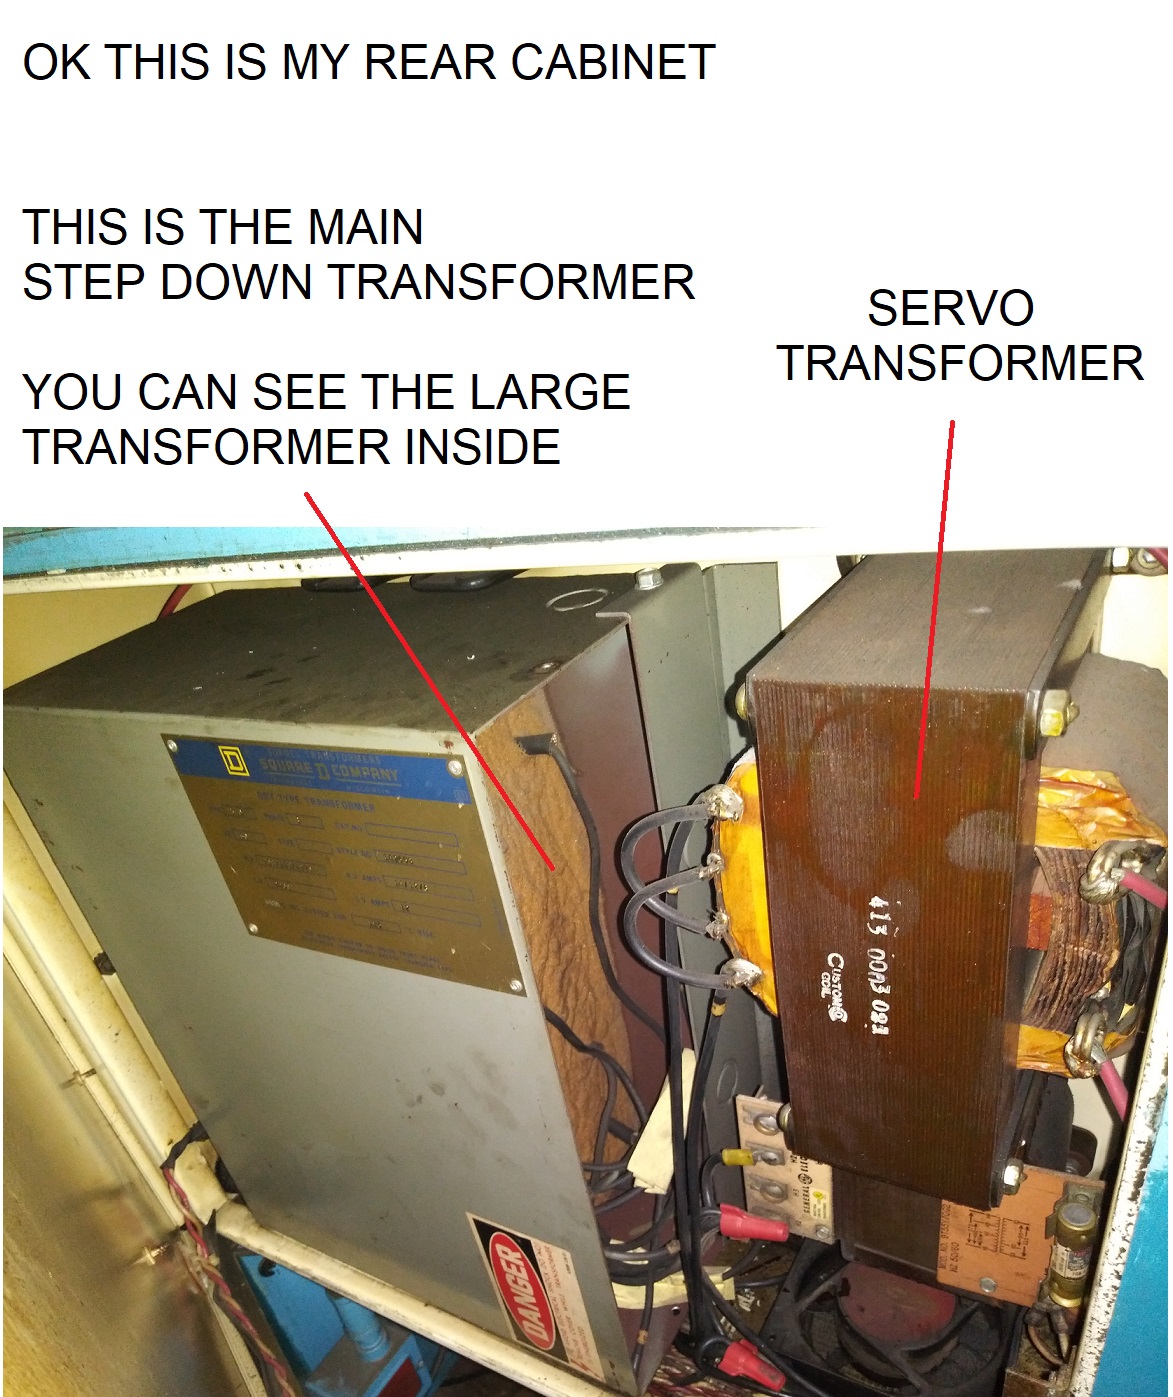
Leith,
Ok yeah just saw the tag and it's 3phase with HV input. In one of the pics, you can see into the side of the gray Square D box and it has a huge transformer the size of the gray box. So yeah that would be the main machine step down transformer, as it would have to be bigger than the servo transformer anyway. Not only is it powering it but all of the machine power will be ran by the step down transformer.
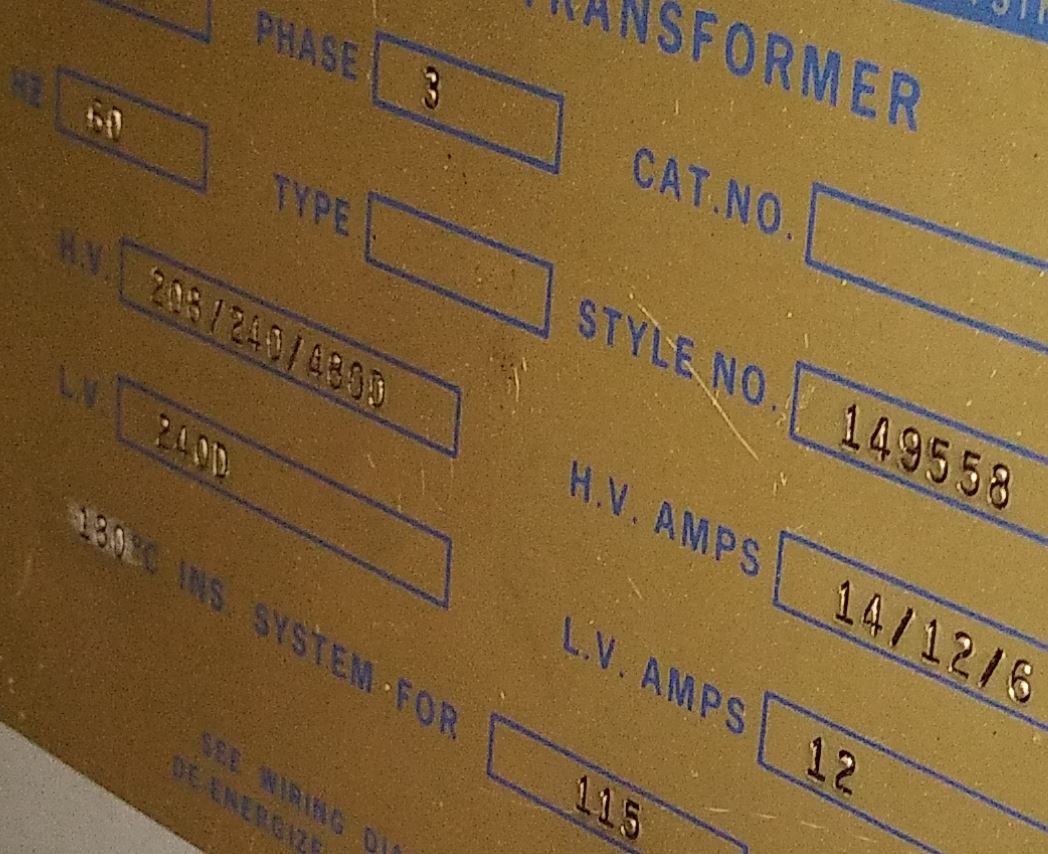
I can't make out the tag perfectly, so may have to go take pics again. but its showing:
HV" 208/220/480D
LV" 240D
KVA: 5.0
PHASE: 3
HV AMPS: 14/12/6
LV AMPS: 12
So yeah the large gray box is the main machine power step down transformer and the one on the right will be to the servo amp transformer. The smaller exposed transformer is definitely the servo transformer, I saw two red wires coming off the secondary side, and I only saw two wire supplying the primary, so that's it. Plus there were 4 taps on the primary with 2 input wires and 2 loops.
Give me a bit and I will up load pics. The lighting is getting bad here, so I may have to shut computer down for a bit.
Will be back,
Robert
Replied by CORBETT on topic Hurco KMB-IS CNC update
Leith,
Ok yeah just saw the tag and it's 3phase with HV input. In one of the pics, you can see into the side of the gray Square D box and it has a huge transformer the size of the gray box. So yeah that would be the main machine step down transformer, as it would have to be bigger than the servo transformer anyway. Not only is it powering it but all of the machine power will be ran by the step down transformer.
I can't make out the tag perfectly, so may have to go take pics again. but its showing:
HV" 208/220/480D
LV" 240D
KVA: 5.0
PHASE: 3
HV AMPS: 14/12/6
LV AMPS: 12
So yeah the large gray box is the main machine power step down transformer and the one on the right will be to the servo amp transformer. The smaller exposed transformer is definitely the servo transformer, I saw two red wires coming off the secondary side, and I only saw two wire supplying the primary, so that's it. Plus there were 4 taps on the primary with 2 input wires and 2 loops.
Give me a bit and I will up load pics. The lighting is getting bad here, so I may have to shut computer down for a bit.
Will be back,
Robert
Please Log in or Create an account to join the conversation.
- CORBETT
-
- Offline
- Elite Member
-
Less
More
- Posts: 286
- Thank you received: 113
06 Aug 2020 00:01 #177444
by CORBETT
Replied by CORBETT on topic Hurco KMB-IS CNC update
Ok here is another pic. I have more, but working on things.
Will be back later,
Robert
Will be back later,
Robert
Attachments:
Please Log in or Create an account to join the conversation.
- CORBETT
-
- Offline
- Elite Member
-
Less
More
- Posts: 286
- Thank you received: 113
06 Aug 2020 00:21 #177446
by CORBETT
Replied by CORBETT on topic Hurco KMB-IS CNC update
Leith,
Ok here is a picture of the tag... not the best, but can read it. The top pic is blown up and cropped from the bottom pic.
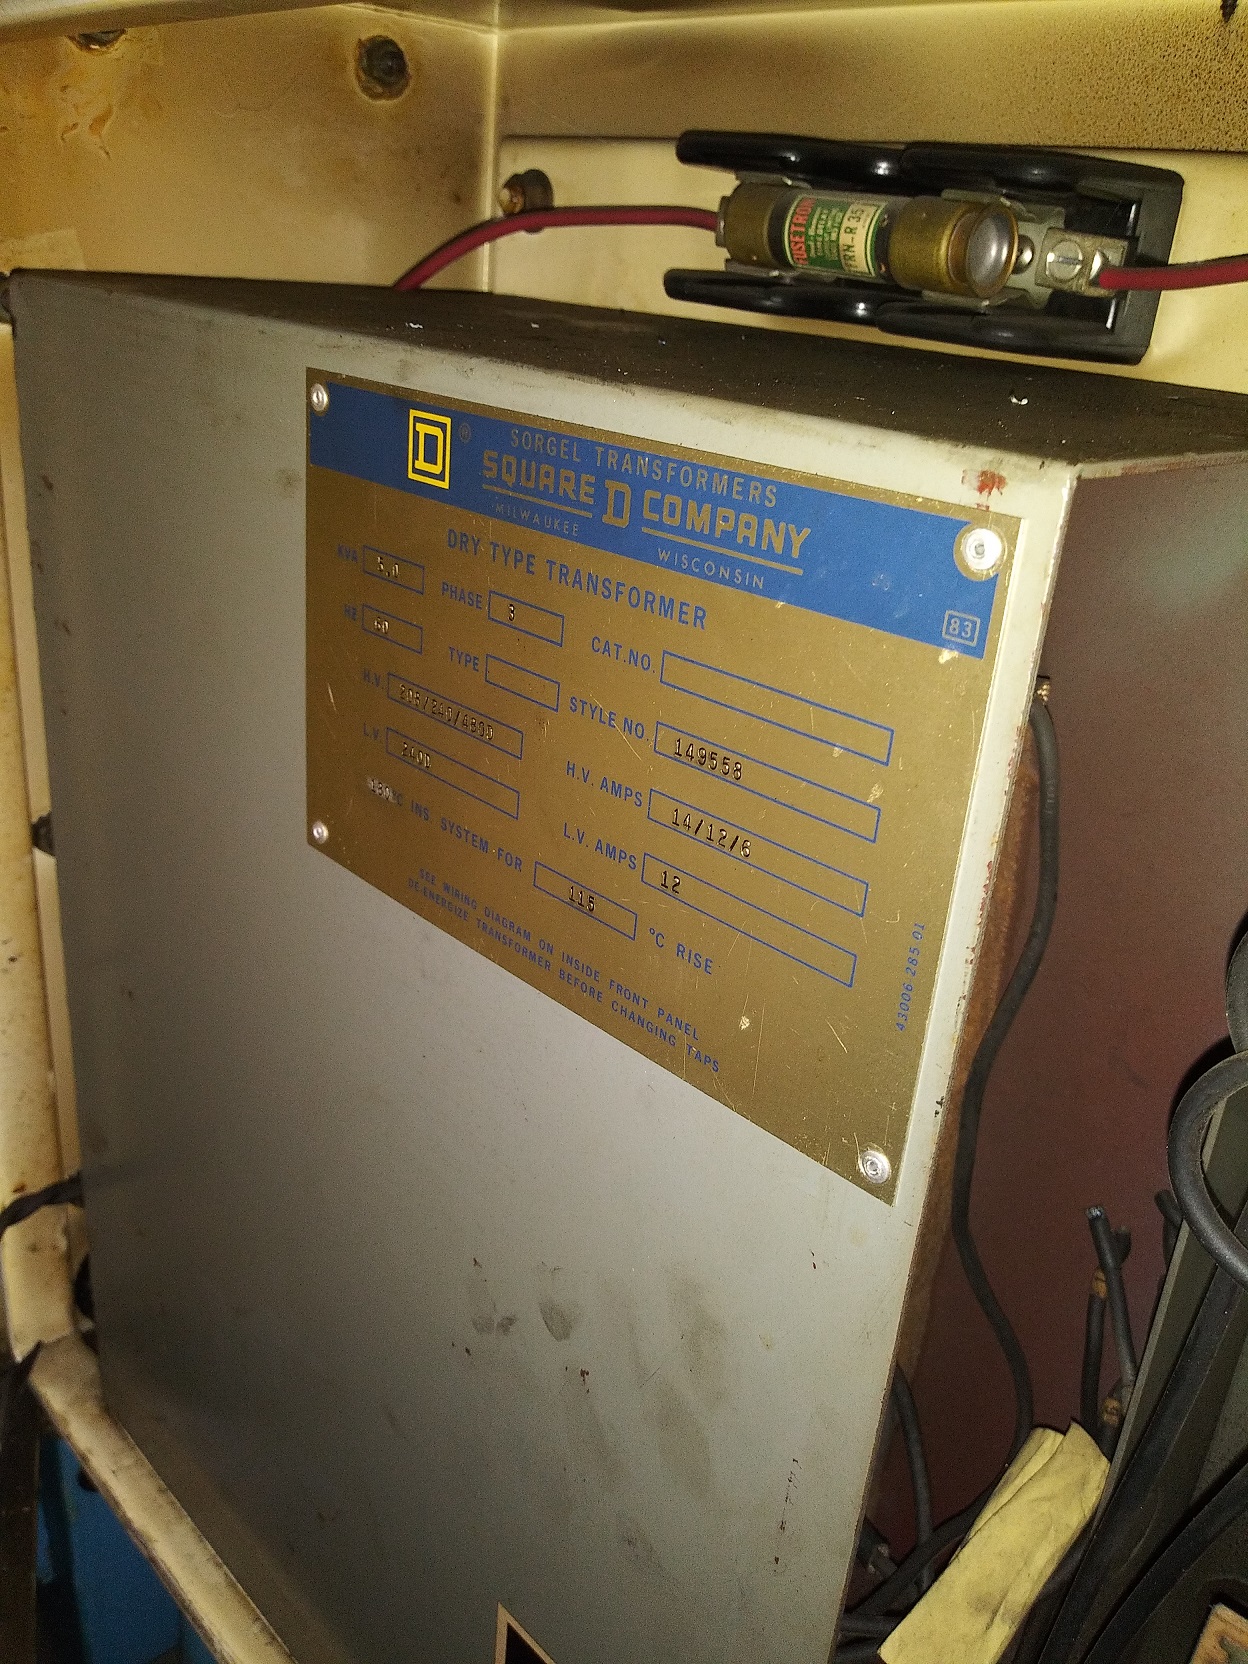
Ok here is a picture of the tag... not the best, but can read it. The top pic is blown up and cropped from the bottom pic.
Please Log in or Create an account to join the conversation.
- CORBETT
-
- Offline
- Elite Member
-
Less
More
- Posts: 286
- Thank you received: 113
06 Aug 2020 05:05 #177465
by CORBETT
Leith,
Sorry I have not gotten more up, but I am way behind on paperwork and trying to bid a job this week... stretched thin LOL.
Just to kind of keep you on track, this is what I would be pushing to do.
Quick List:
1) E-stop
2) Proximity Switches (this will be later with Mesa board)
3) Oiler working and/or getting ways and ball screws coated with oil
4) Cap off all exposed wiring in the left cabinet, getting ready for power
5) Check wiring from Disconnect to the Main transformer, then following wiring and cap any exposed A/C power wires.
6) Air working, or temporarily bypass the air switch for E-stop chain. I don't recommend bypassing, you could forget to wire back up.
7) Check all of the wiring in the right cabinet to see if any A/C power needs capping off, or anything exposed like the left cabinet
This gets you close to powering the machine.
More detailed from the Quick List above:
1) Emergency Stop wired in, this is the first and foremost thing to do before firing up the power.... Like I said before this is super easy to do. I would find a way of temporarily mounting a E-Stop and that way you can wire directly into the TB-3 connector. Just simply a loop between two of the TB-3 connectors and the E-stop.
2) You really need the proximity switches wired next, but that will be down the road when you wire up the Mesa board. When you go to wire the Mesa board. E-stop is first and Proximity switches next. Somewhere down the line you will have the table take off and be glad to have either wired to keep from destroying the machine. I actually consider the proximity switches more critical at this stage as you never know what the servo's may do when setting everything up.... but E-stop is a must... safety first.
2) Keep the way oiler in the back of your mind and prep to get it working. You can coat the ways and ball screws with oil before trying to operate the servos, but can't move around much until you get oil flowing. This is critical... that is the life of the machine literally, especially your ball screws.
4) Cap off all of the wiring in the left panel so that you can prep to put power to the mill. If you want to be simple, you can just use electrical tape to temporarily cover all exposed ends/terminals. I am pretty anal about wiring and I usually cut and cap things with crimp terminals (barrels or caps) so there is no chance of touching or shorting anything.... but you should be tearing a lot of that wiring out, as the VFD will have very little wiring.
5) Check the step down transformer wiring and follow it back to the left cabinet. Should actually go back to the disconnect. You should be able to find any other wiring that powered the Parajust board and cap off. Once you figure out the wiring to the transformers and disconnect then you should be getting closer to put power to the machine. When I get a chance I will trace mine, but I am sure it will simply go from the disconnect to the stepdown transformer, and then take off from the step down to a few places such as the servo transformer, the left cabinet for powering the parajust board, and there will be a power leg that goes over to the right cabinet to power the power supply, hour meter, timer for the oiler, coolant contactor, acc contractor and so forth.
6) Air working to get the E-stop chain working. The air pressure switch need pressure to close and make the chain connection for the E-stop loop. I would not bypass it as it is easy to forget and not wire it back up.
7) Follow the A/C wiring into the right cabinet and make sure there is nothing exposed. It should be white and red wires twisted together going through out the cabinet. Such as to the hour meter at the rear of machine, power to the timer for the oiler solenoid, then there will be power to the power supply, power to the line filters, and power to the contactors. There will be another set of red wires that come from the servo transformer to the servo amps, but that is the 80V and separate, but still need to check for anything exposed.
Once you are comfortable with everything, then you are getting close to putting power and seeing what is going to happen. You technically will not get the power working to the servo amps unless the K5 relays are working. This is assuming the aftermarket work was done correctly and tied back into Hurco's original wiring. But once you are close to power, I can tell you what steps to take from there.
Also on a tangent, you may want to find a old desktop computer or whatever you are comfortable using and put LinuxCNC on and start getting use to how it operates. LCNC has a simulator so that you can tinker to get a feel for it. You may have already done this.
Sorry I have not gotten more tonight, but I am super behind on paperwork and got to get things done in the next few days. I will try to get more together, but I have to have a quote together for the Air Force by this weekend, so I am super busy.
I will be back tomorrow, hope the previous post have helped. Up way too late again, LOL.
Robert
Replied by CORBETT on topic Hurco KMB-IS CNC update
Leith,
Sorry I have not gotten more up, but I am way behind on paperwork and trying to bid a job this week... stretched thin LOL.
Just to kind of keep you on track, this is what I would be pushing to do.
Quick List:
1) E-stop
2) Proximity Switches (this will be later with Mesa board)
3) Oiler working and/or getting ways and ball screws coated with oil
4) Cap off all exposed wiring in the left cabinet, getting ready for power
5) Check wiring from Disconnect to the Main transformer, then following wiring and cap any exposed A/C power wires.
6) Air working, or temporarily bypass the air switch for E-stop chain. I don't recommend bypassing, you could forget to wire back up.
7) Check all of the wiring in the right cabinet to see if any A/C power needs capping off, or anything exposed like the left cabinet
This gets you close to powering the machine.
More detailed from the Quick List above:
1) Emergency Stop wired in, this is the first and foremost thing to do before firing up the power.... Like I said before this is super easy to do. I would find a way of temporarily mounting a E-Stop and that way you can wire directly into the TB-3 connector. Just simply a loop between two of the TB-3 connectors and the E-stop.
2) You really need the proximity switches wired next, but that will be down the road when you wire up the Mesa board. When you go to wire the Mesa board. E-stop is first and Proximity switches next. Somewhere down the line you will have the table take off and be glad to have either wired to keep from destroying the machine. I actually consider the proximity switches more critical at this stage as you never know what the servo's may do when setting everything up.... but E-stop is a must... safety first.
2) Keep the way oiler in the back of your mind and prep to get it working. You can coat the ways and ball screws with oil before trying to operate the servos, but can't move around much until you get oil flowing. This is critical... that is the life of the machine literally, especially your ball screws.
4) Cap off all of the wiring in the left panel so that you can prep to put power to the mill. If you want to be simple, you can just use electrical tape to temporarily cover all exposed ends/terminals. I am pretty anal about wiring and I usually cut and cap things with crimp terminals (barrels or caps) so there is no chance of touching or shorting anything.... but you should be tearing a lot of that wiring out, as the VFD will have very little wiring.
5) Check the step down transformer wiring and follow it back to the left cabinet. Should actually go back to the disconnect. You should be able to find any other wiring that powered the Parajust board and cap off. Once you figure out the wiring to the transformers and disconnect then you should be getting closer to put power to the machine. When I get a chance I will trace mine, but I am sure it will simply go from the disconnect to the stepdown transformer, and then take off from the step down to a few places such as the servo transformer, the left cabinet for powering the parajust board, and there will be a power leg that goes over to the right cabinet to power the power supply, hour meter, timer for the oiler, coolant contactor, acc contractor and so forth.
6) Air working to get the E-stop chain working. The air pressure switch need pressure to close and make the chain connection for the E-stop loop. I would not bypass it as it is easy to forget and not wire it back up.
7) Follow the A/C wiring into the right cabinet and make sure there is nothing exposed. It should be white and red wires twisted together going through out the cabinet. Such as to the hour meter at the rear of machine, power to the timer for the oiler solenoid, then there will be power to the power supply, power to the line filters, and power to the contactors. There will be another set of red wires that come from the servo transformer to the servo amps, but that is the 80V and separate, but still need to check for anything exposed.
Once you are comfortable with everything, then you are getting close to putting power and seeing what is going to happen. You technically will not get the power working to the servo amps unless the K5 relays are working. This is assuming the aftermarket work was done correctly and tied back into Hurco's original wiring. But once you are close to power, I can tell you what steps to take from there.
Also on a tangent, you may want to find a old desktop computer or whatever you are comfortable using and put LinuxCNC on and start getting use to how it operates. LCNC has a simulator so that you can tinker to get a feel for it. You may have already done this.
Sorry I have not gotten more tonight, but I am super behind on paperwork and got to get things done in the next few days. I will try to get more together, but I have to have a quote together for the Air Force by this weekend, so I am super busy.
I will be back tomorrow, hope the previous post have helped. Up way too late again, LOL.
Robert
The following user(s) said Thank You: Wynoose66
Please Log in or Create an account to join the conversation.
Moderators: piasdom
Time to create page: 1.390 seconds