1 or 2 dedicated 120VAC circuits for my CNC?
- spumco
- Offline
- Platinum Member
-

- Posts: 2126
- Thank you received: 882
I have already spent a solid month and a half (8+ hours a day and weekends) just to figure out all the components I need and how they are connected.
Is that all?
Attachments:
Please Log in or Create an account to join the conversation.
- Sray69
- Offline
- Elite Member
-

- Posts: 255
- Thank you received: 13
Good points. I hadn't thought of numbering the wires on the diagram but do have a label maker on my list to research/purchase.Seriously, if you can stomach the additional work, numbering the wires on the diagram and adding labels to the wires as you install them will help in the future.
Thanks for the guidance. Much appreciated!
Please Log in or Create an account to join the conversation.
- Sray69
- Offline
- Elite Member
-
- Posts: 255
- Thank you received: 13
Wow!
I have already spent a solid month and a half (8+ hours a day and weekends) just to figure out all the components I need and how they are connected.
Is that all?
Well to be honest, I thought the mechanical build part was going to be the hardest. I couldn't wait to get to the electrical thinking it would be much quicker and easier. HAHAHAHAHA! Man was I wrong!
Please Log in or Create an account to join the conversation.
- spumco
- Offline
- Platinum Member
-
- Posts: 2126
- Thank you received: 882
Attachments:
Please Log in or Create an account to join the conversation.
- Sray69
- Offline
- Elite Member
-
- Posts: 255
- Thank you received: 13
Please Log in or Create an account to join the conversation.
- Sray69
- Offline
- Elite Member
-
- Posts: 255
- Thank you received: 13
- I have been told to put a fan in the bottom of the cabinet and a vent in the top. Is there a specific location that is recommended or best? Can they go in the door? Or do they have to go in the sides or the top/bottom? I ask because depending on how I lay things out, the air flow may be blocked some by components if I have to put them in the sides or top/bottom. I have determined that if they are placed in the door then they would have better air flow in those situations.
- Not sure why I had not thought about this yet but it turns out my router (Dewalt DWP611) does not have a long enough cord to snake through all the drag chain and down to the cabinet where the switched outlet will be. It is only like 8 feet long and I will need about 20 feet. My question is, do I just run an extension cord or do I replace the cord with a longer one, or do I not run it through all the drag chain and instead drop it from above? That then brings me to another question, whether it is OK to run it in the drag chain with the low voltage wires?
- I have a question is about my breakers. Does it matter which side the line/load go on with the breakers? I ask because I have a couple situations where I have to run the load from one side of a breaker across to the other side of the DIN rail to go into another component. It would be cleaner and easier if I can have the load on the other end of the breaker so I don't have to get it to the other side of the DIN rail. And all my breakers are 120V. I did a little research on it but there was contradicting information. Some say it doesn't matter. Some say if the breaker is not marked specifically with Line and Load sides then it doesn't matter. Some say Line goes on the side of the breaker that the switch is pointing when the circuit is closed (ON).
- My last question is about my diagram. If you look at it you will notice that I have all the 120VAC components on one end of the DIN rail and all my low voltage on the other end. Is this OK to do? Will it cause any interference? Should I try and separate them? If so, how much separation is best?
Thanks
Please Log in or Create an account to join the conversation.
- spumco
- Offline
- Platinum Member
-
- Posts: 2126
- Thank you received: 882
I don't follow any 'industry standard' because I find it hard to follow and I've got no formal training in it. Ladder diagrams drive me nuts, likely through inexperience TBH.
For AC power circuits, its the usual "L1", "L2", ect. If I want to be more granular to help me when wiring or troubleshooting, I'll extend it to "L1-1" or "L2-4a" as that helps keep things straight when following a wire. It tells me what line & voltage to expect, and what components are at either end when referring to the wiring diagram.
For terminal blocks, I number the blocks and then label the wires with what blocks & components they connect. For a row of terminal blocks I'll name them "TB01" "TB02" etc. For different groups of blocks I'll start a new series:
240VAC L1 blocks: TB001-TB0nn
240VAC L2 blocks: TB021-TB02n
24VDC V+ blocks: TB101-TB1nn
24VDC V- blocks: TB201-TB2nn
Other groups are numbered similarly, including new series of block numbers if the group is located outside of the main panel. So...
24VDC V+ blocks in the operator panel: TB501-TB5nn
You get the picture. The numbers don't tell anyone what the voltage is or what the circuit does, but it makes following the wires easy through the diagram and when you've got your face deep in the panel.
Same for components. Circuit breaker 1 is "CB01" and for relays & contactors I'll extend it a bit to include the terminal numbers. I use the "NN/nn-NN/nn" format, where NN is the component and nn is the terminal.
So a wire might have "TB01-K05/A1" on it. That tells me that wire connects TB01 to relay K1's A1 coil terminal.
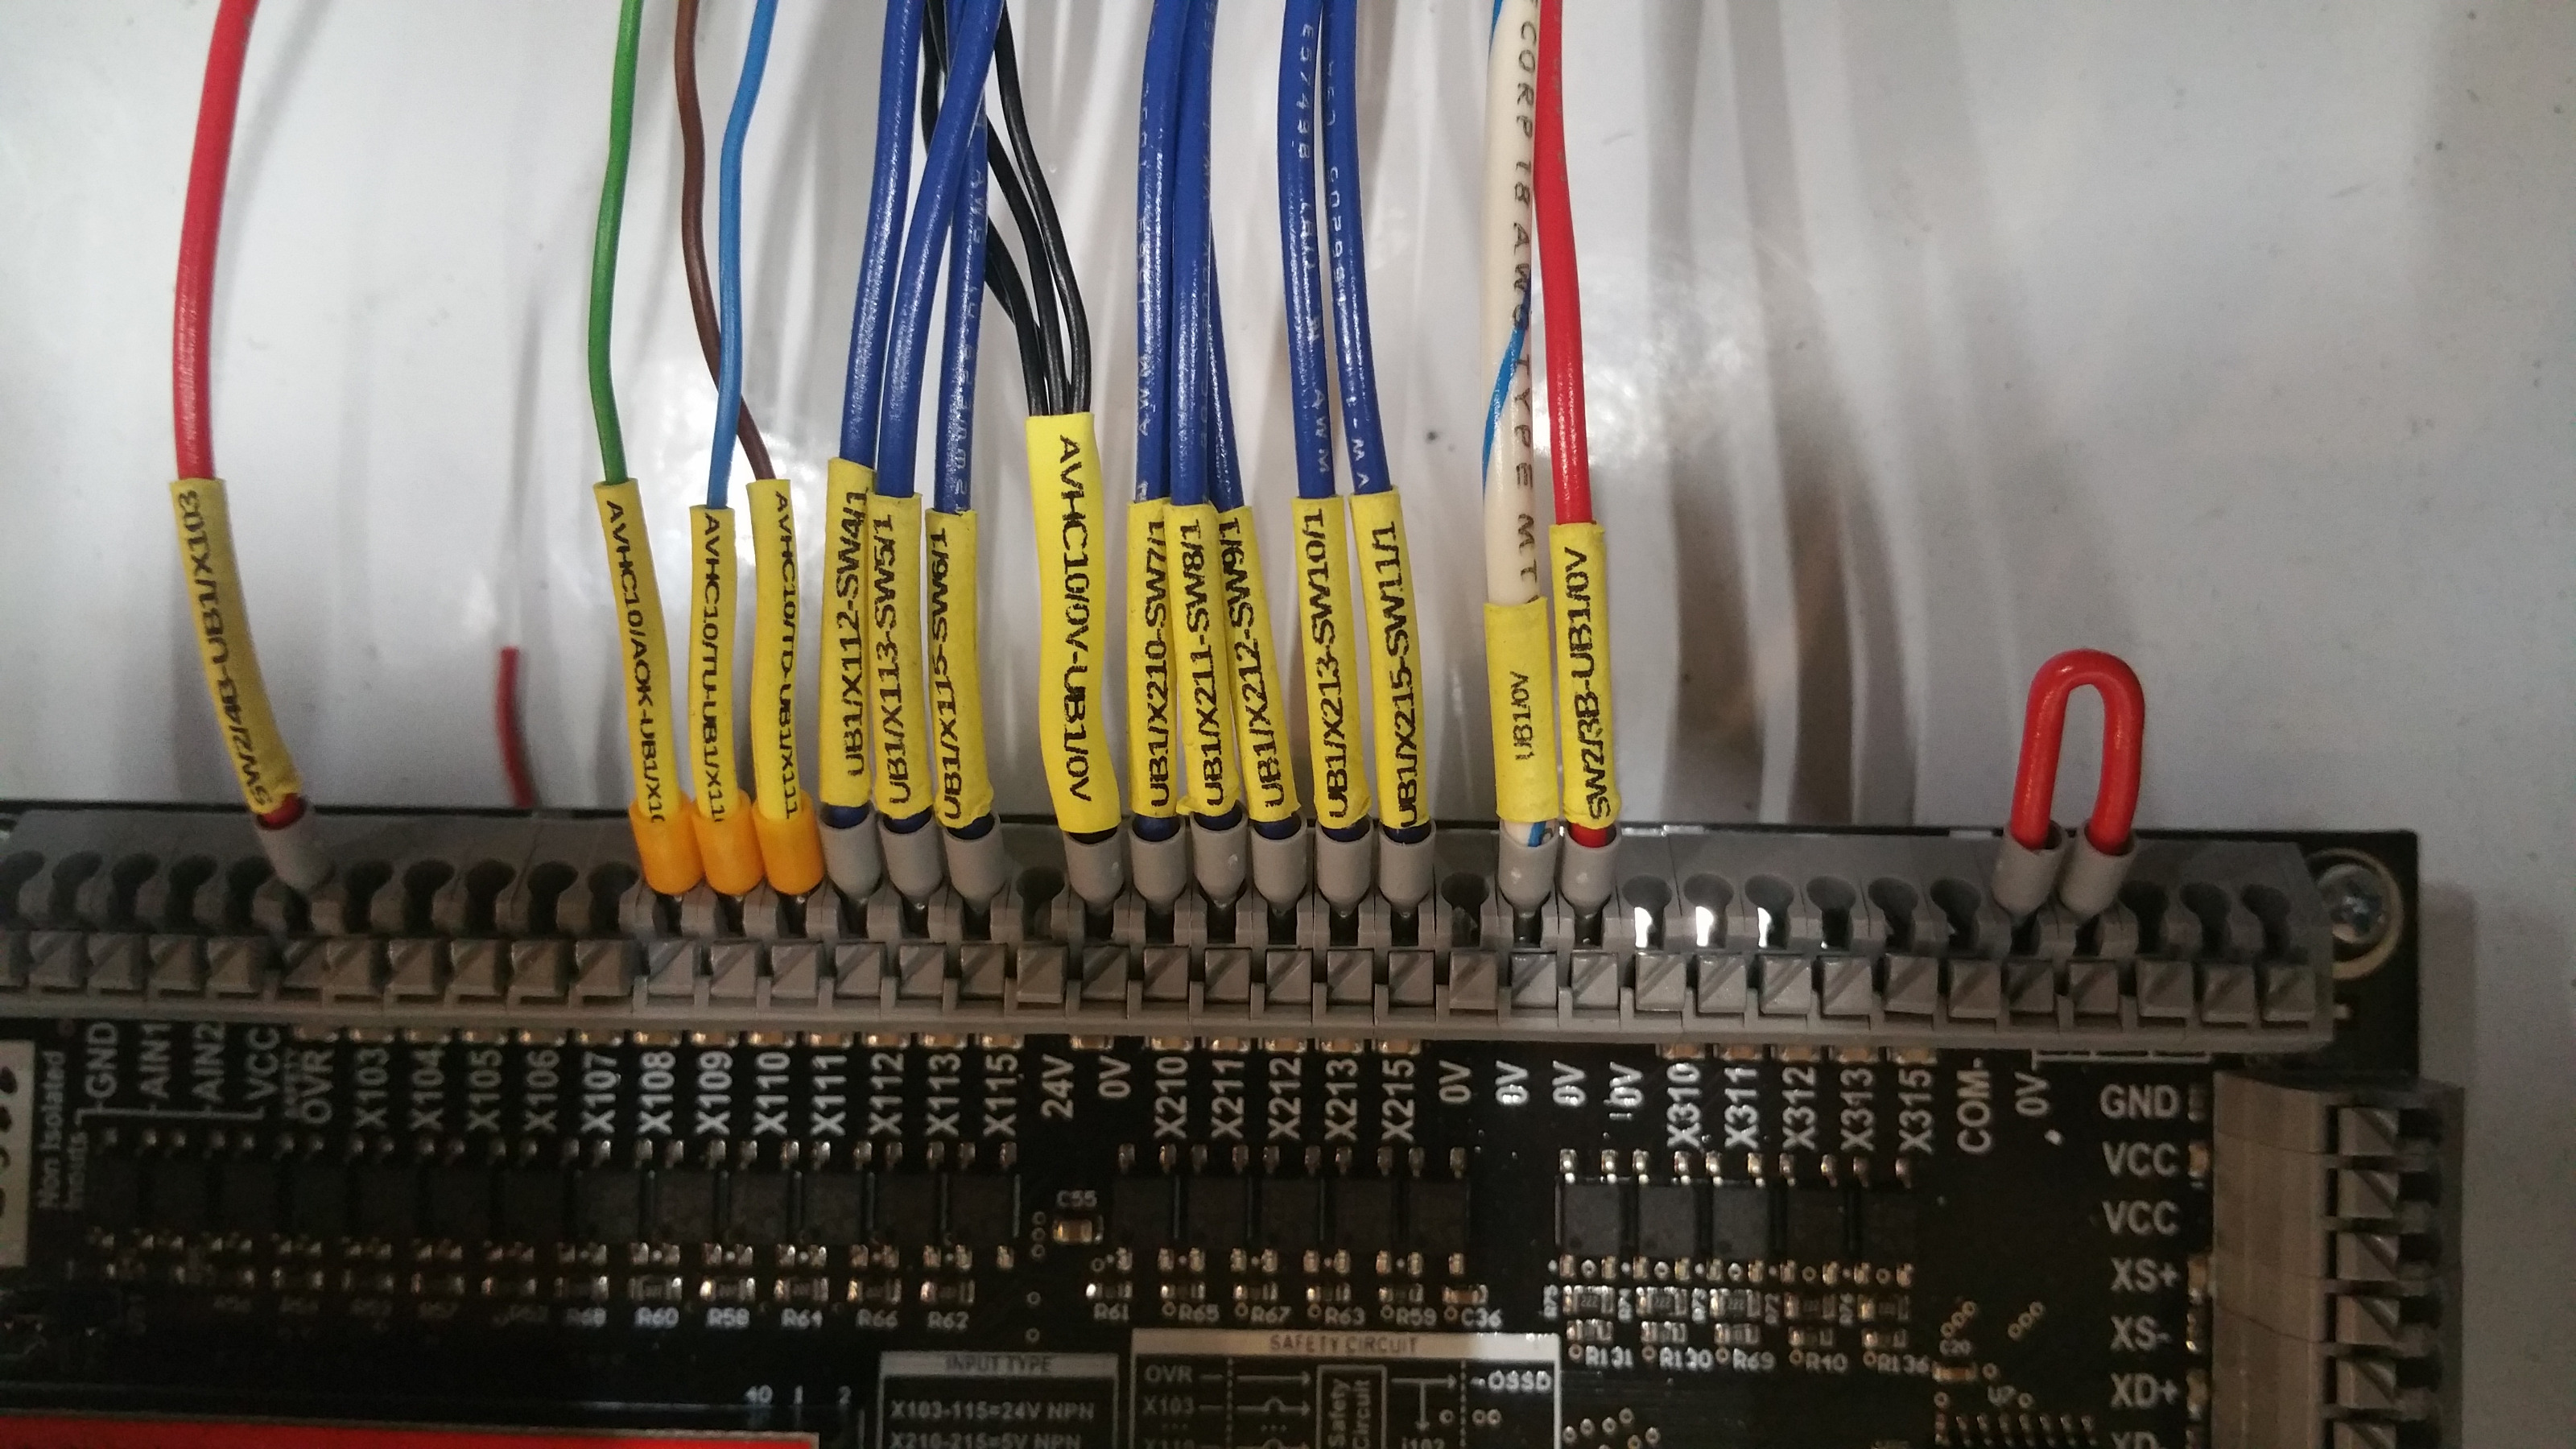
In the photo I posted, check out the 3rd wire from the right. Without looking at a diagram, I can tell that wire connects Switch 1, terminal 01, to the UB1's X215 terminal. The "UB1" is a breakout board for a UCCNC motion controller, and X215 is one of the NPN inputs. So that wire is sending a signal to the motion controller when the switch (pushbutton, likely) is activated. And the wire is blue, meaning it's a 24vdc signal.
The wire at the far right: "SW02, terminal 3B" is a low-numbered switch - probably an estop, especially since simple function switches rarely have more than one set of contacts. It's connecting to the breakout board (UB1) at a 0Vdc terminal - another clue that it's an estop wire. My guess is that wire is the signal wire from the main estop switch, and SW02/1 or /2 are the other switch contacts used to kill the main power contactor.
And the wire is red, which is possibly a no-no is NFPA79-land, but I restrict red wires to estop circuits unless they're AC at non-line voltages (i.e. the 100VAC conductors between my toroid transformer and the dc rectifier are big, fat, red cables).
It helps to label everything on the diagram first, then print out batches of labels for the circuit or section of the wiring you're doing at the moment. As you can see on the diagram I posted the labels are mostly in green. I initially add them to diagram in red font, and then change them to green when I've installed the labeled wire. Helps having the computer right next to the working area, of course.
Are there wires labeled 'backwards'? Of course. I could have TB01-K1/14, or it could be K1/14-TB01. I just pick whatever makes sense to me and try to stick with it as I visualize how the electrons are moving along.
I'm quite sure there are better ways to do this, but it's working for me.
Please Log in or Create an account to join the conversation.
- spumco
- Offline
- Platinum Member
-
- Posts: 2126
- Thank you received: 882
2. Cut the plug off and extend the cord then run it on your drag chain. Zip-tie (or velcro-tie) it to the OUTSIDE of the drag chain so you can easily pull it off if you want to use the router by itself.
3. Unless there are markings on the breaker indicating a direction, it doesn't matter. It's good practice to have all breakers and fuses on a DIN rail all have the 'hot' side on the same side... but then there's the real world.
4. Keep everything separate. Keep the signal wires and especially the step/direction wires as far away from AC wires as possible. If you have to cross AC and signal wires, have them cross at 90 degrees and not run alongside each other. Shielded-stranded twisted pair ethernet cables are cheap and work really well for the step & direction wires. Just buy a 50' cable and start chopping it up, but try to get 24awg or 22awg. The 26/28/30awg is miserable to work with.
Please Log in or Create an account to join the conversation.
- Sray69
- Offline
- Elite Member
-
- Posts: 255
- Thank you received: 13
Yeah I figured that. Seeing what format others use will help me come up with something that makes sense to me. Thanks for being thorough. It gives me something to go off of.There are as many naming conventions and philosophies as there are panel builders.
Please Log in or Create an account to join the conversation.
- andypugh
-

- Offline
- Moderator
-

- Posts: 19875
- Thank you received: 4642
There are as many naming conventions and philosophies as there are panel builders.
Yeah I figured that. Seeing what format others use will help me come up with something that makes sense to me.
You have to consider who the audience for your labeling is. It will generally be "future you" who will have forgotten much of what "current you" knows.
If you put the same labels on the wires as on the circuit diagram and put the diagram in the cabinet, then future-you will thank you.
Please Log in or Create an account to join the conversation.