CamView for Wheesy and Jessie
- john@jstockton.com
- Offline
- New Member
-

Less
More
- Posts: 1
- Thank you received: 0
15 May 2016 18:06 #74686
by john@jstockton.com
Replied by john@jstockton.com on topic CamView for Wheesy and Jessie
Newbie question - Norbert - I downloaded your camview.py code and can run it in stand-alone mode successfully (with the slower frame rate as the higher rate crashed). I want to embed your module into a Camera tab in the regular Axis interface. I can see how people have embedded mplayer to make it work, but my experimenting always brings up your code as a separate window, rather than an embedded window. Got any hints? I know this isn't how you planned on the code being used, but it would be very helpful for us Axis users.
Thanks in advance and great job with the code,
John
Thanks in advance and great job with the code,
John
Please Log in or Create an account to join the conversation.
- Wirewrap
-

- Offline
- Senior Member
-

Less
More
- Posts: 60
- Thank you received: 1
16 May 2016 13:37 #74744
by Wirewrap
Replied by Wirewrap on topic CamView for Wheesy and Jessie
How do I find the widget and how do I embed it?
I have built the branch mentioned below.
>> You find the branch with an GladeVCP widget to be embedded very easy on
>> GladeVCP CamView
I have built the branch mentioned below.
>> You find the branch with an GladeVCP widget to be embedded very easy on
>> GladeVCP CamView
Please Log in or Create an account to join the conversation.
- bogie6040
-

- Offline
- Senior Member
-
Less
More
- Posts: 44
- Thank you received: 10
19 Jan 2017 21:41 #86199
by bogie6040
Replied by bogie6040 on topic CamView for Wheesy and Jessie Revisited
Norbert,
I know this is an old thread.... but...
I have finally come back to this since I have a good camera on the way... which I will be testing with and reporting results. I have spent the better part of two days trying to figure out how to embed this into a tab with no success. I have given up all together trying to get this to work with axis as it seems it is not built to work with python programs in tabs. I am now trying to get it working in gmoccapy since that GUI at least seems to work with GladeVCP. I tried to use the snapshot from the github link in the first post, however the ./configure gave several errors about missing packages (which I installed) and then finally this:
checking for tcl... tclConfig.sh not found, trying tcl.h and libs.
If it doesn't work try running ./configure --with-tclConfig=<path to tclConfig.sh>
I searched for the file "tclConfig.sh" and it does not exist anywhere. Also sudo make setuid gives:
Makefile:71: Makefile.inc: No such file or directory
Makefile:82: *** Makefile.inc must specify RTPREFIX and other variables. Stop.
test@debian-test:~/Downloads/CamView LinuxCNC/linuxcnc-c805e97/src$
I have also tried to piece the files in from what I can gather online and from your branch on GIT nothing works.
Running python camview.py from the containing directory works bringing up it's own window, but I would really like this to work in axis or I can switch to gmoccapy (which I may do anyway).
Thanks in advance,
Bogie
Please Log in or Create an account to join the conversation.
- newbynobi
-
 Topic Author
- Offline
- Platinum Member
-

Less
More
- Posts: 1931
- Thank you received: 394
23 Jan 2017 17:33 #86490
by newbynobi
Replied by newbynobi on topic CamView for Wheesy and Jessie Revisited
Sorry have been working for money ")
")
Use this to embed in gmoccapy, I have not tested with axis and will not do that either.
***************************************************************************************************
First step: Install dependencies
sudo apt-get install qv4l2
Second step: Check your camera
open a terminal
enter qv4l2 and check if your camera is recognized. (start live stream).
Third step: Install the resting dependencies
sudo apt-get install python-opencv
sudo apt-get install v4l-utils
sudo apt-get install v4l2ucp
Fourth step: Prepare your INI File
Put in your INI File in the [DISPLAY] Sektion:
EMBED_TAB_NAME = Camera
EMBED_TAB_LOCATION = ntb_preview
EMBED_TAB_COMMAND = gladevcp -x {XID} camview.glade
Fifth step: Download the attached zip file and unpack it
You will need the following files:
camview.py
camview.glade
hal_python.xml
hal_pythonplugin.py
Make a backup of your files
hal_python.xml
hal_pythonplugin.py
They are in the following directories:
/usr/lib/pymodules/python2.7/gladevcp
/usr/share/pyshared/gladevcp
copy:
camview.glade into your Config directory
gmoccapy_with_user_tabs.ini only shows the example of embedded commands, you do not need that one
copy
camview.py
hal_python.xml
hal_pythonplugin.py
to /usr/lib/pymodules/python2.7/gladevcp
and also to
/usr/share/pyshared/gladevcp
***********************************************************************************************************************
IMHO there have been added some additional widgets to the catalog, so it might be worse the work to
just add the camview lines to your original files.
I do not know why the files have to be in two directories. It is unusual for Linux.
And please; one of you should right a how to or better make a WIKI page.
It will not be easy to get this included in linuxcnc unless someone takes an effort to make it a package.
Norbert
Please Log in or Create an account to join the conversation.
- bogie6040
-
- Offline
- Senior Member
-
Less
More
- Posts: 44
- Thank you received: 10
24 Jan 2017 15:54 #86566
by bogie6040
Replied by bogie6040 on topic CamView for Wheezy and Jessie Revisited
Thanks Norbet,
It works in a gmoccapy tab I didn't find the "hal_python.xml" file in either directory, but copied yours to there anyway...
I'm not sure what you mean by:
"IMHO there have been added some additional widgets to the catalog, so it might be worse the work to
just add the camview lines to your original files."
Also of note: it appears the power line frequency function does not pass through for some reason, it gives an error on the CLI after running. I have poked at it in camview.py file but couldn't get it to work - I could however remove all lines and the button associated with it and then the error no longer occurs. Also, I had to check the box for autosize to make the buttons below the camera view not overlap one another.
Would you like me to see if I can make an installer similar to what is used on features? Perhaps I can modify his installer to work with CamView, with his permission of course. At the very least I will try my hand at creating a wiki page to explain the install and perhaps make a script to ease the backup and install to the protected directories.
I saw on the mailing list you had mentioned you were thinking of changing the name so as to not be confused with the original "camview-emc" how about GmoCamy?
Bogie
It works in a gmoccapy tab
I didn't find the "hal_python.xml" file in either directory, but copied yours to there anyway...I'm not sure what you mean by:
"IMHO there have been added some additional widgets to the catalog, so it might be worse the work to
just add the camview lines to your original files."
Also of note: it appears the power line frequency function does not pass through for some reason, it gives an error on the CLI after running. I have poked at it in camview.py file but couldn't get it to work - I could however remove all lines and the button associated with it and then the error no longer occurs. Also, I had to check the box for autosize to make the buttons below the camera view not overlap one another.
Would you like me to see if I can make an installer similar to what is used on features? Perhaps I can modify his installer to work with CamView, with his permission of course. At the very least I will try my hand at creating a wiki page to explain the install and perhaps make a script to ease the backup and install to the protected directories.
I saw on the mailing list you had mentioned you were thinking of changing the name so as to not be confused with the original "camview-emc" how about GmoCamy?
Bogie
Please Log in or Create an account to join the conversation.
- newbynobi
-
Topic Author
- Offline
- Platinum Member
-
Less
More
- Posts: 1931
- Thank you received: 394
24 Jan 2017 17:04 #86572
by newbynobi
Replied by newbynobi on topic CamView for Wheezy and Jessie Revisited
Hallo and Thanks for the offer to help.
Yes please right an installer!!
Here the power line frequency is working, does your camera support that? Check with qv4l2
You should have
hal_python.xml
hal_pythonplugin.py
but on my new pc they are also not in both files.
If you do the installer, just add the corresponding camview lines to the existing files. Otherwise we may change user configs. Just compare the installed files with my sample file and you will see, that the original ones does contain more widget lines.
I would like the name Campy")
Norbert
Yes please right an installer!!
Here the power line frequency is working, does your camera support that? Check with qv4l2
You should have
hal_python.xml
hal_pythonplugin.py
but on my new pc they are also not in both files.
If you do the installer, just add the corresponding camview lines to the existing files. Otherwise we may change user configs. Just compare the installed files with my sample file and you will see, that the original ones does contain more widget lines.
I would like the name Campy
Norbert
Please Log in or Create an account to join the conversation.
- bogie6040
-
- Offline
- Senior Member
-
Less
More
- Posts: 44
- Thank you received: 10
26 Jan 2017 22:10 - 27 Jan 2017 17:14 #86744
by bogie6040
Replied by bogie6040 on topic CamView for Wheezy and Jessie Revisited
Hi Norbert,
You are correct, the camera I'm using at the moment doesn't have support for the power line frequency.... Some things I have noticed though, is that the color selection dialog will let you pick any color you want but the program picks the color from your selection based on whether the RGB values are 0 <OR> 1 to 255 (ie: the only colors you can get to show on the screen are: [0, 255, 0][255, 255, 0][255, 0, 255].... etc.) Also the section named:
# set other default values or initialize them
self.color =(0, 0, 255)
self.radius = 150
self.radius_difference = 5
self.circles = 2
self.autosize = False
" " " " " "
I assume you meant for these to be editable so if someone wanted something specific every time it started embedded it would come up that way? I have changed some of these like the "self.radius_difference = 5" which does work some however do not like "self.circles = 2" it always comes up with 5 circles and is red in color. However if you run it standalone the settings at the end of the file do work to change the # of circles and color, is there a way we can change this?
I have successfully modified the installer that FernV made for his NativeCAM to install the necessary lines into the hal_python.xml file and add links to the camview.py file. So now it is as simple as: install the required packages with apt-get, run the script, copy the appropriate lines into your .ini file and copy the camview.glade file to your config directory.
I would like to add (preferably to the glade file somehow) two offset buttons that would both reference an external file for an X & Y offset between the camera center and the spindle center. One button would move the spindle center to what the camera is centered on and the other button would move the camera center to the spindles current location. Any Ideas how I could implement this? Is it possible to put this functionality into the camview.glade file? If so any tutorials for glade that would help me get started that you know of?
Thanks,
Bogie
You are correct, the camera I'm using at the moment doesn't have support for the power line frequency.... Some things I have noticed though, is that the color selection dialog will let you pick any color you want but the program picks the color from your selection based on whether the RGB values are 0 <OR> 1 to 255 (ie: the only colors you can get to show on the screen are: [0, 255, 0][255, 255, 0][255, 0, 255].... etc.) Also the section named:
# set other default values or initialize them
self.color =(0, 0, 255)
self.radius = 150
self.radius_difference = 5
self.circles = 2
self.autosize = False
" " " " " "
I assume you meant for these to be editable so if someone wanted something specific every time it started embedded it would come up that way? I have changed some of these like the "self.radius_difference = 5" which does work
some however do not like "self.circles = 2" it always comes up with 5 circles and is red in color. However if you run it standalone the settings at the end of the file do work to change the # of circles and color, is there a way we can change this?I have successfully modified the installer that FernV made for his NativeCAM to install the necessary lines into the hal_python.xml file and add links to the camview.py file. So now it is as simple as: install the required packages with apt-get, run the script, copy the appropriate lines into your .ini file and copy the camview.glade file to your config directory.
I would like to add (preferably to the glade file somehow) two offset buttons that would both reference an external file for an X & Y offset between the camera center and the spindle center. One button would move the spindle center to what the camera is centered on and the other button would move the camera center to the spindles current location. Any Ideas how I could implement this? Is it possible to put this functionality into the camview.glade file? If so any tutorials for glade that would help me get started that you know of?
Thanks,
Bogie
Last edit: 27 Jan 2017 17:14 by bogie6040.
Please Log in or Create an account to join the conversation.
- newbynobi
-
Topic Author
- Offline
- Platinum Member
-
Less
More
- Posts: 1931
- Thank you received: 394
29 Jan 2017 12:55 #86898
by newbynobi
Replied by newbynobi on topic CamView for Wheezy and Jessie Revisited
Hallo Bogie,
the settings in the py file are only the default values. To change your special stuff, you need to edit the glade file, as the values of the glade file will overright the py default values.
I have added the offset stuff to my tool table. My camera is tool number 99 and that tool has offsets in X /Y and Z so after a G43 the positions are corect again.
If you want to add buttons, just do it in the glade file, or in the py file, it is up to you. I use for testing the debug button. In a final release this button will be gone.
Norbert
Please Log in or Create an account to join the conversation.
- bogie6040
-
- Offline
- Senior Member
-
Less
More
- Posts: 44
- Thank you received: 10
09 Feb 2017 23:15 #87728
by bogie6040
Replied by bogie6040 on topic CamView for Wheezy and Jessie Revisited
Hallo Norbert,
I've attached a zip file with the install files. I would like for you to test this to make sure it is suitable for release as I have made quite a few changes. Also I have modified the camview.py file to have two buttons for moving the machine based on offsets in tool # 99 it seems to work ok in axis but it seems to act differently in gmoccapy. This was as good as I could get it, if there is a better way please let me know or go ahead and change it. I have started a wiki page for it but wanted to pass it by you first before I post it.
To test this copy the zip file to your configs directory and unzip it there. Open the new folder named CamPY and view the readme file for instructions.
Thanks,
Bogie
The following user(s) said Thank You: nkp, Tchefter, ikkuh
Please Log in or Create an account to join the conversation.
- ikkuh
-

- Offline
- Elite Member
-

Less
More
- Posts: 273
- Thank you received: 48
26 Mar 2017 14:14 - 26 Mar 2017 14:15 #90288
by ikkuh
Replied by ikkuh on topic CamView for Wheezy and Jessie Revisited
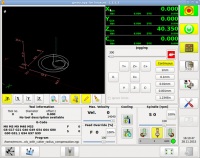
Wow Bogie, worked first time! The documentation in the readme file is excellent, it was a matter of seconds to set everything up.
Looks really nice in gmoccapy.
Thank you for all your troubles, it is much appreciated!
Looks really nice in gmoccapy.
Thank you for all your troubles, it is much appreciated!
Last edit: 26 Mar 2017 14:15 by ikkuh.
Please Log in or Create an account to join the conversation.
Moderators: HansU
Time to create page: 0.508 seconds