Build: XZero Predator... With more teeth!
- ihavenofish
- Offline
- Platinum Member
-

Less
More
- Posts: 1025
- Thank you received: 286
10 Jun 2019 01:42 #136434
by ihavenofish
Replied by ihavenofish on topic Build: XZero Predator... With more teeth!
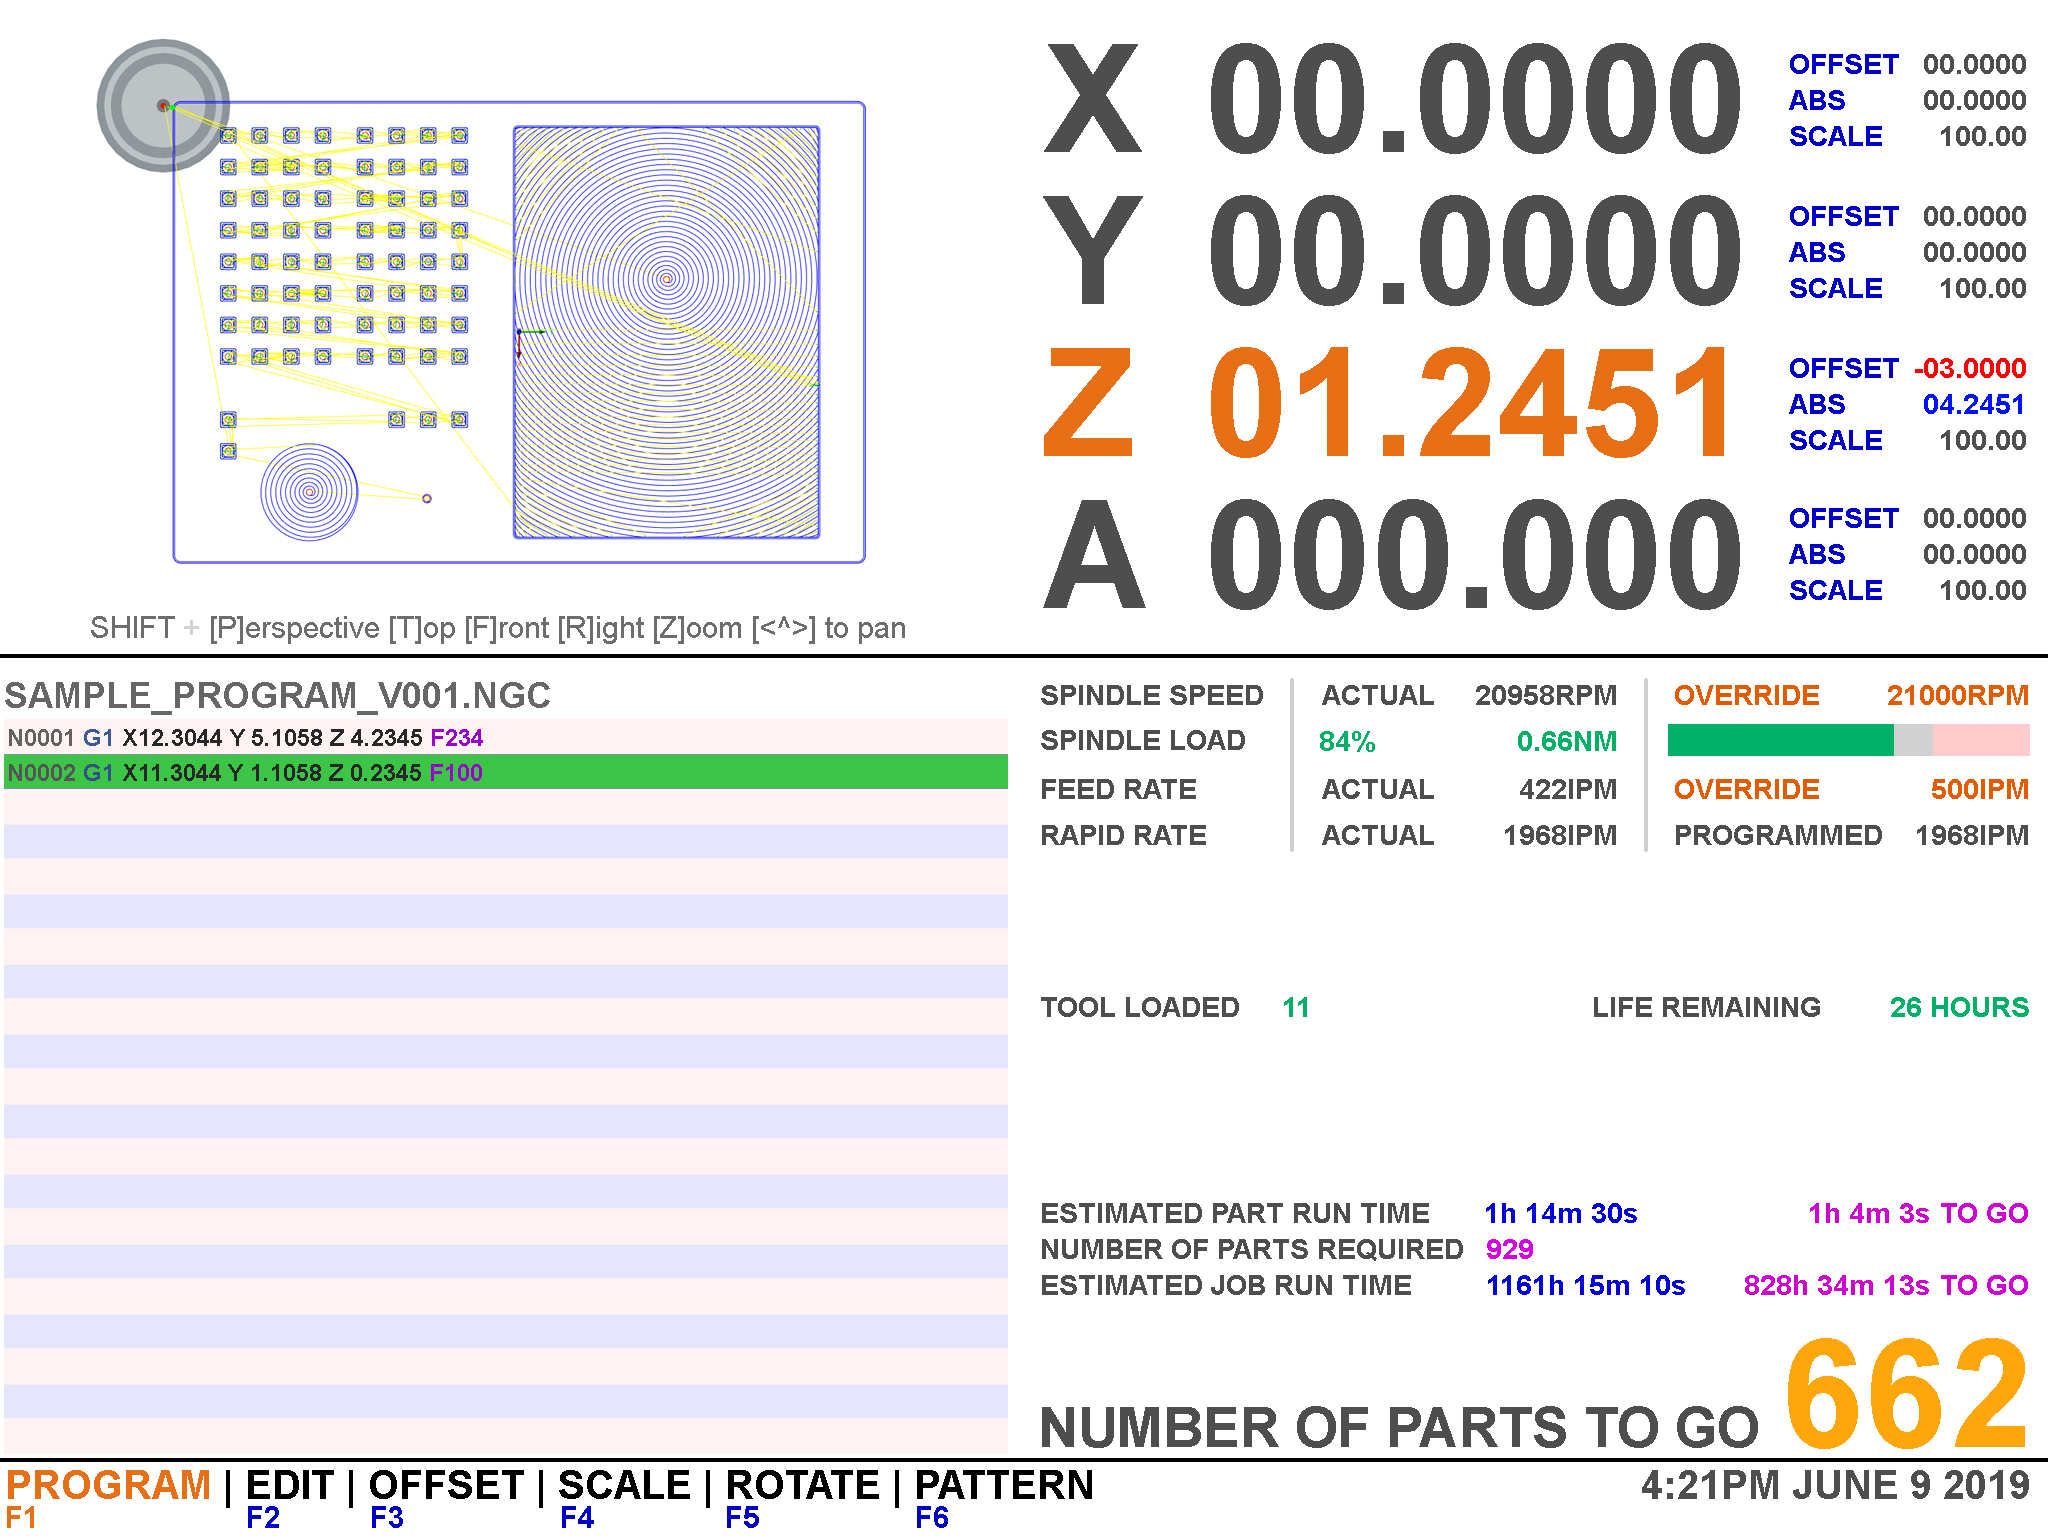
Added a task manager... Gotta keep them workers in line! Oh, wait, that's me!

Attachments:
Please Log in or Create an account to join the conversation.
- ihavenofish
- Offline
- Platinum Member
-
Less
More
- Posts: 1025
- Thank you received: 286
10 Jun 2019 02:22 #136436
by ihavenofish
Replied by ihavenofish on topic Build: XZero Predator... With more teeth!
OK, last for the day.
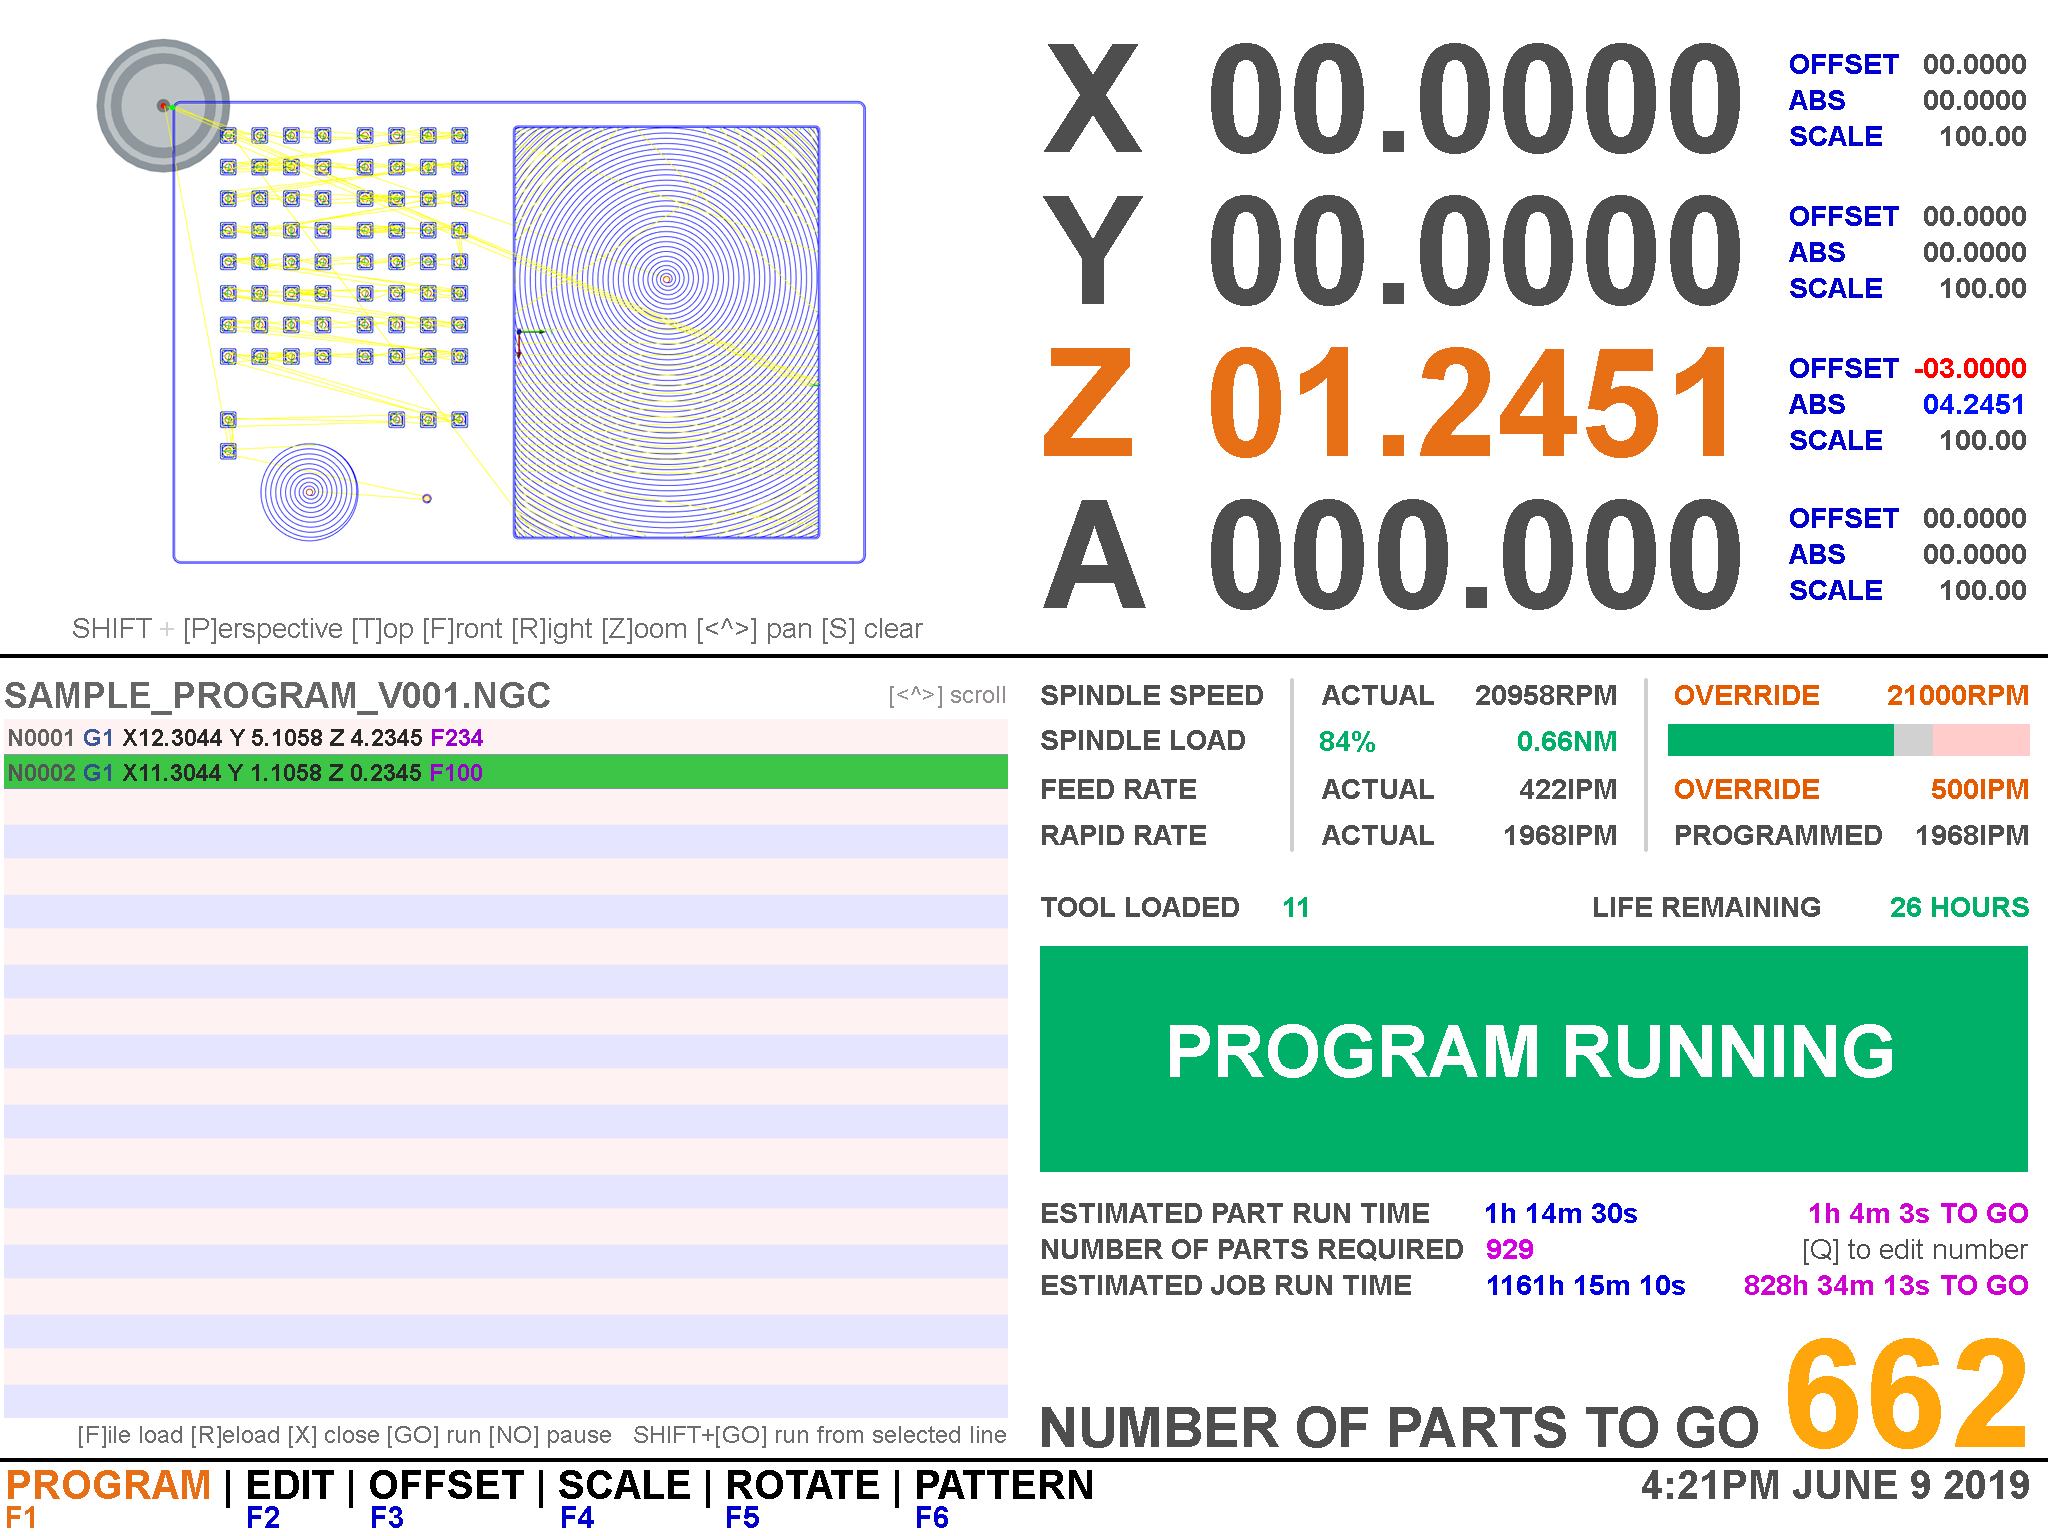
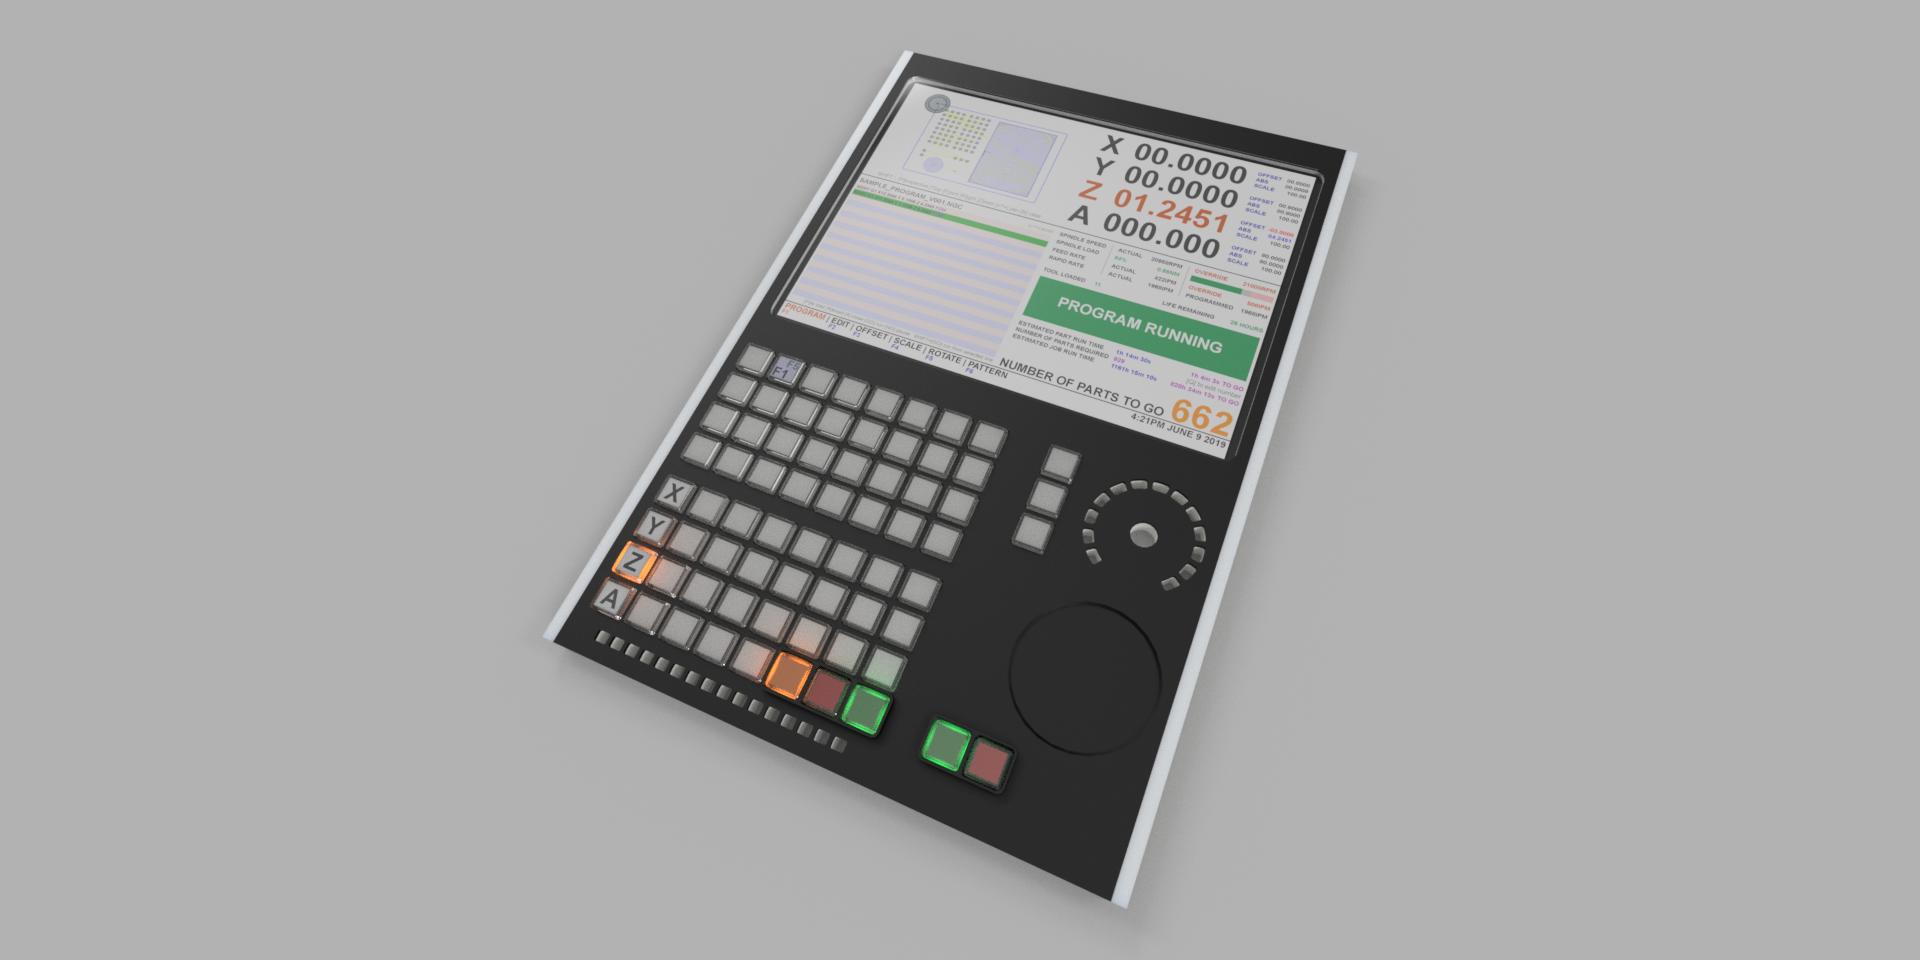
The green box is where status is displayed, like running, or error. It will also be where any type in boxes will pop up, like directly entering in an axis offset, or a tool number to change, or the job quantity.
I cant think of anything I've forgotten right now. Maybe you can")
The green box is where status is displayed, like running, or error. It will also be where any type in boxes will pop up, like directly entering in an axis offset, or a tool number to change, or the job quantity.
I cant think of anything I've forgotten right now. Maybe you can
Attachments:
Please Log in or Create an account to join the conversation.
- ihavenofish
- Offline
- Platinum Member
-
Less
More
- Posts: 1025
- Thank you received: 286
10 Jun 2019 05:47 #136439
by ihavenofish
Replied by ihavenofish on topic Build: XZero Predator... With more teeth!
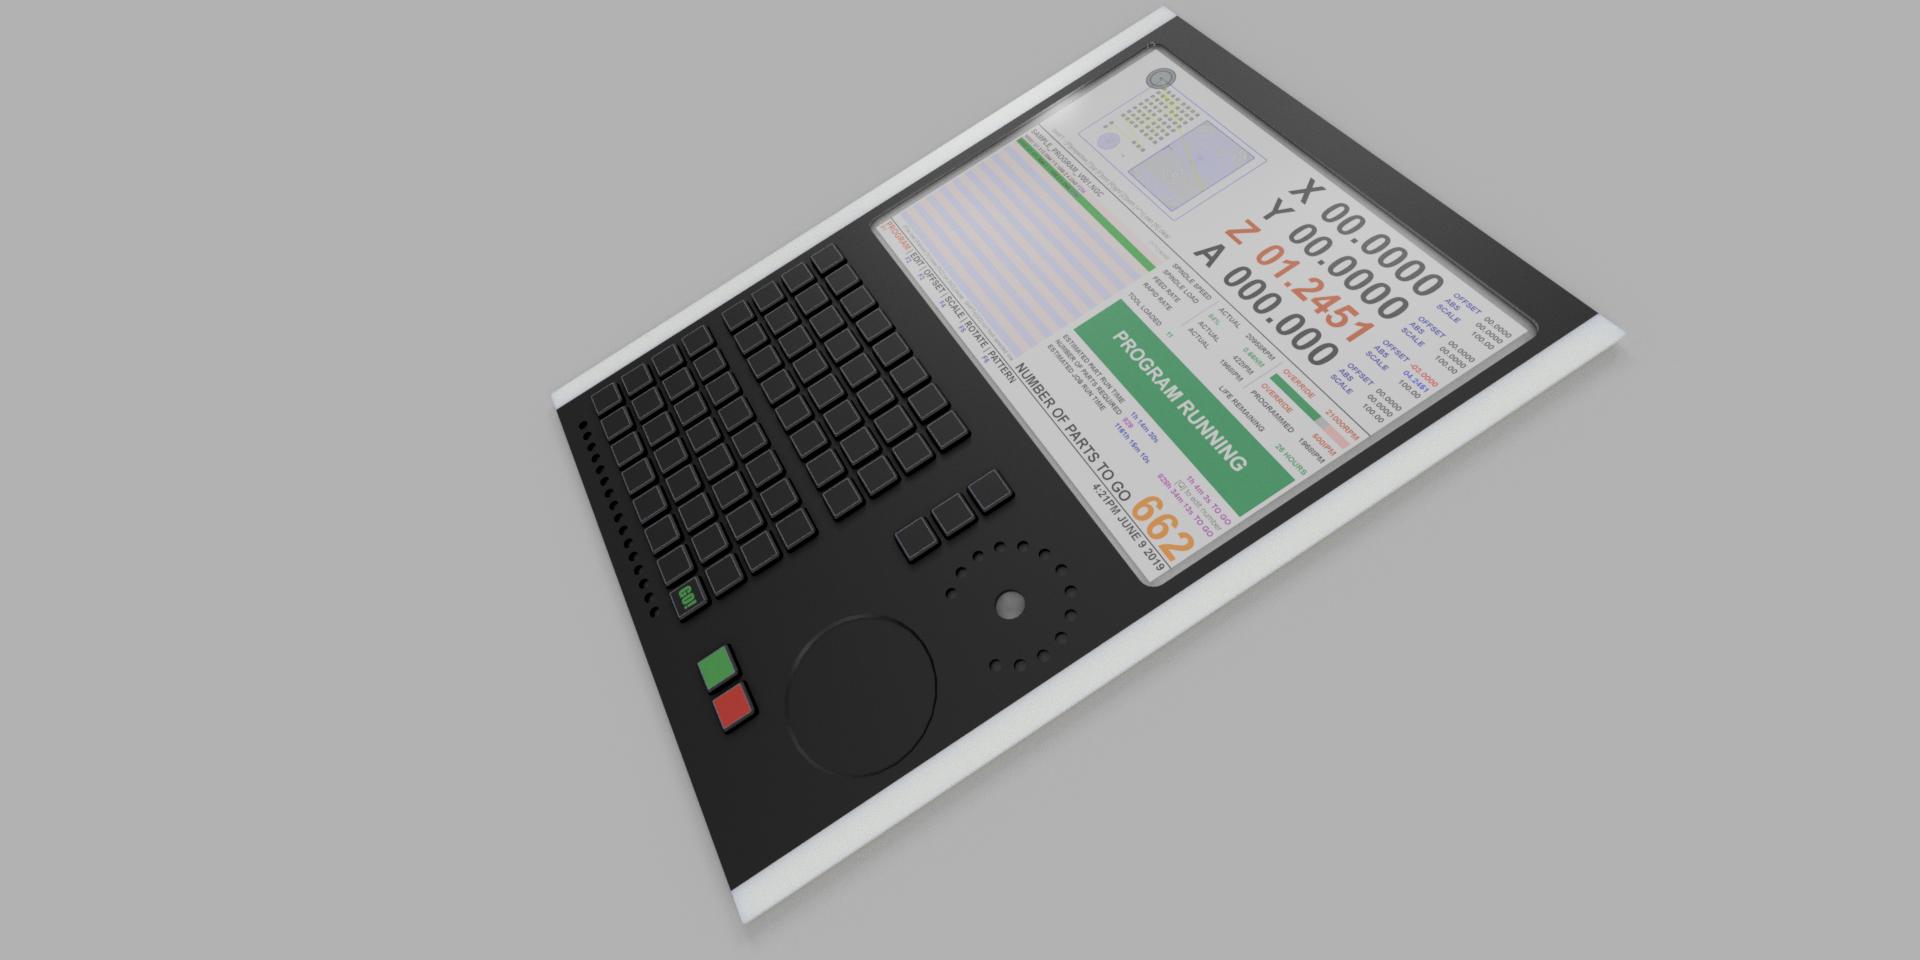
Pretty self explanatory. It's a control panel milling itself
Attachments:
Please Log in or Create an account to join the conversation.
- rodw
-

- Offline
- Platinum Member
-
Less
More
- Posts: 12014
- Thank you received: 4097
10 Jun 2019 07:53 #136445
by rodw
I can't see why it can't. You can save the probe data to a file and from there you could feed the results back into a component that used external offsets so the z axis followed the surface via linear interpolation. I have mapped the surface on a straight line like this.
Replied by rodw on topic Build: XZero Predator... With more teeth!
Got me wondering now, can linuxcnc do this type of probing?
In which it creates a map of the surface, correcting the Z offset dynamically. It seems like it would be pretty simple in my head (like everything complicated
I can't see why it can't. You can save the probe data to a file and from there you could feed the results back into a component that used external offsets so the z axis followed the surface via linear interpolation. I have mapped the surface on a straight line like this.
Please Log in or Create an account to join the conversation.
- ihavenofish
- Offline
- Platinum Member
-
Less
More
- Posts: 1025
- Thank you received: 286
10 Jun 2019 08:16 #136447
by ihavenofish
Replied by ihavenofish on topic Build: XZero Predator... With more teeth!
Ooh that's sounds good then. I'm still quite a long way for doing the UI and special features, But I'm trying to plan out everything I want in it now.
My Sanyo servo for testing will be here Wednesday (explain to me why shipping from korea take 2 days and is free, and shipping from 6 blocks down the street takes a week and costs $50? Sigh.
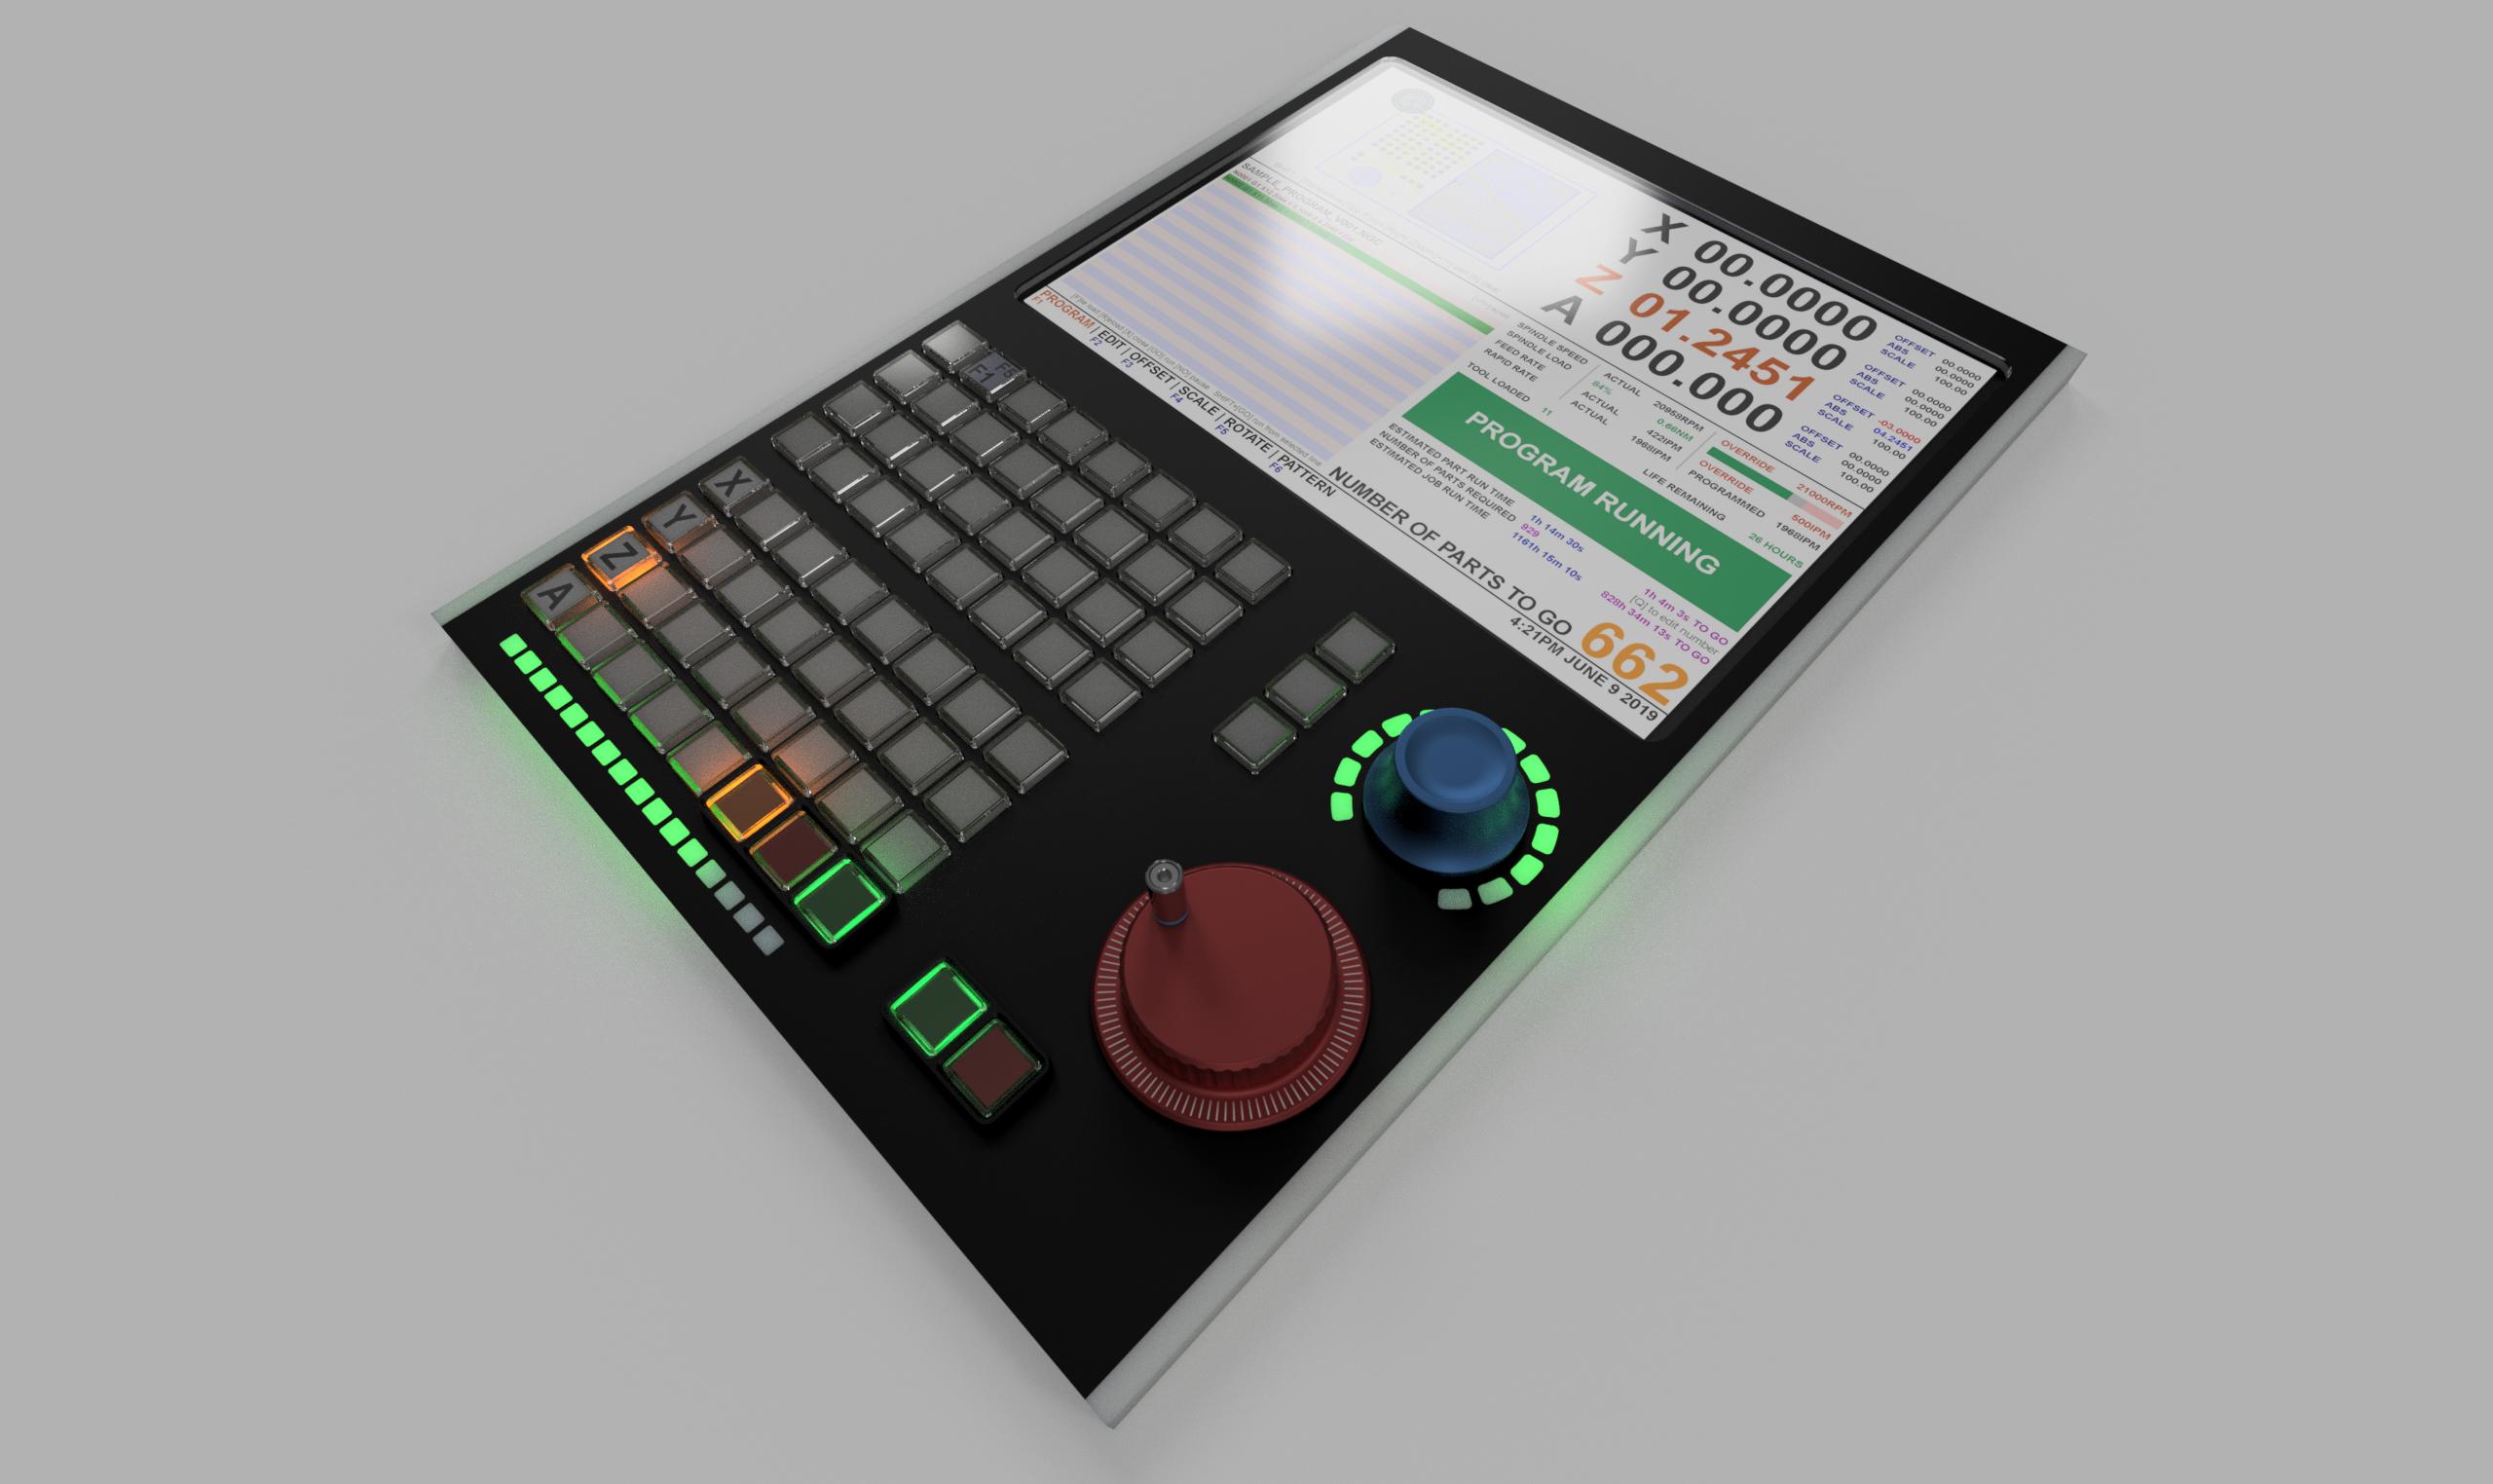
Revised the panel a little to use acrylic buttons (pressed or cast) with printed paper faces underneath. This might be a lot easier to deal with vs printing then painting then lasering then decaling then clear coating. also means you can change the button function by just printed out a new piece of paper. Downside is a mould is needed.
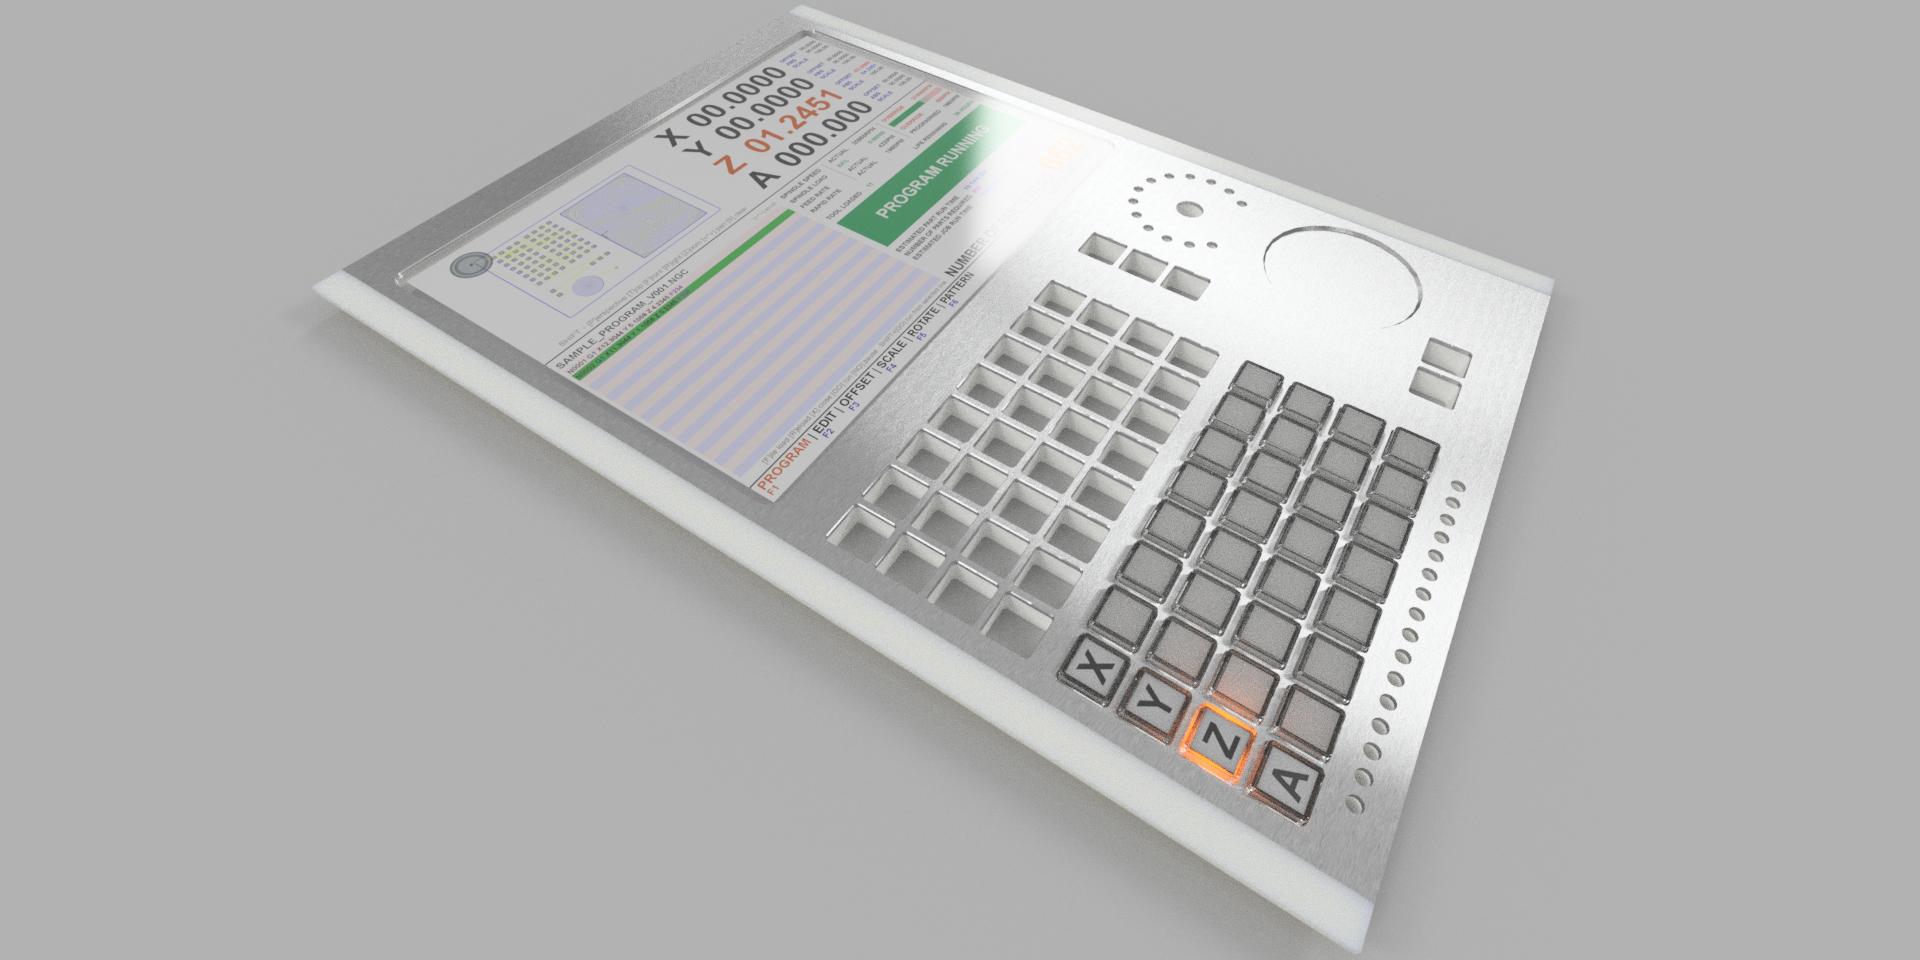
With a stainless steel front the control has a very heidenhain look.
My Sanyo servo for testing will be here Wednesday (explain to me why shipping from korea take 2 days and is free, and shipping from 6 blocks down the street takes a week and costs $50? Sigh.
Revised the panel a little to use acrylic buttons (pressed or cast) with printed paper faces underneath. This might be a lot easier to deal with vs printing then painting then lasering then decaling then clear coating. also means you can change the button function by just printed out a new piece of paper. Downside is a mould is needed.
With a stainless steel front the control has a very heidenhain look.
Attachments:
Please Log in or Create an account to join the conversation.
- ihavenofish
- Offline
- Platinum Member
-
Less
More
- Posts: 1025
- Thank you received: 286
10 Jun 2019 13:49 #136471
by ihavenofish
Replied by ihavenofish on topic Build: XZero Predator... With more teeth!
Added some button guards to the power and run related buttons. Now you cant accidentally press them.
I need to pull apart my MPG and measure it to make sure it fits.
Construction now is a 3d printed front shell (with the 2 side lighting bars). A 3d printed rear shell which gives enough structure to press the buttons fairly firm. Then the front panel face is a laser cut sheet of, anything. Black acrylic, or black anodised aluminium if you want more durability. Stainless if you want it to match your kitchen. Anything 0.0625" thick. Well, almost anything. Pie crust probably wouldn't make a good front face. The button guards are part of the front shell, poking through the laser cut sheet.
I think need to add a USB port and an SD slot in the bottom right corner. Seems like a bad idea though for getting chips and dirt inside. maybe it has to go under a little door, or maybe there are some rubber plugs that fit the ports (like they have on some usb charging ports).
Attachments:
Please Log in or Create an account to join the conversation.
- ihavenofish
- Offline
- Platinum Member
-
Less
More
- Posts: 1025
- Thank you received: 286
10 Jun 2019 16:31 #136489
by ihavenofish
Replied by ihavenofish on topic Build: XZero Predator... With more teeth!
Knobs to twiddle!
All MPG knobs are 60mm. I only have 50mm of useful space. As a result, I drew up my own to be machined and attached to the stock encoder. All ive really done is reduced the outer flange. Because of this reduction, there wasn't much room left for numbers on the dial.
Question:
Do the numbers matter? Those of you who use MPG wheels do you look at the numbers? Or do you just look at the DRO and machine and feel the detents while turning? I haven't used an MPG on my machine, but it seems to me the numbers aren't relevant but the etched lines are useful.
Attachments:
The following user(s) said Thank You: Grotius
Please Log in or Create an account to join the conversation.
- tommylight
-

- Offline
- Moderator
-

Less
More
- Posts: 21722
- Thank you received: 7424
11 Jun 2019 02:45 #136530
by tommylight
Replied by tommylight on topic Build: XZero Predator... With more teeth!
Nice ............. Oh, who am I kidding, Awesome !!!!
A wisit to some friends with a laser cutter is in order. Today.
A wisit to some friends with a laser cutter is in order. Today.
Please Log in or Create an account to join the conversation.
- ihavenofish
- Offline
- Platinum Member
-
Less
More
- Posts: 1025
- Thank you received: 286
11 Jun 2019 07:34 - 11 Jun 2019 07:36 #136561
by ihavenofish
Replied by ihavenofish on topic Build: XZero Predator... With more teeth!
Mmm lasers.
Now we have to build the thing! My 3d printer will be here end of next week I hope. The laser cut bits (in acrylic) are easily done by a maker friendly shop nearby.
The button caps will be tricky. the "right" way to do them is to machine an aluminium mold for an arbor press. you heat up 1.5mm thick acrylic and then press it. Like vac forming, but in a closed mold under higher force. I was shown this trick ages ago, I didn't think it could be formed more then just bending / stretching, but you can fully 3d form it like playdough!.
BUT a mold is expensive (for now, since I cant machine it myself yet).
Last edit: 11 Jun 2019 07:36 by ihavenofish.
Please Log in or Create an account to join the conversation.
- pl7i92
-

- Offline
- Platinum Member
-
Less
More
- Posts: 1872
- Thank you received: 358
11 Jun 2019 07:55 #136565
by pl7i92
Replied by pl7i92 on topic Build: XZero Predator... With more teeth!
the hard way is always the best
but there are so many "cheep" hitachi control panels at 24V that fit the 7i76
look
www.ebay.de/sch/i.html?_odkw=panel&_osac...w=cnc+panel&_sacat=0
but there are so many "cheep" hitachi control panels at 24V that fit the 7i76
look
www.ebay.de/sch/i.html?_odkw=panel&_osac...w=cnc+panel&_sacat=0
Please Log in or Create an account to join the conversation.
Time to create page: 0.266 seconds